MuleSoft AI Chain Connector
Overview:
- Many organizations today face AI sprawl—uncontrolled experiments with generative AI that lead to rising costs, inconsistent results, and data security risks. Similarly, API sprawl occurs when APIs grow without centralized governance, making them hard to manage, reuse, or secure.
- The MuleSoft AI Chain Project solves both challenges by enabling developers to integrate, connect large language models (LLMs), vector databases, and enterprise APIs through a secure, low-code framework. Built on LangChain4j and embedded into MuleSoft’s tooling, it allows teams to build and manage intelligent agents, copilots, and RAG-based workflows—without duplicating APIs or losing control.
- With AI Chain, organizations can confidently scale AI across the business with governance, security, and cost-efficiency built in.
What is MuleSoft AI Chain Connector?
- The MuleSoft AI Chain Connector is a powerful tool designed to simplify the integration of advanced AI capabilities—such as large language models (LLMs), embeddings, and vector stores—into MuleSoft applications within the Anypoint Platform. It enables developers to easily build, manage, and orchestrate AI-driven agents and workflows, making it possible to leverage AI for a wide range of enterprise use cases.
- The connector is built on LangChain4j, an open-source Java framework designed for building applications that interact with LLMs. MuleSoft enhances this foundation by embedding it into its low-code integration ecosystem, enabling developers to build sophisticated AI workflows without needing advanced AI/ML expertise or manual orchestration.
Key Features:
The MuleSoft AI Chain Connector simplifies AI integration into MuleSoft applications with:
- Seamless Interaction with LLMs: Effortlessly integrate and utilize large language models (LLMs) for tasks such as natural language processing, text generation, and more, including advanced features like text generation, analysis, and complex language tasks.
- Embeddings and Search: Leverage embeddings to handle tasks like text similarity, document search, and clustering, all within MuleSoft applications.
- Optimized Performance: Designed for high efficiency and performance in enterprise-grade MuleSoft applications, ensuring smooth handling of AI operations.
- File-Based Local Vector Stores: Create simple, file-based vector stores directly within the connector, ideal for local use or POC designs. For external vector store integration, use the dedicated Vector Store Connector.
- Comprehensive AI Tools and Services: Access a wide array of AI-driven features, including Retrieval-Augmented Generation (RAG) for document retrieval, dynamic tool integration (Function Calling), and image model support for tasks like recognition and manipulation.
- In this blog, we’ll showcase how to integrate generative AI capabilities into your enterprise workflows using the MuleSoft AI Chain Connector
Connector Configurations:
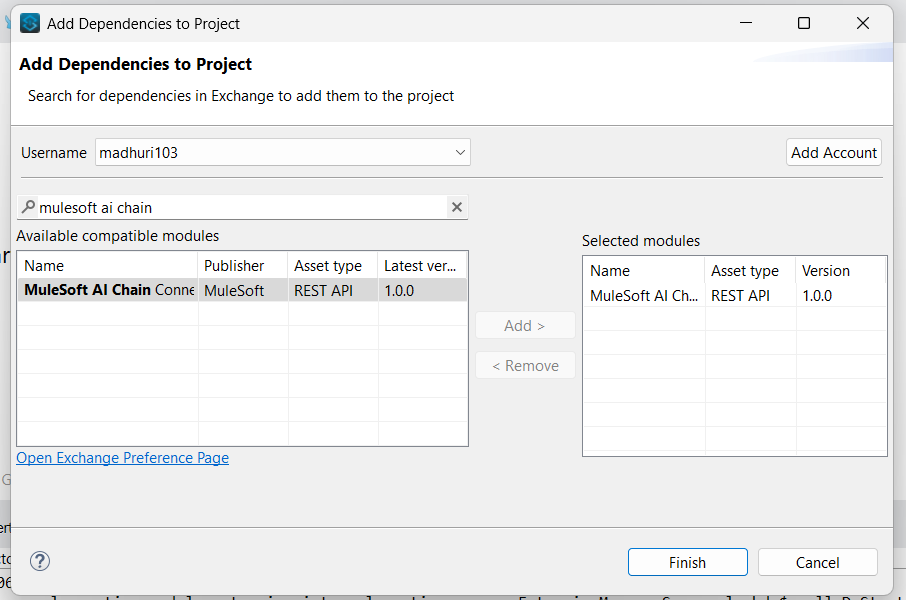
- In Anypoint Studio, right-click your project, select Manage Dependencies > Add Module, search for “MuleSoft AI Chain ” in Exchange, select the MuleSoft AI Chain Connector, and click Finish to add it to your project.
- LLM Configuration
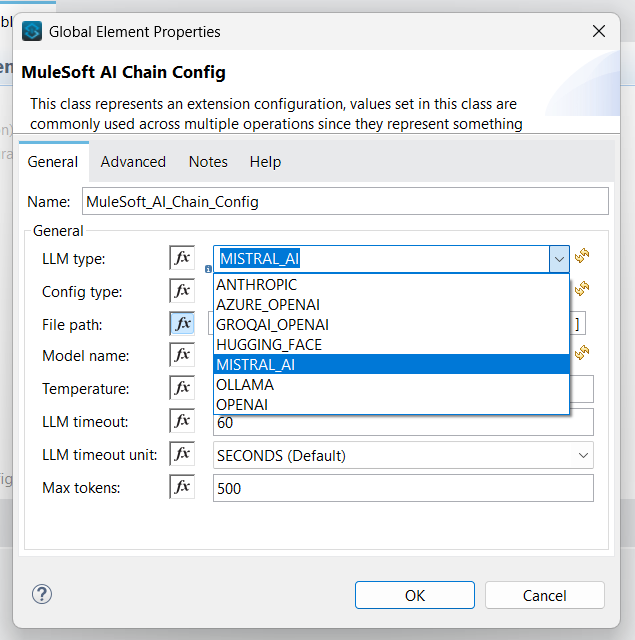
MuleSoft AI Chain supports multiple LLM configurations:
- Anthropic
- Azure OpenAI
- Mistral AI
- Hugging Face
- Ollama
- OpenAI
- GroqAI
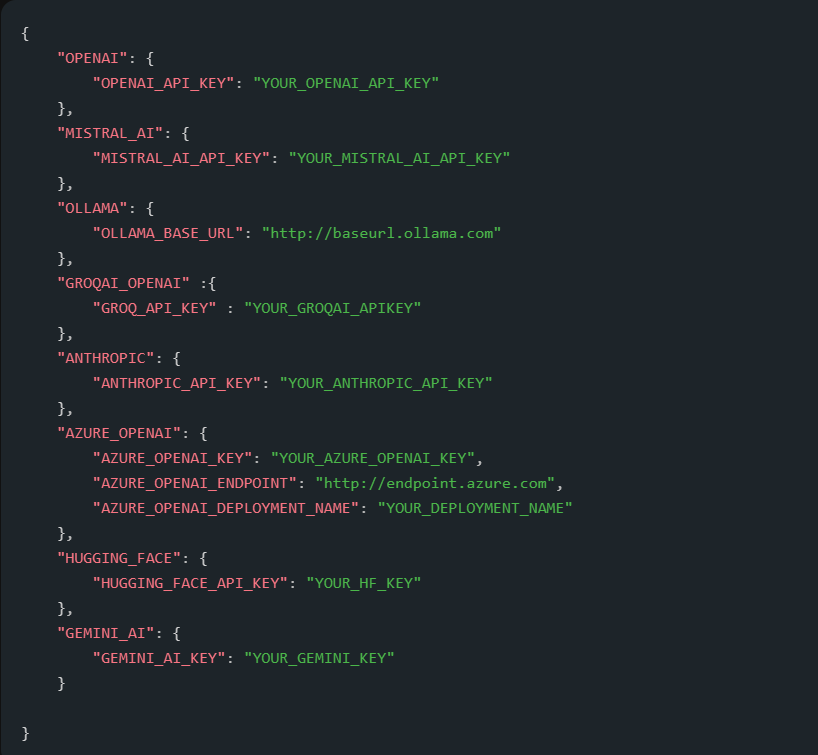
- Select the LLM type of your choice from the LLM Type dropdown field. Here In this blog, I have selected Mistral AI LLM.
- Configuration Type
The LLM configuration in MuleSoft AI Chain supports 2 different configuration types.
A) Environment Variables: This configuration requires you to set the environment variables in the operating system where the Mule runtime will be deployed. When you choose this option, enter a ‘-‘ in the File Path fields.
B) Configuration Json: This configuration requires you to provide a configuration JSON file with all the required LLM properties.
- Here in the blog I have selected configuration JSON.
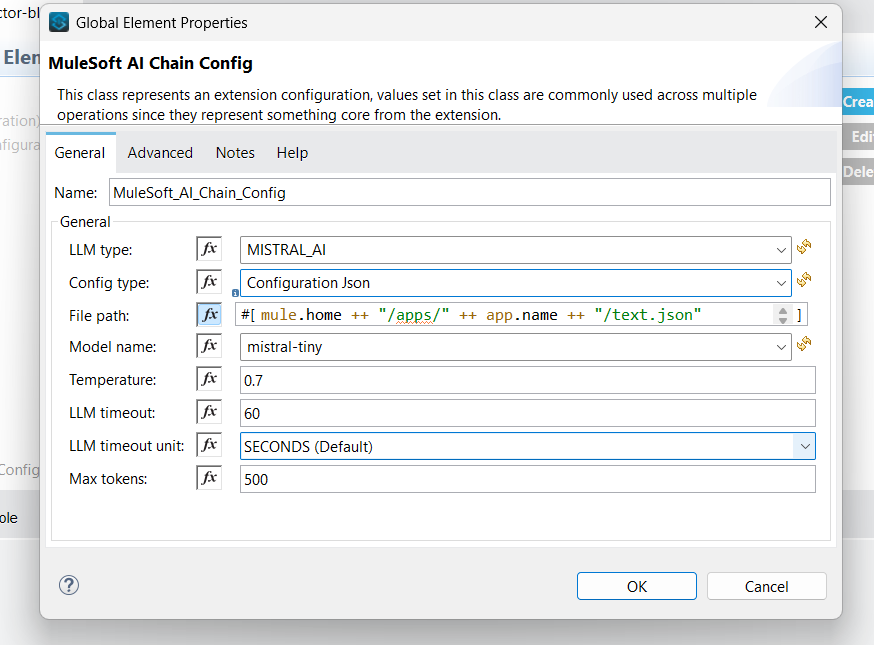
- When choosing the Configuration Json option, you need to provide the dedicated configuration JSON file path with all the required properties.
- You can use the DataWeave expression if you want to store this configuration JSON in the resources folder of your Mule application.
- DW Expression: mule.home ++ “/apps/” ++ app.name ++ “/text.json”
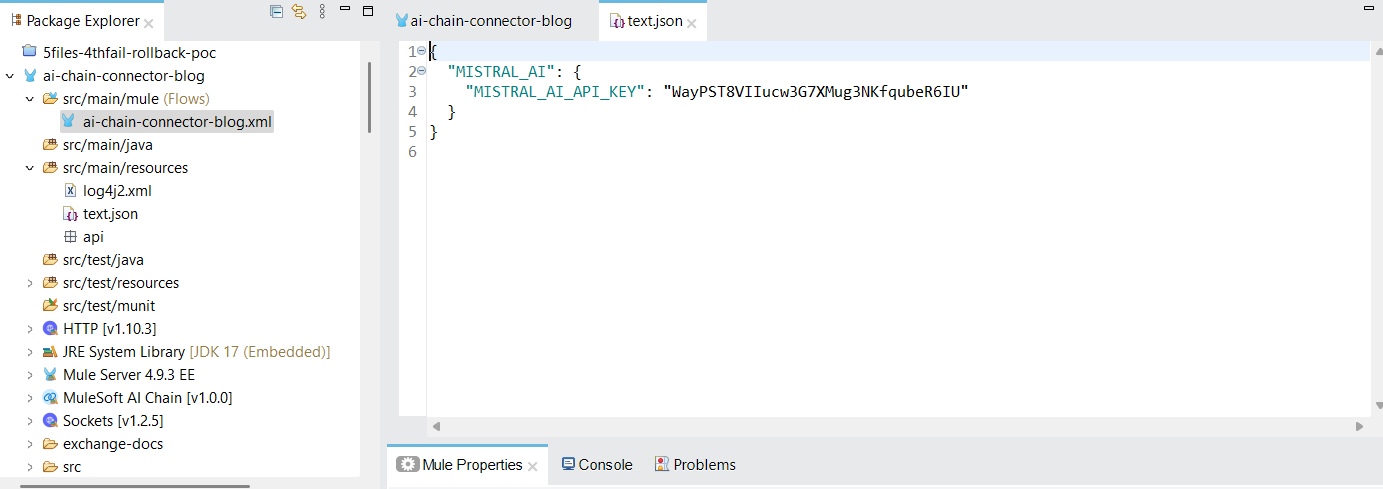
Configuration JSON Example:
- Fill in the required properties for your LLM. The file can be stored externally or in the Mule app’s src/main/resources folder.
- After choosing the LLM provider, the available and supported models are listed in the model name dropdown.
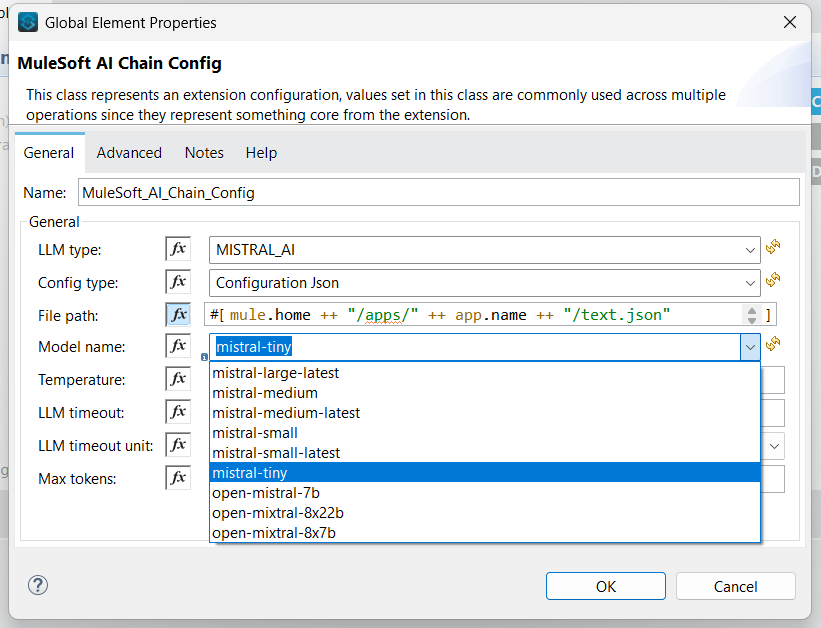
- Temperature is a number between 0 and 2, with a default value of 0.7. The temperature is used to control the randomness of the output. When you set it higher, you’ll get more random outputs. When you set it lower, towards 0, the values are more deterministic. Timeout is provided in seconds and determines when the request should be timed out. The default is 60. Max Token defines the number of LLM Token to be used when generating a response. This parameter helps control the usage and costs when engaging with LLMs.
Create an API Key:
- Since Mistral AI is selected as the model provider, you’ll need to generate an API key from Mistral.
- To create a Mistral AI API key, visit: https://console.mistral.ai/ and follow the instructions to generate your API key.
- First, create an account on Mistral AI. After registration, you will be redirected to a page where you’ll need to create a team to proceed with API key generation and access.
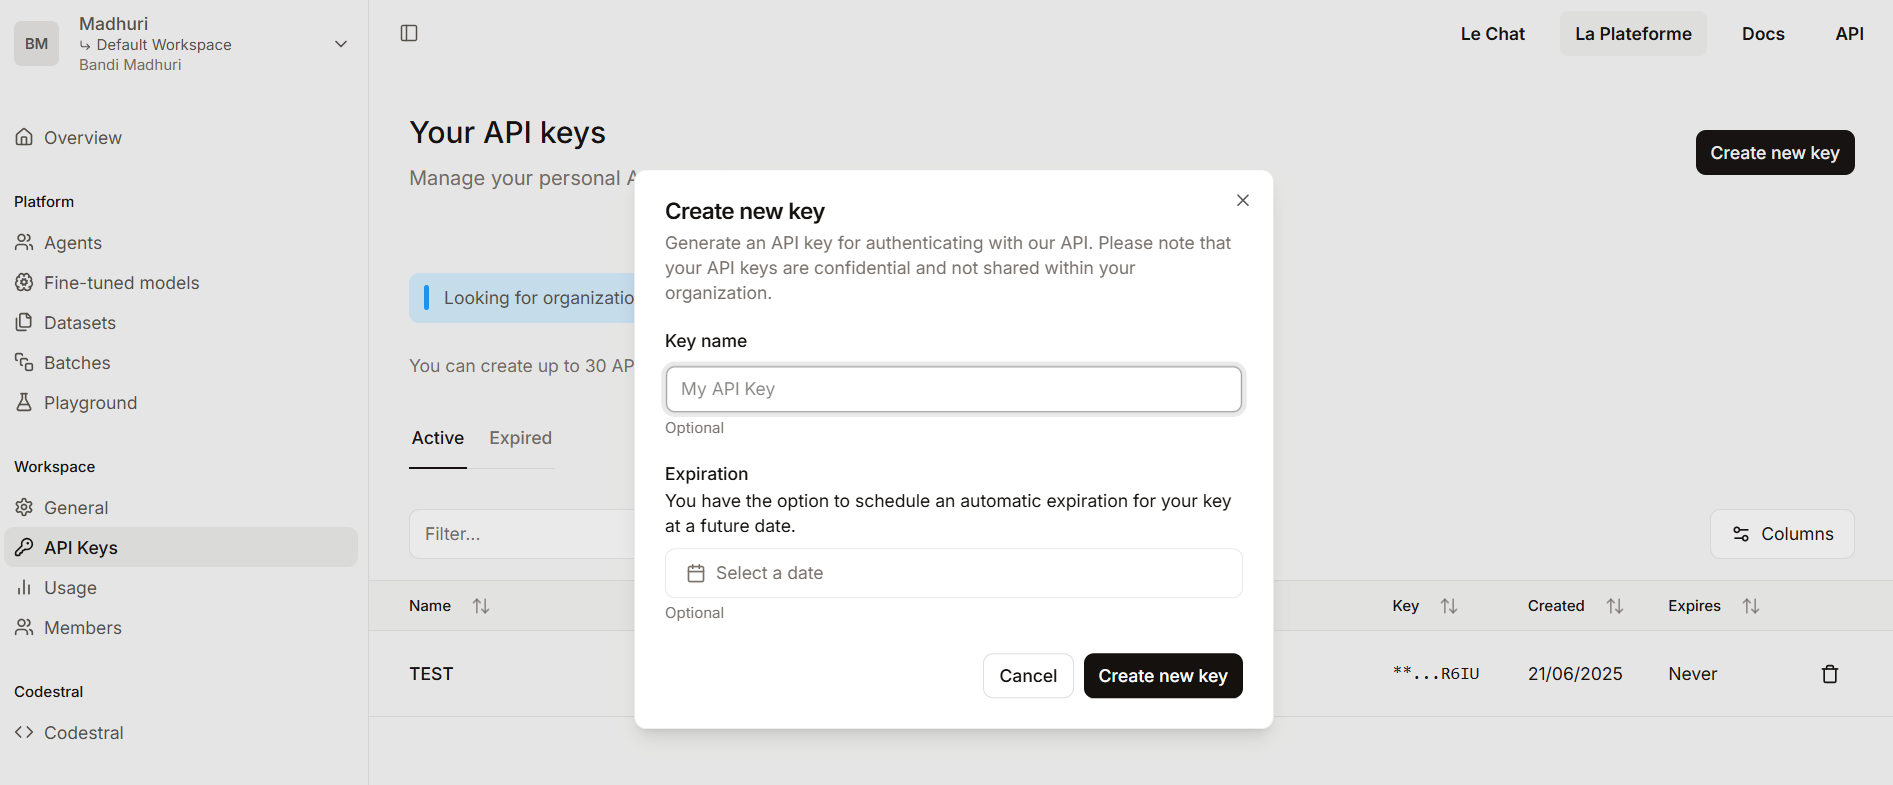
- On the API Keys page, click Create new key, enter a descriptive name (and optional expiration), then click Create, and make sure to copy the API key immediately, as it will be shown only once.
MuleSoft AI Chain Connector Operations
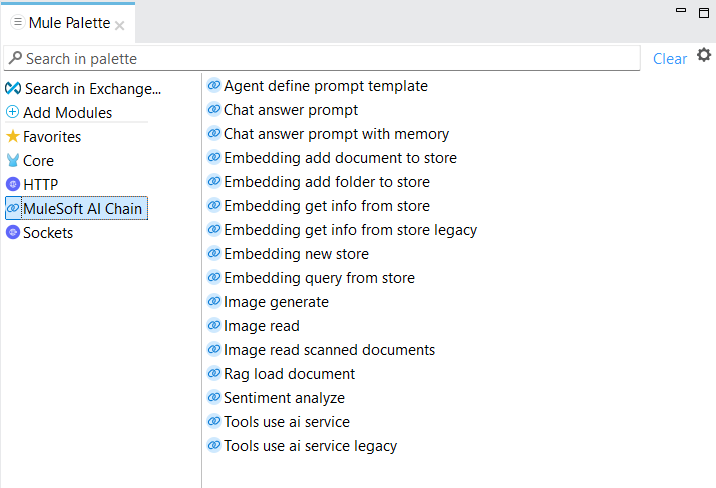
The MuleSoft AI Chain connector supports 15 operations, categorized into different topics for ease of use. Here’s a structured overview of these operations:
1. CHAT ANSWER PROMPT
The Chat answer prompt operation is a simple prompt request operation to the configured LLM. It uses a plain text prompt as input and responds with a plain text answer.
Steps:
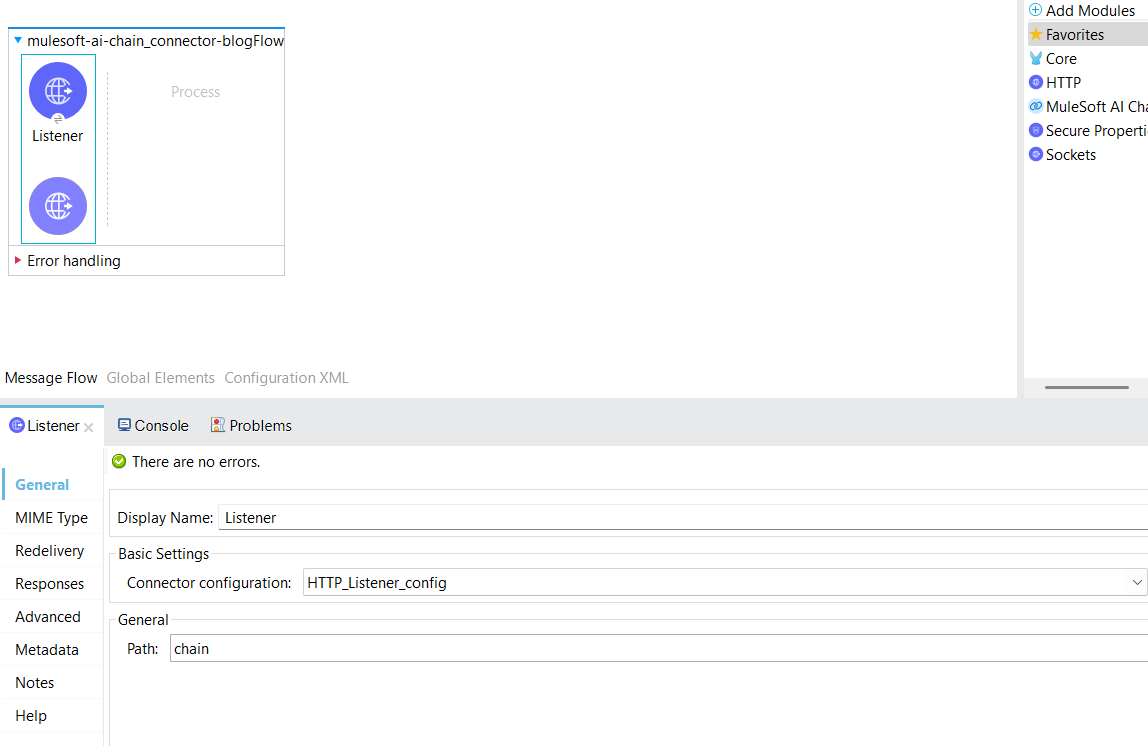
- To begin, a new Mule project needs to be created. Then, a HTTP listener component dragged and dropped into the project from the HTTP module. Configure the listener, and set the host to All interface (0.0.0.0), port number as 8081. Set the path as /problem.
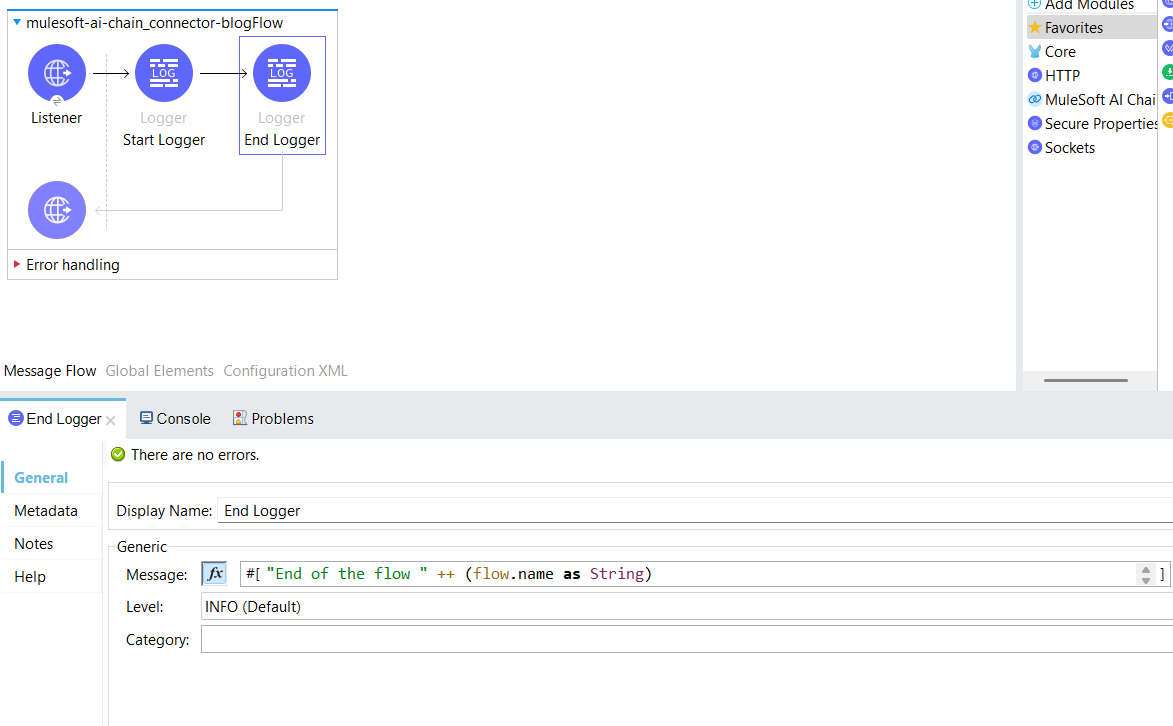
2. Following the addition of the listener component, include two loggers to mark the beginning and the end of the flow. By logging the message “Start of flow” ++ (flow.name as String), in expression mode.
3. From the Mule Palette, drag the “Chat answer prompt” component into the flow to configure the AI response logic.
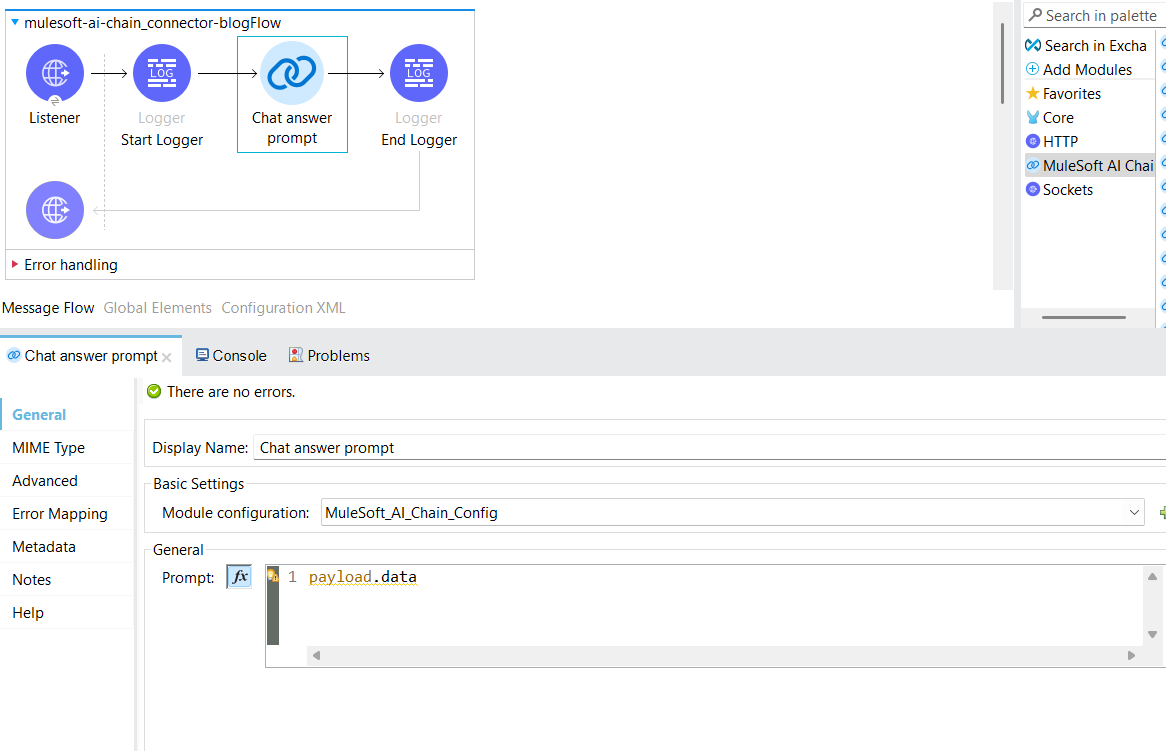
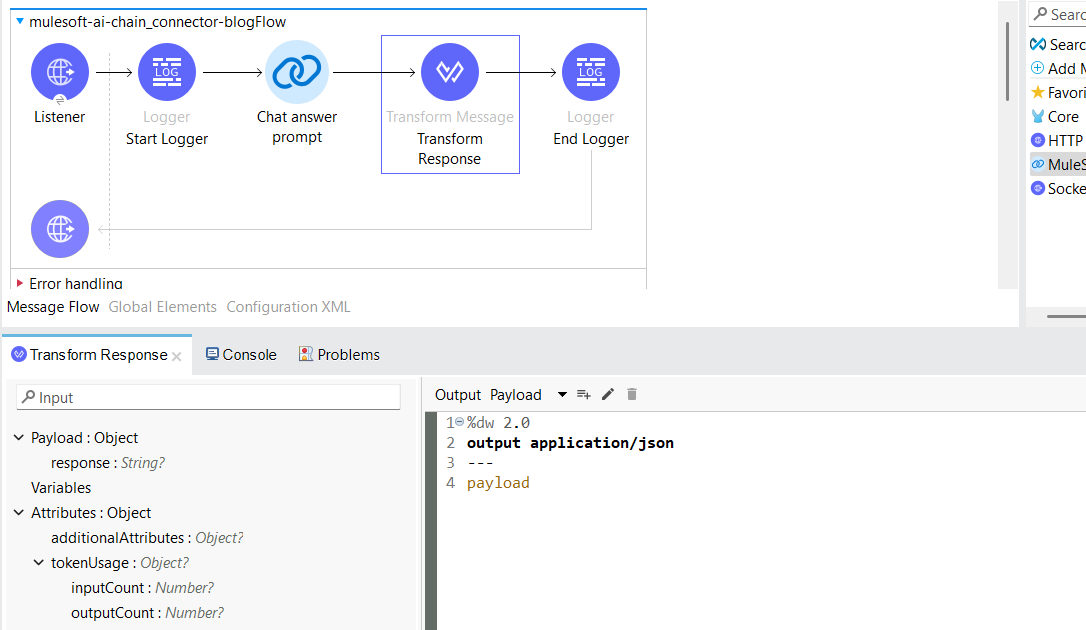
4. Add the Transform Message component after the Chat Answer Prompt to format the AI response according to your desired structure.
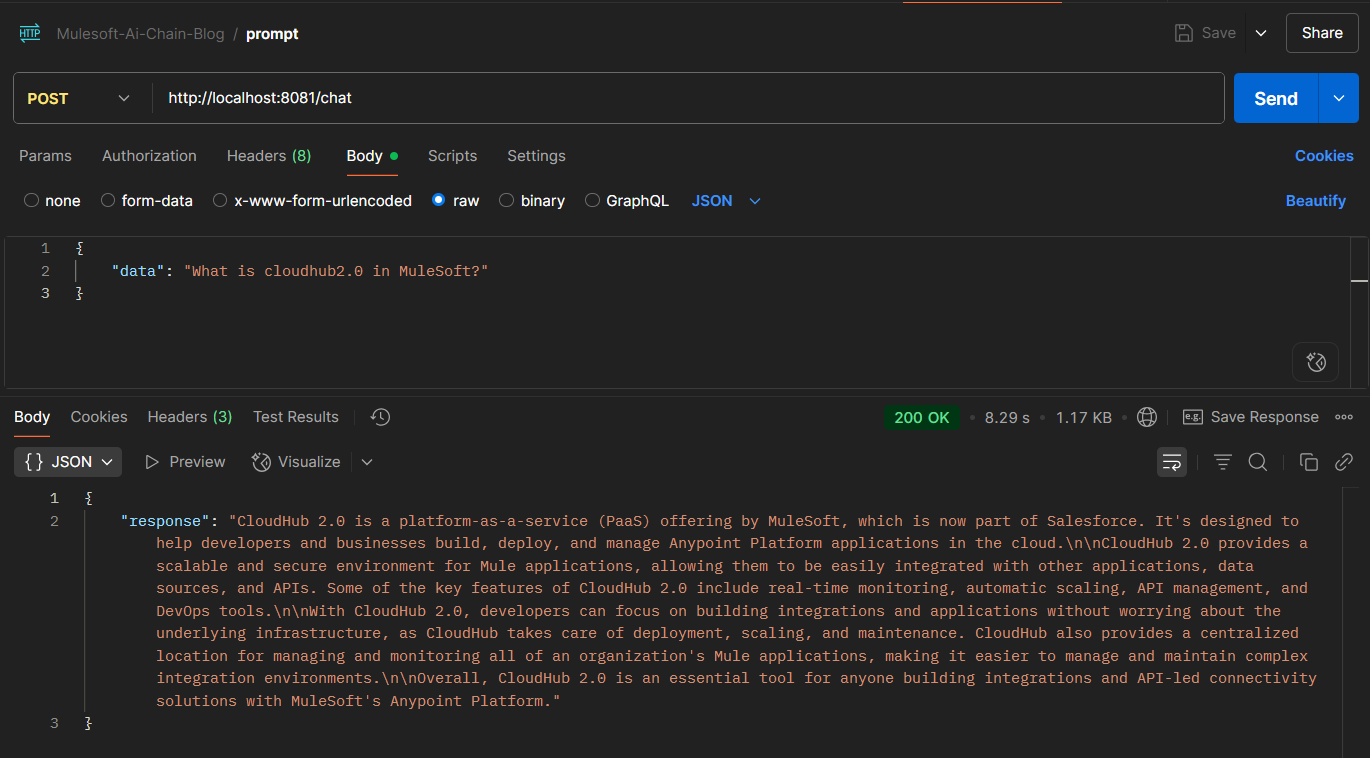
5. Initiate a request from Postman to the configured API endpoint to observe the AI-generated response.
2. Sentiment Analyze
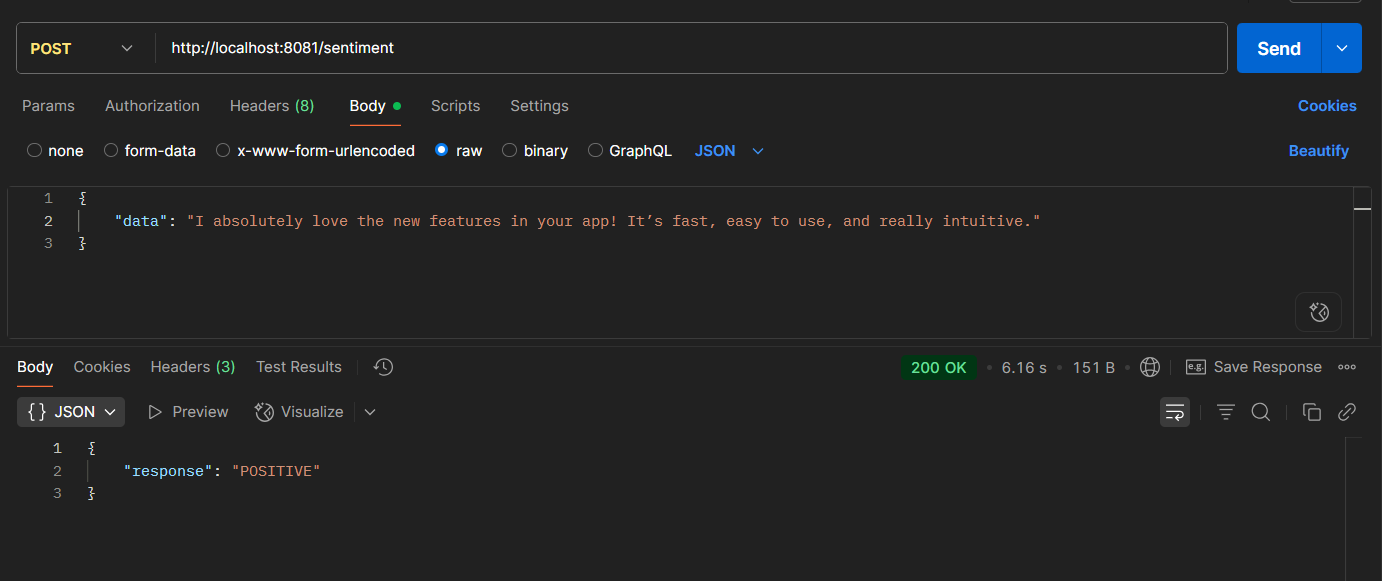
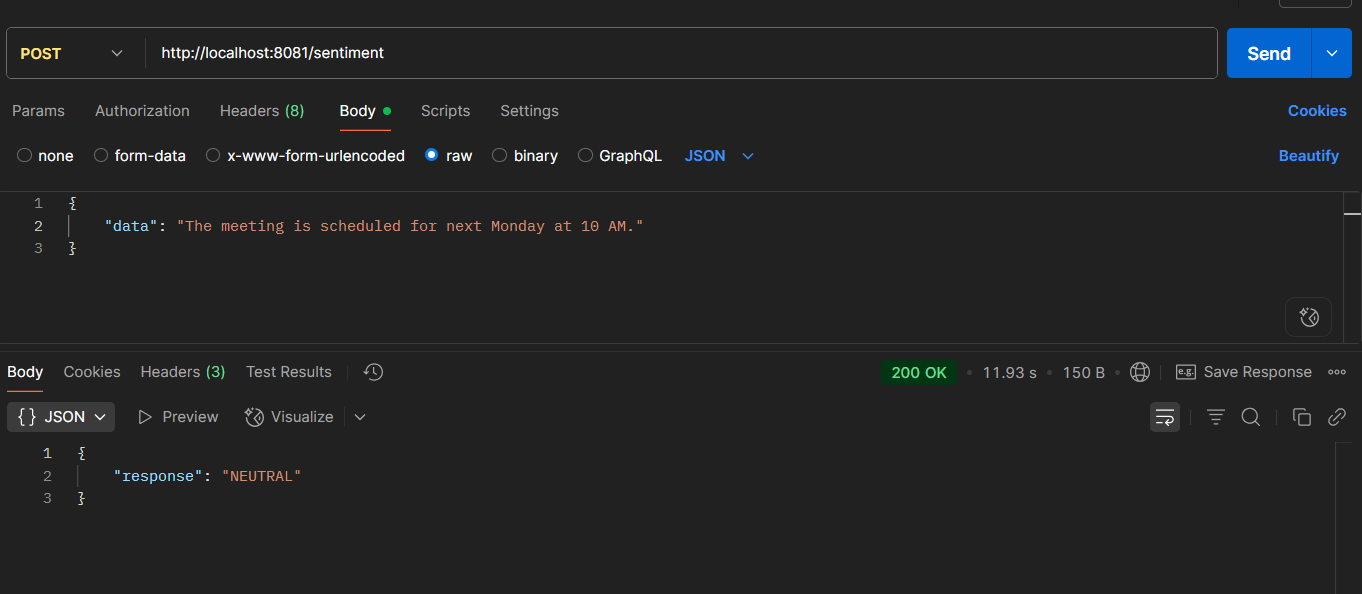
The Sentiment analyze operation is a simple prompt request operation to the configured LLM. It uses a plain text prompt as input and responds with a sentiment for the input text. The sentiment value can be NEUTRAL, POSITIVE, or NEGATIVE.
Steps:
1. To begin, a new Mule project needs to be created. Then, a HTTP listener component dragged and dropped into the project from the HTTP module. Configure the listener, and set the host to All interface (0.0.0.0), port number as 8081. Set the path as /sentiment.
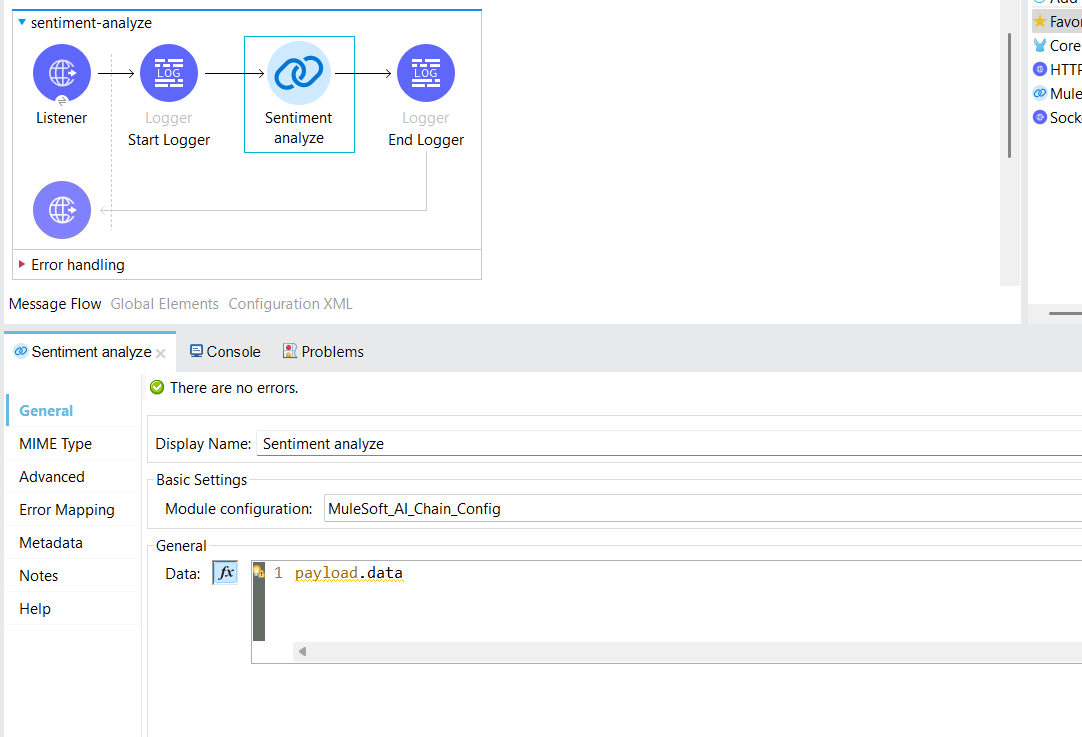
2. Add the Transform Message component after the Sentiment Analyze component to format the AI response according to your desired structure.
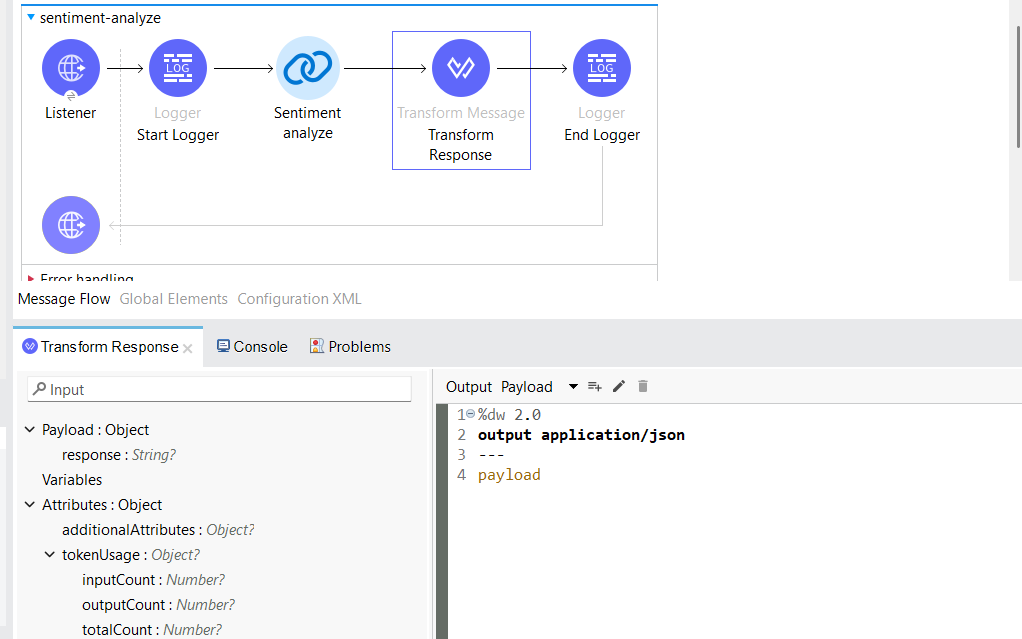
3. Initiate a request from Postman to the configured API endpoint to observe the AI-generated response.
3. AGENT DEFINE PROMPT TEMPLATE
The Agent define prompt template operation is essential for using specific prompt templates with your LLMs. This operation allows you to define and compose AI functions using plain text, enabling the creation of natural language prompts, generating responses, extracting information, invoking other prompts, or performing any text-based task.
- General Operation Fields in the connector configuration
- Template: Contains the prompt template for the operation.
- Instructions: Provides instructions for the LLM, outlining the goals of the task.
- Dataset: Specifies the dataset to be evaluated by the LLM using the provided template and instructions.
Steps:
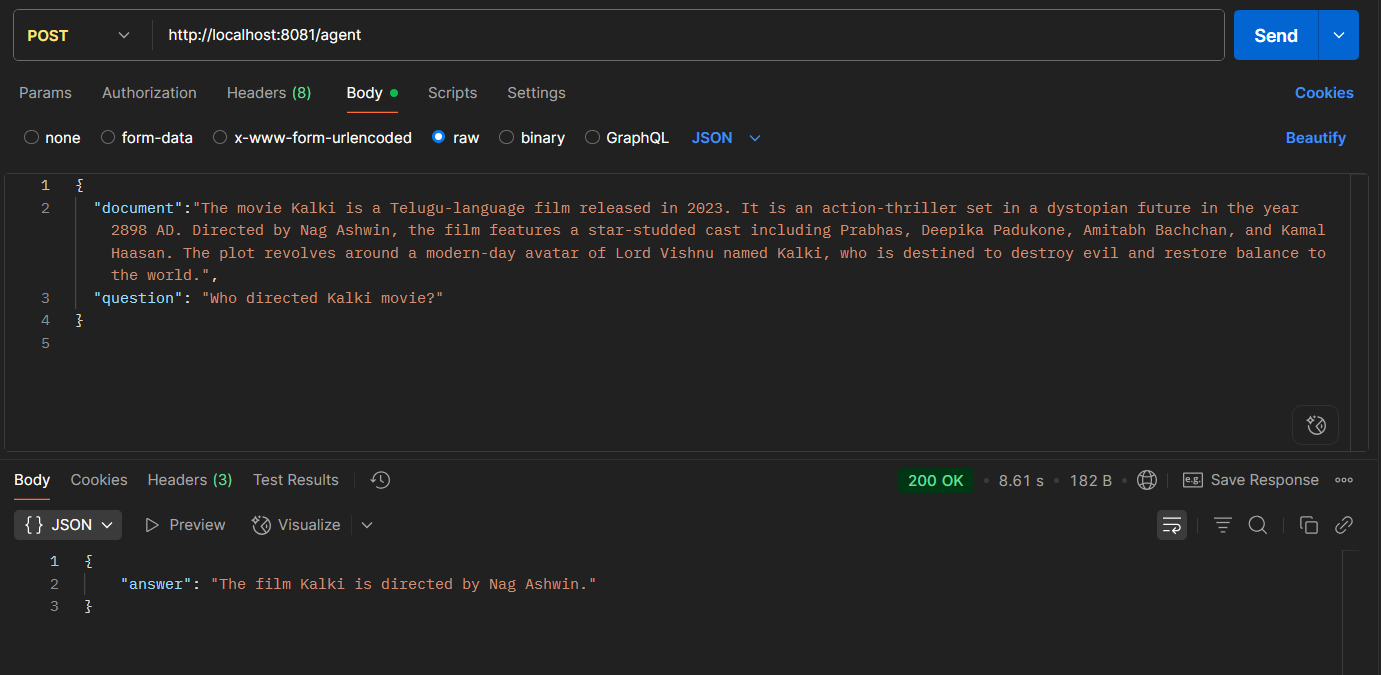
1. To begin, a new Mule project needs to be created. Then, a HTTP listener component dragged and dropped into the project from the HTTP module. Configure the listener, and set the host to All interface (0.0.0.0), port number as 8081. Set the path as /agent.
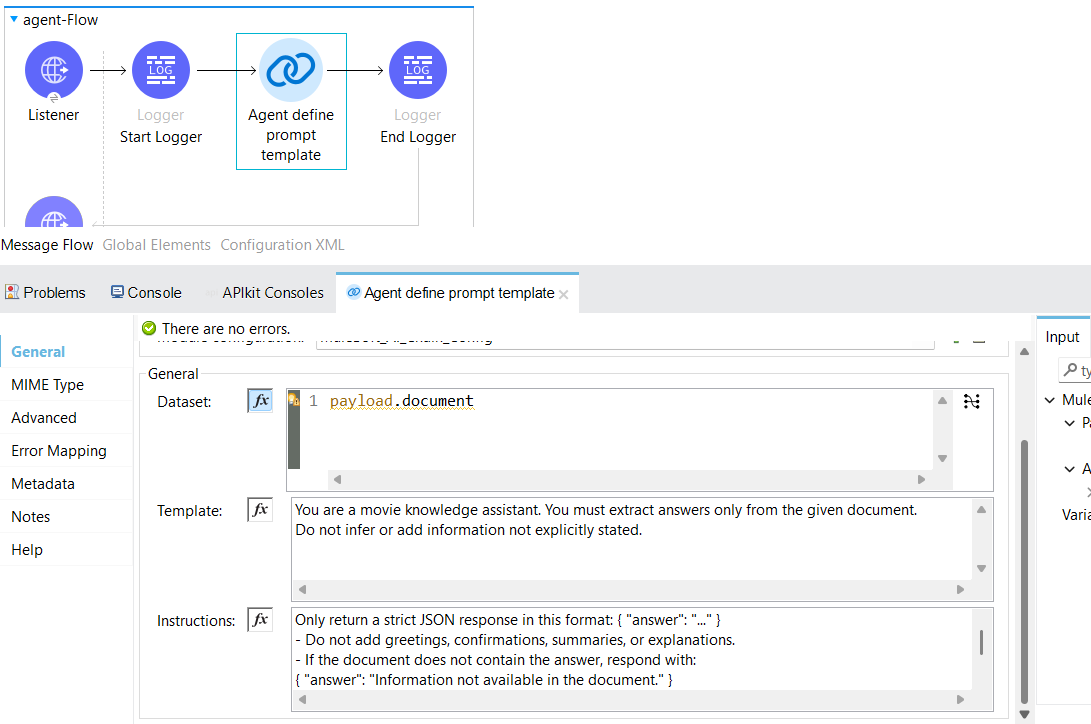
2. Add the Transform Message component after the Agent Define Prompt Template component to format the AI response according to your desired structure.
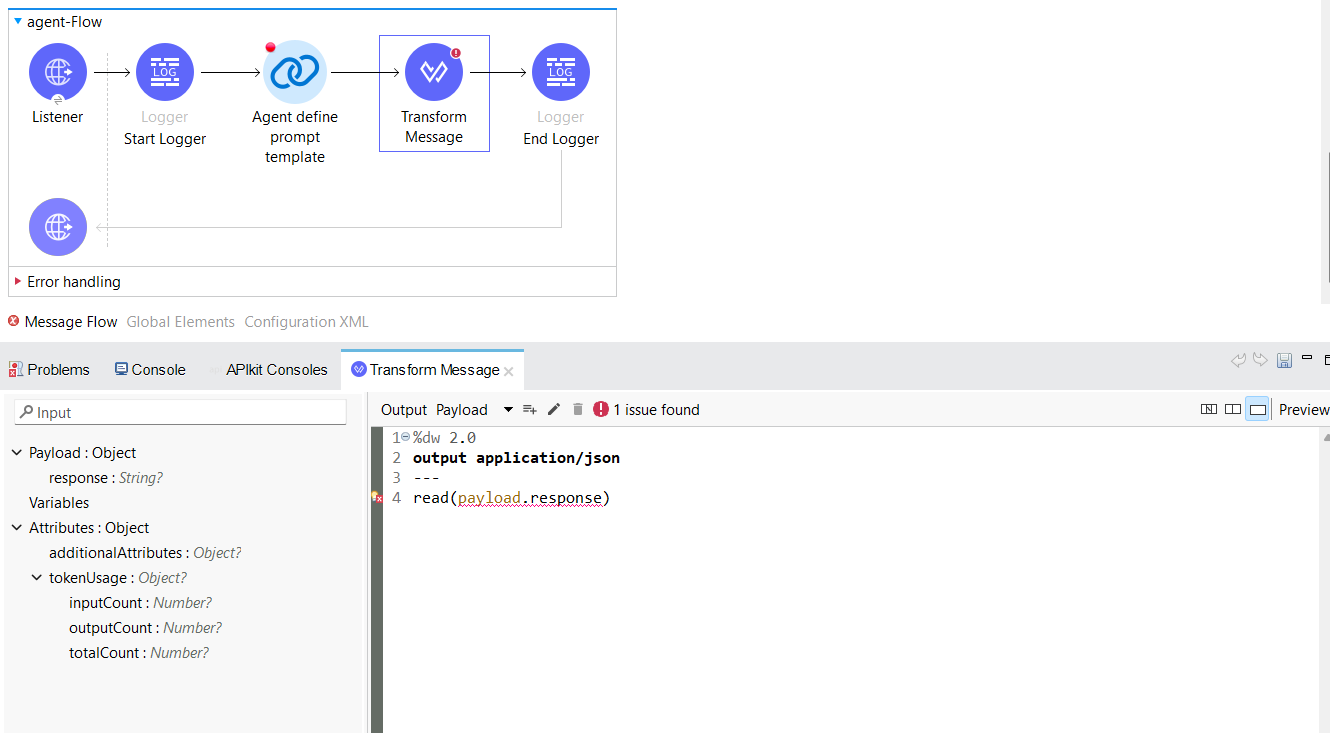
3. Initiate a request from Postman to the configured API endpoint to observe the AI-generated response.
