

Master Data Hub – Data Masking
Introduction
What is Data Masking?
When you have sensitive data in your records, you can use the Data Masking feature to completely or partially hide your data.
You can configure model fields with the following options to mask field values with sensitive data.
- All – hides entire data. Displays all field values as five asterisks. Available for all data types except Reference.
- Partial Mask – hides a portion of the data. Not available for Boolean and Reference type fields.
- Partial Show – reveals a portion of the data. Not available for Boolean and Reference type fields.
- None – reveals entire data
You must have one of the following user permissions to view masked data:
MDM – Privileged Data Steward role
MDM – Administrator role
MDM – Reveal Masked Data privilege
MDM – Data Steward role (or MDM – Stewardship privilege) and the Reveal Masked Data Hub entitlement (available with the Advanced Security feature)
Let’s go to the platform and see how this Data Masking works:
Steps:
Step 1. Go to platform.boomi.com

Step 2. Login by giving your valid credentials (Username and Password).
Step 3. Home page will be displayed, now click on “Integration”.

Step 4. Click on the “Create New” button.

Step 5. Select “Process” and click on “Create”.

Step 6. Click on “No Data” option and click on “OK”.

Step 7. Drag and drop a Message shape.

Enter the below message into the Message section:
empid, empname, phone
101, Apurba, 8975325167
102, Adi, 7834526178
103, Steve, 9865427634
Step 8. Add a Boomi Master data Hub connector. To configure the connection click on “+” icon.

Step 9. Give the URL, UserName and Token.

URL: Go to Atom Management à Click on “Test” atom cloud à Click on Shared web server à Copy the Base URL à Add “/mdm/” at the end.
Username and Token: Go to MDH à Select the Test repository à Configure Tab à Copy the Username and Auth token.
Step 10. Save and close, select the Action as Upsert and then configure the operation.

Step 11. Click on Import operation.

Step 12. Select your Atom, give the Source name and Staging Area ID, click on “Next”.

Step 13. Select your Model and click on Next.

Step 14. Click on Finish.

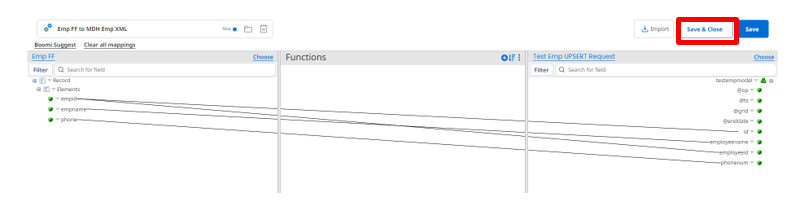
Step 15. Drag and drop one Mape shape and inside map component add two profiles. In the source side add the Employee profile and in the Target add the MDH upsert request profile.
After mapping each fields click on Save and close.
Step 16. Add a stop shape at the end. The process should look like this now-

Step 17. Save the process and test.

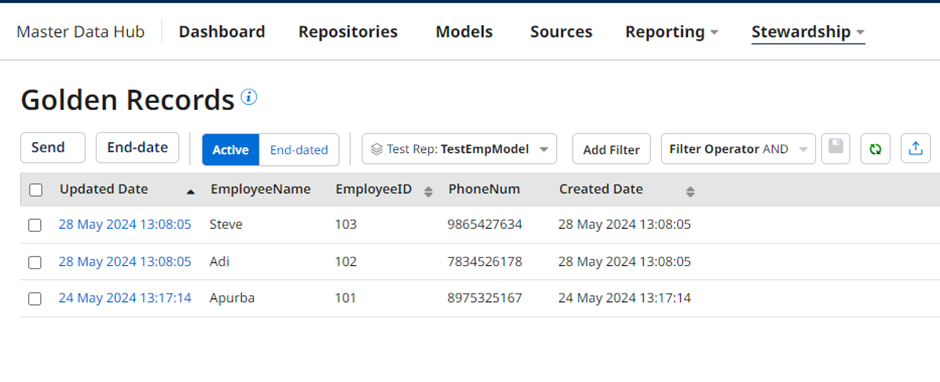
Step 18. Now go to the MDH à Stewardship à Golden Records

This is how Golden Records will appear without applying the Data Masking:
Now let’s apply the Data Masking feature and see how it helps us to mask the data.
Step 19. Go to your Model setting. Click on the Fields tab. Click on the field which one you want to mask.

Step 20. Click on the Mask drop-down, and select All (Which helps us to mask complete data).

Step 21. Click on Save.

Step 22. Likewise configure other Fields with different masking types.

Step 23. Now click on Publish to save and publish the model.

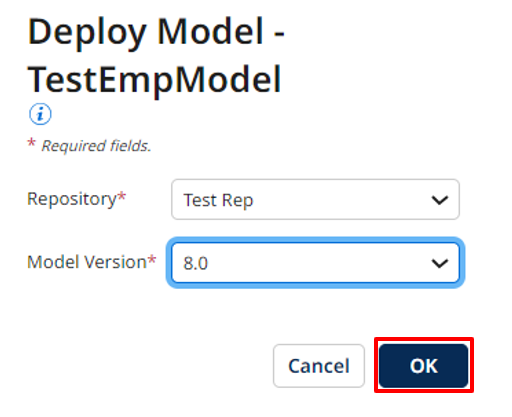
Step 24. You will be redirected to the Models page. Click on Deploy.

Step 25. Select your Repository, and click on OK.
Step 26. Changes have been done, now again go to the Golden Records to see the effect.

As you can see in the below image as per the field configurations in the model fields the Data Masking took effect:
