
Domain Projects In MuleSoft
Overview: –
- When working with MuleSoft, particularly in large-scale enterprise environments, managing shared resources and configurations across multiple applications can be a challenge. This is where MuleSoft Domain Projects come into play. By centralizing and sharing common configurations like connectors, security settings, and global elements, Domain Projects offers a streamlined approach to development, ensuring consistency and efficiency.
- In this blog, we’ll explore what domain projects are, their benefits, how to set them up, and how to deploy domain projects to a Mule standalone server.
What is a Domain Project: –
- In MuleSoft, a domain project serves as a centralized repository for reusable components that can be shared across multiple applications within a domain.
- These resources can include connectors, HTTP listeners, JMS configurations, and other global elements.
- By using a domain project, you ensure consistency across applications and reduce redundancy, making Mule applications easier to manage and maintain.
Advantages of Mule Domain Project: –
- By defining shared resources in a domain project, you can manage configurations centrally. This makes it easier to update and maintain resources across multiple applications.
- Ensure consistency between apps upon any changes because the configuration is only set in one place.
- Expose multiple services within the domain through the same port.
Note:-
- You can’t deploy it in CloudHub, you have to install the Mule runtime engine On Premises.
- You can’t define any flows, subflows or any other business logic.
Let’s demonstrate a simple use case to understand about Domain project clearly.
Use Case: –
Deploy two applications with the same port on Mule standalone run time.
Note: – Generally, each application needs to be deployed on different ports otherwise you will get an error.
To prevent this issue, you can create a dedicated domain project and set up an HTTP listener on a specific port (e.g., 8081). This domain project can then be referenced in all other projects or applications, allowing them to share the same port.
Setting Up a Domain Project: –
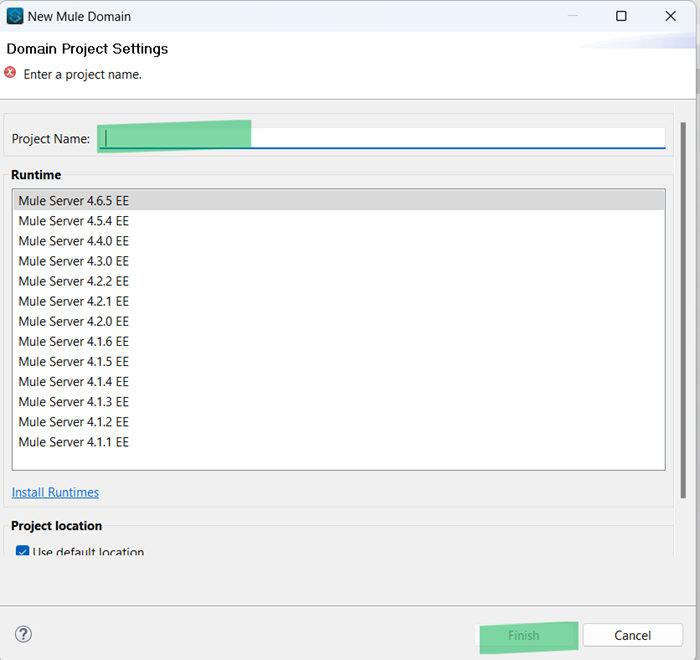
- Step 1: Domain Projects in MuleSoftOpen Anypoint Studio and create a new Mule Domain Project by selecting File > New > Mule Domain Project.

- Step 2: Give your domain project name and click Finish.
Once the domain project is created, it will look like this, also an XML file is created inside src/main/mule where we can define the shared resources.


Now you can observe that it is different from a normal canvas where we can create flows. Also, you can observe that the root tag for the configuration XML file is “domain:mule-domain” whereas for normal projects root tag is “mule”.

- Step 3: By default, we’ll not get any modules and the modules that are not present in the default Configuration Elements can be imported from the exchange. In our case, the HTTP module has to be imported from the exchange. In our case, we have to import the HTTP module, to import the module click on the “Manage Module” button.

- Step 4: A window will pop up, click on ‘+’ and click on ‘Exchange’ to import new modules.

- Step 5: A window will pop-up, search for the HTTP module then it will show the available modules select HTTP connector and click on ‘Add’ and then ‘finish’.

- Step 6: It will download the HTTP Connector and after that click on ‘Apply and Close’.

- Step 7: Once the module is added click on the ‘create’ option to configure the listener.

- Step 8: Go to Connector Configuration > HTTP Listener config and select ‘OK’.

- Step 9: A new window will pop up and configure the Listener with port 8081(default) and select ‘OK’

The resource is now created and can be shared among different applications within the workspace.
Import Mule Domain Project in a Mule Application: –
- Step 1: create a new Mule Domain Project by selecting File > New > Mule Project and provide the project name then click on ‘Finish’.


- Step 2: Click on the project name, go to properties > mule project

- Step 3: There is an option for the domain, from the drop-down select the domain name that you have given for your domain project and then click on ‘Apply and Close’

- Step 4: drag Listener from the palette to your canvas. Currently, we have only the HTTP Listener configuration in the domain project, and In the connector configuration you can that the HTTP Listener configuration from the drop-down, select that, and give the path as ‘/api/one’

- Step 5: Drag and drop Set payload to the canvas from the palette and set the value as “Hello World”.

- Step 6: Deploy the application, Right click on any one application> Run as > Mule Application

Once the application gets deployed you can check that the domain project is also deployed along with it.
- Step 7: Hit the application using Postman or any other testing application and the endpoint will be “http://localhost:8081/api/one” Then you’ll get a response as “Hello World”

Repeat the same process and create another application with the path as ‘/api/two’ and set the payload to “Hey Muley”.

- Step 8: Deploy both the applications, Right click on any one application> Run as > Mule Application(configure)

- Step 9: A new window will pop up and select both applications then click on “Run”

You can check that both the applications are deployed.

- Step 10: Hit both applications using Postman or any other testing application and the endpoints will be “http://localhost:8081/api/one” and “http://localhost:8081/api/one”. Then you’ll get responses as “Hello World” and “Hey Muley” respectively. And after that terminate it in Anypoint Studio.
Deploying Domain Project in Mule Standalone Server: –
- Step 11: Right-click on the Domain project and click on Export

- Step 12: Click on Mule> Anypoint Studio Project to Mule Deployable Archive (includes Studio metadata)

- Step 13: Select the path to export the jar file and click on finish.

- Step 14: Repeat the same step for the other two Mule applications.
- Step 15: Navigate to the Mule Standalone folder, and the folder structure looks like this: –

- Step 16: Copy the executable jar for the Domain project and paste it inside the “domains” folder.

If you are running the server then you can check that that domain project will get deployed in the terminal and the jar file will convert it into a folder.


- Step 17: Copy the executable jar files for the Mule projects and paste them inside the “apps” folder.

You can check the terminal that both applications will be deployed and the jar file will get extracted.


- Step 18: Hit both applications using Postman or any other testing application and the endpoints will be “http://localhost:8081/api/one” and “http://localhost:8081/api/one”. Then you’ll get responses as “Hello World” and “Hey Muley” respectively.


As demonstrated in the use case, domain projects allow multiple applications to share the same port on a Mule standalone runtime. This helps avoid potential port conflicts.