
OAS Implementation in JSON
Introduction
What is Open API Specification
The OpenAPI Specification (OAS), formerly known as Swagger, is a widely adopted, language-agnostic standard for defining HTTP-based APIs. It enables both humans and machines to explore and understand an API’s capabilities without needing access to the underlying source code.
At its core, OAS provides a structured format, typically in JSON or YAML, to describe endpoints, operations (like GET, POST), parameters, response formats, and security details. Key tools like Swagger UI and OpenAPI Generator enhance OAS by enabling interactive documentation, client SDK generation, and automated testing.
OAS 3.x, the latest version, builds on earlier versions with added features, making it a critical asset in modern API development. It streamlines documentation, testing, and client library generation, simplifying API management across platforms.
Implementation
What are we implementing?
We are going to implement 2 resource paths (/employee, /employee/{id}), /employee is going to have two methods get and post, /employee/{id} is going to have 1 method get.
And we are also going to discuss how to implement a header, query, and uri/path parameter and we are also going to see how to implement security schemes, and servers, creating local and global fragments.
Basic Information
At the beginning, we provide the basic information or the metadata of the OAS
example

Here we are providing the contact info, title, version, tos, description, license
What is the use of license
“license”: {
“name”: “MIT”,
“url”: “https://opensource.org/licenses/MIT”
}
url: https://opensource.org/licenses/MIT
- name: MIT: This indicates that the API is licensed under the MIT License. The MIT License is a permissive free software license originating at the Massachusetts Institute of Technology (MIT). It allows users to do almost anything with the API, such as modifying it, distributing it, or integrating it into other projects, as long as the original copyright notice and license terms are included.
- url: https://opensource.org/licenses/MIT: This provides a URL where users can read the full text of the MIT License or get more details about it. It helps users understand the specific terms and conditions that apply to the API.
Resource Path
To define the resource paths we need to do it under “paths:”

This defines this particular skeleton

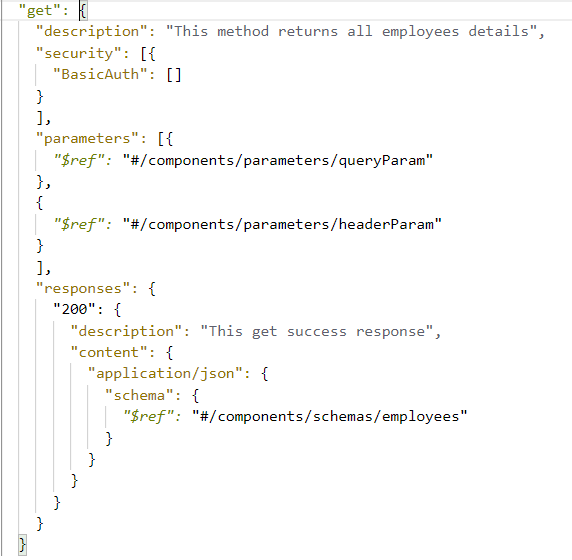
Here is an example of how to define a get method with its components
Here “description” is used to describe the functionality of the method
As the “get” method does not have a body so here we have the response
“Content” helps us to define what type of content it will send us as the response
“application/json” defines the mime type
“Schema” is used to define the response structure
“$ref” is used to refer to elements
“Components” are used to make codes reusable
“Type” defines the type of data example

“Properties” defines what kind of properties it going to have
“Id” is the key
“value” is the value that will be set against the key
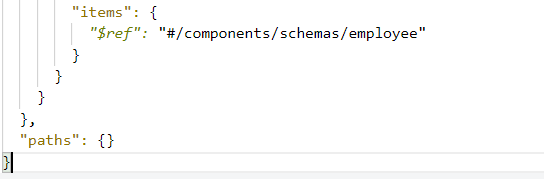
Below you can see 2 schemes employee and employees. Employee refer to employees and their type is array this indicates the employees will have a JSON object array. The objects will be the type Post.


Post
The “post” method sends a request body to define it we use “requestBody”
“example” is used to define the example response


Delete
This an example of a delete method

Parameters
Here we will see examples how to define different types of parameters
Path Parameter/URI parameter
Here I have defined a path parameter id now we need to define the parameter in each method. We will define the components and refer to them in the method.


In the components we have defined the path parameter idPath and we can control the behaviour with


These are some attributes that can be used to control the behavior of the path parameter
Query parameters and headers
In the same way, we can define headers and query parameter

This “in” attribute is used to define the type of parameter we are going to define

Security Schemes
We define security schemes to specify which endpoint and methods are protected with security policy
Now we are going to apply Basic Authentication and JWT to different methods
We are going to define the security schemes in the components and refer them in the methods we want to apply the security schemes.


We can define the following types of security schemes

Here “in” is used to define which parameter we are going to pass the security details
Define Server (Base URL)
We will see an example of how to define a base URL and its servers using variables.
We need to use the “servers” attribute under which we can define the URL and the placeholder variables which will be replaced with the actual value


In the swagger editor, you can see that we can choose from the enum values and that will form the complete URL
Referring to components from a file
Now I have created the schemas in an external json file


Now we are going to refer to this schema in the main file
In the below picture highlighted in yellow, you can see it refers to the schema posts that we have defined in the external file.
$ref is used to refer the file
“components.json” this is the file path
“#/components/schemas/employee” helps us to refer to the Posts schema in the file

Creating a fragment adding as a dependency and referring to it.
We create fragments to make parameters, security schemes, and schemes reusable in different APIs. These fragments can be imported as dependencies and can be used in the main specification.
We need to create a specification fragment in the design centre and publish it in the exchange
Step 1:
Create a fragment project

Step 2:
Write the reusable components

Step 3:
Publish the fragment to exchange


Step 4:
Now in the main API specification go to dependencies and add the fragment

In the highlighted section marked as 1 choose your organization
Select the required dependencies you want to add
In the highlighted section marked as 2 click it to add the dependencies

The dependencies are added in the Files section as an exchange modules folder

The below pic shows how to refer to the files added as a dependency
