
VM Connector In MuleSoft
Overview: –
- Virtual Machine (VM) Connector in MuleSoft is an internal mechanism that facilitates communication between different Mule applications or flows within the same MuleSoft runtime instance.
- In this blog, you will learn:
- What is a VM queue?
- Operations that we can Perform using the VM Module.
- How to Use MuleSoft VM Connector.
What is a VM Connector: –
- VM queues in MuleSoft are internal queues that allow for communication between different flows within the same Mule application. They are particularly useful for decoupling components, ensuring reliable message processing, and handling asynchronous operations. Unlike JMS queues, VM queues are confined to the Mule application’s JVM, making them ideal for scenarios where you do not need inter-application communication.
- VM queues are used to achieve asynchronous intra-app and inter-app communication (only with the concept of domain project).
- It provides transient queues and persistent queues.
- Transient Queues: – A transient queue is faster than a persistent queue because it stores data in memory. However, this speed comes with a drawback: if the application or server is turned off or experiences a failure, any messages in the queue will be lost.
- Persistent Queues: – The persistent queue writes data to the disk to ensure persistence, which slows down its performance. However, this approach has the benefit of serializing the message onto the disk, ensuring that the data remains recoverable even if the server experiences downtime. Once the Mule server is back up and running, the data can be restored.

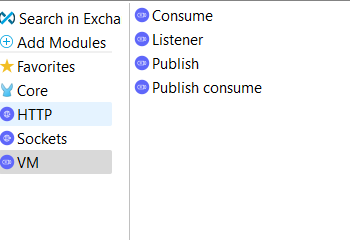
Operations that we can Perform using the VM Module: –
- Publish:
- This operation is used to publish the data into the queue.
- This works asynchronously.
- Consume:
- This operation is used to get the data from the queue in between the flow.
- If there is no data present in the queue, then in that case this operation will wait for timeout to get over and then it will error VM: QUEUE_TIMEOUT.
- Listener:
- This operation keeps on listening(polls) to the queue and gets the data present in the queue.
- Publish Consume:
- This operation publishes data into the queues and then waits for the response up to the configured queue timeout value. If the response is not received in the given time then the VM:QUEUE_TIMEOUT error is thrown.
- This works synchronously.
Setting up the VM connector Configuration: –
- Create a new project in Any point Studio. To create click on the “File” menu at the top left corner of the window. From the dropdown menu, select “New” and then choose “Mule Project”.

2. A dialog box will appear where you can enter details about your new Mule project. Provide a name for your project in the “Project name” field. And click on finish.

3. Add the VM module to the project by clicking on the Add Modules in the mule palette. If the VM module is not present add it from the exchange.
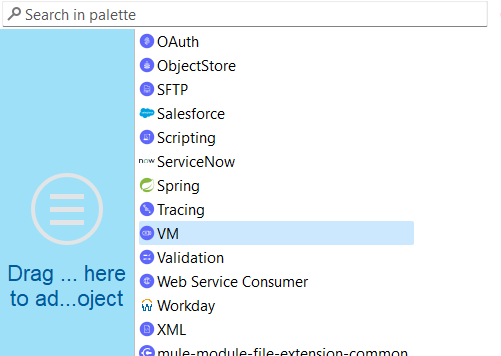
4. Drag and drop the VM module into the project and then VM module will be added to the project.
5. Now click on the global elements in the project file and click on Create.

6. Search for VM config and click on it. It will open the VM configuration.

7. A window will pop up and Select edit in for Queues in the general section.

8. Click on (+) to add the queue.

9. A new window will pop up and provide queue name, select queue type. Then click on Finish.

10. You can check that a new queue has been created and click on Ok.

- Now we successfully configured the VM connector and created a queue. And let’s develop an application to understand components in VM connector.
Use cases: –
- Publish the Message into the VM Queue and Listen to the Message from the Queue:
- Steps to create a flow to publish a message to the VM queue:-
Step 1. Drag and drop the HTTP Listener Connector into the project from the HTTP module. Configure the listener, and set the host to All interface (0.0.0.0), port number as 8081 by clicking on the (+) in Connector configuration. Set the path as /publish.


Step 2. Drag a Read component from the file module and drop it on the canvas

Step 3. Configure the Read component by providing a file path from a local directory by clicking on “…” (here I am reading a CSV file)

Step 4. Drag and drop the logger from the core module and configure the message as #[payload] to log the payload from the Read component.

Step 5. Drag and drop the publish component from the VM module in the canvas.

Step 6. Select VM_config from the drop-down for connector configuration, and select Queue name in the queue section.

Step 7. Drag and drop the transform message from the core module and write a data weave code as shown below:

Step 8. Drag and drop the logger from the core module and configure the message as #[payload] to log the payload

Step 9. Now we successfully created a flow to publish a message. And terminate the deployment in Any point Studio and Lets create a new flow to consume the message we published
Step 11. Drag and drop flow from the core module. Give the flow name as vm-listener-flow

Step 12. Drag and drop the VM Listener Components into the project from the VM module, select VM_config for connector configuration, and select queue name(the queue that you have given while configuring the publish component)

Step 13. Drag and drop the logger from the core module and configure the message as #[payload] to log the payload
Step 14. Drag and drop the transform message component to the canvas and write a data weave code to convert the data (CSV) that we get from the queue to JSON. Drag and drop the logger from the core module and configure the message as #[payload] to log the payload


Step 15. Add breakpoints to the publish component in publish-message-flow and the logger component in vm-listener-flow

Step 16. Deploy the application in debug mode, to deploy the application in debug we have to right click on the project, go to Debug As-> Mule Application

Step 17. After the application is deployed, Open Postman and hit our application, and the endpoint will be http://localhost:8081/publish. Once you hit the Request, Open Anypoint Studio and you can check that execution is paused at the breakpoint near the publish component. Then click on “ ![]() ” to execute next processor
” to execute next processor

Step 18. You can check that once we publish that message. vm-listener -flow is triggered and execution will stop at the logger and meanwhile the publish-message-Flow will execute parallelly.

Step 19. Now check the payload and it was the same data that we published. And also check that console after passing each logger.

Step 20. We can get a clearer picture of this by looking at the Mule logs below:

- In this way, we can send messages to the VM queue and consume the same message from the queue.
2. The Publish Consume Operation:
-
- Upon using Publish Consume, the published message will wait for the defined time to get a response from the queue.
Step 21. Terminate the before deployment. For the publish consume operation demo, we replace the publish component of Publish-message-flow with the Publish consume component. Provide the same configuration as we gave for the Publish configuration and also provide timeout and add a breakpoint to it.
Step 22. Delete the transform message after publish consume message
- Upon using Publish Consume, the published message will wait for the defined time to get a response from the queue.

Step 23. Deploy the application in debug, send a request from the postman as we did before and open Any point studio. You can check that execution is paused at the breakpoint near the publish component. Then click on ‘ ![]() ’ to execute the next processor
’ to execute the next processor

Step 24. Click on ‘ ![]() ’ and observe the execution one by one. You can observe that once the message is published the publish consume component will wait for the response from the VM listener then only it will move to the next processor.
’ and observe the execution one by one. You can observe that once the message is published the publish consume component will wait for the response from the VM listener then only it will move to the next processor.


Note: If the VM listener takes more time to execute and publish consume components wait for the response up to the configured queue timeout value. If the response is not received in the given time then the VM: QUEUE_TIMEOUT error is thrown.
Step 25. can check the JSON response in the Postman.

Step 26. We can get a clearer picture of this by looking at the Mule logs below:You


3. The Consume Operation:
-
- For the consume operation, we will change the publish-consume component with the publish component in the Publish Message flow and add transform message. write a dw code as show in below.


- Delete or comment VM-listener-flow. We create one more flow named consume-flow

Step 27. Drag and drop the HTTP Listener Connector into the project from the HTTP module. Select HTTP_Listener_config for connector configuration and set the path as /consume

Step 28. Drag and drop the consume component from the VM module to the canvas. select VM_config for connector configuration and select queue name(the queue which you have given while configuring publish component)

Step 29. Drag and drop the logger from the core module and configure the message as #[payload] to log the payload
Step 30. Drag and drop the transform message component to the canvas and write a data weave code to convert the data (CSV) that we get from the queue to JSON. Also drag and drop the logger from the core module and configure the message as #[payload] to log the payload


Step 31. Deploy the application, to deploy the application we have right click on the project, go to Run As-> Mule Application
Step 32. After the application is deployed, Open Postman and hit our application to publish the message to the queue, and the endpoint will be http://localhost:8081/publish.

Step 33. After publishing the message to queue, hit our application again, and the endpoint will be http://localhost:8081/consume. Once you hit the request then you can check the converted JSON response.

Note: The consume operation will throw a VM: EMPTY_QUEUE error, as there was no other message in the queue to pick up.
- Now we know how to use a VM queue in Mule flow and how we can perform various operations provided by the VM connector.