

Insert and Query CSV data from SQL Collection
In this blog, we will see how to insert and query csv data from SQL Collection.
What is SQL Collection?
- Sql collection by Workato is a robust native application that provides you with the tools to manipulate table data.
- We can use the collection to synchronize related data across multiple systems (databases, web services).
- Collection allows you to run sql statements with data from multiple sources.
- We can create temporary tables from a list input or csv file.
- We can perform a variety of sql queries to arrive at the required output for your use case.
- Sql collection tables (also called Collection lists) are temporary tables, meaning it exist only during the job execution and will not persist across multiple jobs.
Step 1: Give your user credentials to log in to Workato.
Step 2: Now click on create project.

Step 3: Now give a project name and description and click on create project.

Step 4: Now you can see your project is created with the name you have given. Now click on create and then click on Recipe.

Step 5: Give your recipe a name and select run on a schedule as a starting point.

Step 6: You will see the below image on your screen and now click on action in an app.

Step 7: Search for logger by workato and click on it.

Step 8: In this message paste this csv data and click on save.

Step 9:Again click on action in an app in 3rd step of our recipe and search for csv tools by workato and click on it.

Step 10: Choose parse csv.

Step 11: Click on csv content and select the message from STEP 2 in our recipe.

Step 12: Scroll down to header schema and click on add column name.

Step 13: Add columns by giving the name to the field and click on the add field.

Step 14: As shown in the above image add the below fields and click on save.

Step 15: Again in STEP 4 in our recipe select action in an app and search for sql collection and choose sql collection by Workato.

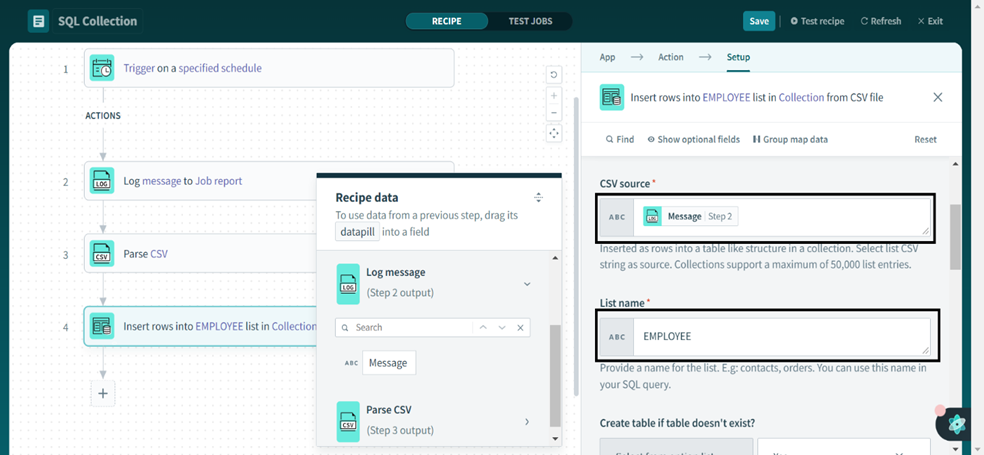
Step 16: Click on insert rows from csv file.

Step 17: Click on csv source and select message from STEP 2 in our recipe and give the list name as I have given employee.
Step 18: Scroll down and add the column name as shown in STEP 13 in our blog.
In Ignore csv header row give the value as true and click on save.

Step 19: Again in STEP 5 in our recipe search for sql collection and click on sql collection by Workato.

Step 20: Click on query lists.

Step 21: Write sql statement to query the output and select columns from STEP 4 in our recipe as shown in the figure.
In output list schema, add the schema fields as shown in this blog in step 13 and click on save.

Step 22: Now click on test recipe and click on STEP 5 in our recipe and you will be able to see the output.
