

Mulesoft JMS Connector With JMS ActiveMQ
Overview: –
- MuleSoft provides a powerful and flexible integration platform that simplifies the process of connecting applications, data, and devices.
- Using MuleSoft’s JMS connector, you can seamlessly integrate JMS with various systems and services.
- Integrating MuleSoft with JMS ActiveMQ enables you to build powerful and reliable messaging solutions, leveraging the strengths of both platforms. This integration helps in achieving seamless communication between distributed systems, ensuring efficient data flow and process automation.
- In this blog, you will learn:
- What is JMS?
- What is ActiveMQ? And how to set up Apache ActiveMQ.
- Instructions to set up the JMS connector in MuleSoft.
- An example showing how to publish and consume using the JMS connector in Mulesoft.
What is JMS: –
- JMS (Java Messaging System) is mostly used to enable the communication between APIs using an exchange of messages.
- JMS allows application components based on the Java Platform Enterprise Edition (Java EE) to create, send, receive, and read messages.
- It enables distributed communication that is loosely coupled, reliable, and asynchronous.
- A JMS Broker is an application server that acts as an intermediary between the sender (producer) and the receiver (consumer). It receives messages from producers and then forwards them to consumers. In other words, a message sent by a producer is not delivered directly to the consumer. Instead, it first goes to the Broker, which then forwards it to the appropriate consumer.
- The JMS producer is an entity that creates and sends messages to a JMS queue or topic, while the JMS consumer is an entity that receives messages from the JMS queue or topic.
- JMS supports two models for messaging:
- Queue (Point to Point)
- Topic (Publish-Subscribe)

1. Queue (Point to Point): –
It facilitates one-to-one communication, also known as point-to-point communication. In this model, the sender delivers a message to a queue, and a single receiver retrieves the message from the queue. The receiver does not need to be actively listening to the queue when the message is sent.
2. Topic (Publish-Subscribe): –
It facilitates one-to-many communication, also known as publish-subscribe communication. In this model, the publisher sends a message to a topic, and all subscribers actively listening to that topic will receive the message. If a subscriber is not actively listening when the message is published, it will miss the message unless the messages are made durable.
- Many providers have implemented JMS interface and created JMS messaging products
e.g. Apache ActiveMQ, IBM MQ, JBoss Messaging, RabbitMQ, etc.
(for this instance, I am using Apache ActiveMQ)
Apache ActiveMQ: –
- ActiveMQ is an open-source protocol developed by Apache which functions as an implementation of message-oriented middleware. Its basic function is to send messages between different applications.
Steps to Setup JMS Active MQ: –
1. Download the ActiveMQ from the below link:
https://activemq.apache.org/components/classic/download/
2. find ActiveMQ Classic and click on apache-activemq-6.1.2-bin.zip file for the windows

Now you can check that a zip file getting downloaded.
Note: Check the Java version before downloading the zip file.
3. Go to downloads in your system and extract the zip file that downloaded.

4. Open the folder that was extracted, navigate to bin>win64 and open activemq.bat

(Now, we can check that the server is getting started)

5. Open the ActiveMQ console by going to the link: http://localhost:8161/admin/ in the browser.
It will ask for a username and password. The default username is ‘admin’ and the password is ‘admin’.

6. Now, Console will look like this and click on queues

7. We can create a Queue by entering the name of the queue, that we want to create. Here we are giving the name of the queue as mule. 
8. After creating the queue. Interface will look like this:

We have successfully set up JMS ActiveMQ and created a queue. Now we will see how we can use JMS ActiveMQ in Mulesoft Anypoint studio.

Setting up the JMS Configuration: –
Step 1. Create a new project in Anypoint Studio. To create click on the “File” menu at the top left corner of the window. From the dropdown menu, select “New” and then choose “Mule Project”.

Step 2. A dialog box will appear where you can enter details about your new Mule project. Provide a name for your project in the “Project name” field. And click on finish.

Step 3. Add the JMS module to the project by clicking on the Add Modules in the mule palette. If the JMS module is not present add it from the exchange.

Step 4. Drag and drop the JMS module into the project and then JMS module will be added to the project.
Step 5. Now click on the global elements in the project file and click on Create.

Step 6. Search for JMS config and click on it. It will open the JMS configuration.

Step 7. Select ActiveMQ Connection from the drop down for connection.

Step 8. we need to add the required libraries for JMS. For this, we will click on the Configure Button next to each dependency. Select Add recommended libraries.

Step 9. On clicking Add recommended libraries option, a pop-up will appear on the screen that gives info about the library going to be added to the project. We will click on OK.

Step 10. Once libraries are added we will give the details like Username and password (username and password is admin)

Step 11. Scroll down and select Factory configuration as Edit inline.

Step 12. Give Broker URL as tcp://localhost:61616 (As we are connecting with localhost for this)

Step 13. Click on test connection and check whether the connection is successful or not then click on OK. (if the connection failed check all the configurations and also check whether the ActiveMQ server is running or not).

Operations that we can Perform using the JMS Module: –
- There are 6 operations we can perform using the JMS Module and They are: –
- Publish:
- This operation is used to publish the message to the JMS and it works asynchronously.
- TTL can be set for the message.
- Consume:
- This operation is used to get the message in between the flow. If there is no data present in the queue, then in that case this operation will wait for timeout to get over and then it will error JMS: TIMEOUT
- On New Message:
- This operation keeps on listening to the particular destination for the new message.
- Publish Consume: This operation allows the user to publish the message to the destination and waits for the response either to the destination or temporary destination
- Ack: This operation allows sending the ACK in manual mode is selected while consuming the Message.
- Recover session: This operation is used to perform a session recovery when the Ack MANUAL mode is selected while consuming the Message.
- Publish:
- Let’s create a simple usecase to publish and consume the message.
Usecase: –
Steps to create a flow to publish a message to JMS:-
- Drag and drop the HTTP Listener Connector into the project from the HTTP module. Configure the listener, and set the host to All interface (0.0.0.0), port number as 8081 by clicking on the (+) in Connector configuration. Set the path as /publish.


2. Drag a Read component from the file module and drop it on the canvas

3. Configure the Read component by providing a file path from a local directory by clicking on “…” (here I am reading a CSV file)

4. Drag and drop the logger from the core module and configure the message as #[payload] to log the payload from the Read component.

5. Drag and drop the publish component from the JMS module in the canvas.

6. Select JMS config from the drop-down for connector configuration, give Destination as a mule (queue name that we created before), and select Destination type as Queue.

7. Drag and drop the transform message from the core module and write a dataweave code as shown below:

8. Drag and drop the logger from the core module and configure the message as #[payload] to log the payload

9. Deploy the application, to deploy the application we have right click on the project, go to Run As-> Mule Application

10. After the application is deployed, Open Postman and hit our application, and the endpoint will be http://localhost:8081/publish. Once you hit the request then you can check that the response in JSON indicates that the message was successfully published.

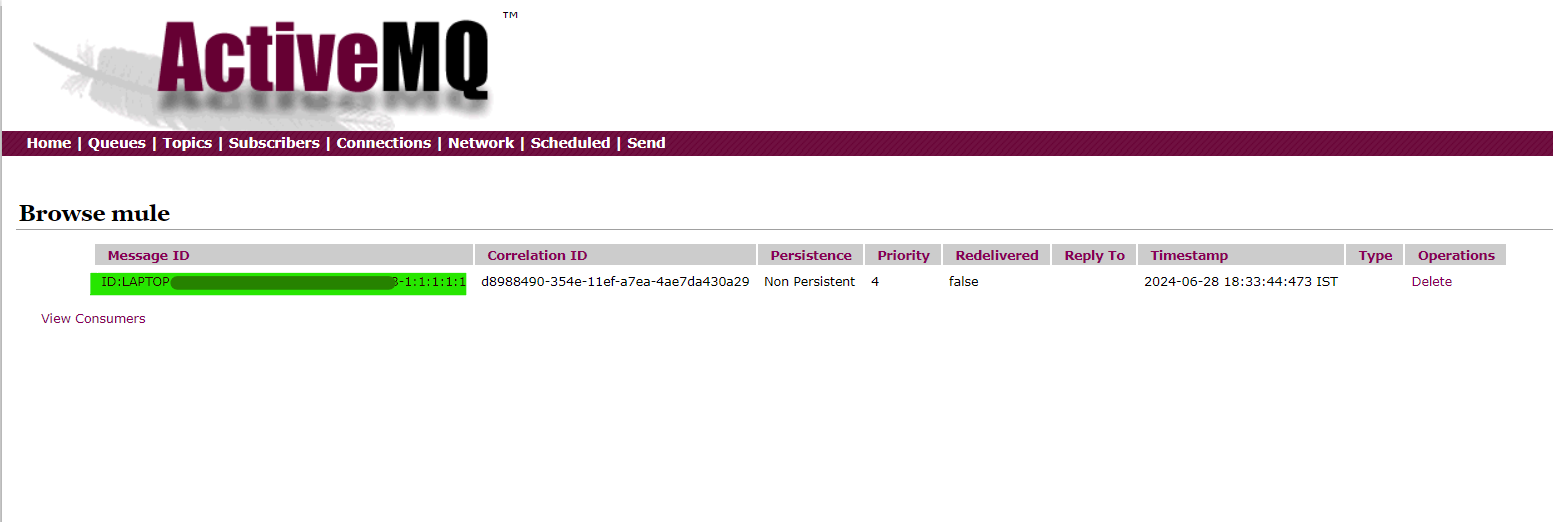
11. Open the ActiveMQ console and there you can check that one message has been in the queue. If you want to check the published message then click on the queue name.

12. Now Click on the MessageID and there it will show the entire details of the message.

- Now we successfully created a flow to publish a message. And terminate the deployment in Anypoint Studio and Let’s create a new flow to consume the message we published
13. Drag and drop flow from the core module. Give the flow name as consume-message-flow.

14. Drag and drop the HTTP Listener Connector into the project from the HTTP module. Select HTTP_Listener_config for connector configuration and set the path as /consume

15. Drag and drop the consume component from the JMS module to the canvas.

16. Select JMS config from the drop-down for connector configuration, give Destination as a mule (queue name that we created and also queue name that we give for publish), and select Consumer type as Queue consumer.

17. Drag and drop the logger from the core module and configure the message as #[payload] to log the payload
18. Drag and drop the transform message component to the canvas and write a dataweave code to convert data (CSV) that we get from the queue to JSON. Drag and drop the logger from the core module and configure the message as #[payload] to log the payload


19. Deploy the application, to deploy the application we have right click on the project, go to Run As-> Mule Application (as we did before)
20. After the application is deployed, Open Postman and hit our application, an the endpoint will be http://localhost:8081/consume. Once you hit the request then you can check the converted JSON response.

21. Open the ActiveMQ console and there you can check that 0 pending messages in the queue because we consumed the message.

- This is how we can use the JMS connector for JMS operations in Mulesoft.