

Configuration of Salesforce Platform Events Connector in Boomi
About Connector:
- Salesforce Platform Events connector help us to configure the integration between Salesforce Platform Events and connected business applications.
- Salesforce Platform Events is a feature in the Salesforce enterprise messaging platform and helps organizations run faster and more efficiently through event-driven business processes that execute in near-real time.
- The Salesforce Platform Events connector passively listens for events that are published through Platform Events and also listens for events from connected applications to update Platform Events and trigger actions.
- This listening provides real-time connectivity and more immediacy in business processes.
Connector configuration
To configure the connector to communicate with Salesforce Platform Events, set up two components:
- Salesforce Platform Events connection. This connector uses the OAuth 2.0 protocol for authentication and authorization.
- Salesforce Platform Events operation (Listen and Send)
Before creating the connection component, we need to create Connected App in Salesforce to get the client Id and Client secret.
Creating a Connected App in Salesforce:
Step 1.1: Login to the Salesforce platform (https://login.salesforce.com/) with the required credentials (Email Address and Password).

Step 1.2: Go to the Home tab and type Apps in the search box and click on App Manager. A page will open as shown below. Now click on New Connected App to create a Connected App

Step 1.3: Configure Basic Information (like Connected App Name, Contact Email, Contact Phone) and API (Enable OAuth Settings) as shown below. In the callback URL box configure the Boomi callback URL i.e., https://platform.boomi.com/account/<your_account_ID>/oauth2/callback.
For Scopes select Full access and click on Add. Click on save button at the bottom to save the changes.


Step1.4: A message will be displayed as shown below. Click on Continue.

Step1.5: Now click on Manage Consumer Details

Step1.6: A new tab will open as shown below. Enter the Verification Code that has been sent to your email and click on verify.

Step1.7: Now copy the consumer key and consumer secret which are generated and save it in a notepad. Click on cancel.

Step1.7: Now go to the Home tab and search for change data capture. Click on change data capture.

Step1.8: A page open as shown below.

Step1.9: Select the objects for which we want to capture change data and click on forward arrow to add them in the selected entities. Here I have selected Account, Contact, Opportunity. (But you can add n number of entities depending on requirement) Click on save.

Configuring salesforce platform events Connector:
Now open the Boomi platform to configure the salesforce platform events connector.
Step2.1: Log onto the Boomi platform (https://platform.boomi.com/) with the required credentials (Email Address and Password).

Step2.2: Under Services choose Integration

Step2.3: First configure the connection component of salesforce platform events connector.
Step2.4: Click on create new. Choose Connection.
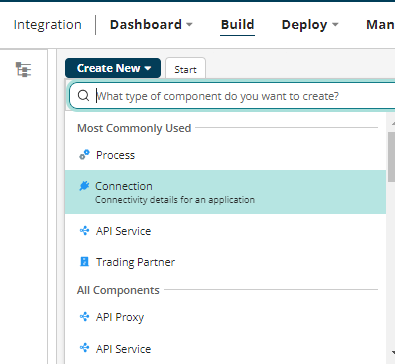
Step2.5: Choose Salesforce Platform Events connector and click on Create.

Step2.6: Configure a proper name for the connection component. Under Connection tab, choose New Events for the Replay option and click on save.

Step2.7: Now go to the OAuth2.0 tab and configure the details like client id and client secret which we copied earlier in step1.7. Click on Generate to generate the access token.

Step2.8: We will be automatically redirected to authorization endpoint where we need to give consent to access the resources. Click on Allow button.

![]()
![]()
Step2.9: A message will be displayed as shown below.

Step2.10: Click on close. Configuration of connection component is successful. Save and close the connection component.

Now we have to develop a process which listens to the changed events in Salesforce and pulls changed data into Boomi in Real Time.
Steps to develop a Listener Process in Boomi Platform
Step3.1: Configure a new process with name as Listener|SalesforcePlatformEvents and configure the start shape with connector. Choose the connection component which we have created earlier. Choose the action as Listen.

Step3.2: Now configure the operation component. Click on + icon. Configure the operation component name as Salesforce Platform Events Connector Listen|op and click on import operation to import the events.

Step3.3: Select your atom and the connection component which we have configured earlier and choose Change Data Capture Events for Streaming Event Type option. Click on Next.

Step3.4: Choose All Change Events from the dropdown and click on Next.

Step3.5: Click on Finish.

![]()
Step3.6: Now drag and drop a return documents shape into the process canvas and attach it after the start shape.
![]()
Step3.7: Complete Process looks as shown below.

As it’s a listener process, we cannot test it on the build page.
Step3.8: Click on Create Packaged Component button on the top right corner on the process canvas to create Packaged Component for this Process.
Step3.9: Now deploy the Packaged Component to your environment. Make sure you have the required licenses.
Here the highlighted field represents the specific environment in my account to which I’m deploying the Packaged Component of Listener Process.

Step3.10: Now go to the Deployments under Deploy tab. We can see the Process which we deployed.

Step3.11: Now go the Process Reporting Page under Manage tab. In the Add filter choose atoms and select your atom which is attached to your environment.

Here we can see there is no executions related to Listener|SalesforcePlatformEvents Process
Step3.12: Now go to your salesforce account and do some changes like creating a new Account Object or modifying existing object or deleting).
Step3.13: Now I’m creating a new Account Object in Salesforce.
Step3.14: Go the Object Manager and click on Accounts. A page opens as shown below.

![]()
Step3.15: Click on New which is highlighted in above image to create new Account Object.
Fill the required details as shown below and click on save.

Step3.16: Now go to the Process Reporting Page in the Boomi platform and refresh the page. We can see our Listener Process got executed.

Step3.18: Click on time stamp of the execution. We can see a page as shown below.

Step3.19: Click on successes hyperlink of Salesforce Platform Events connector and click on View Document to view the document.

Step3.20: A document will be loaded as shown below.

Step3.21: Copy and paste it in a Notepad++ to format the Json document to view it clearly.
![]()
![]()

We can see the complete information in the document like the object type and change type and the payload.
In this way we can use salesforce platform events connector to capture the changed data from salesforce and develop interfaces which will help us to synchronize data from salesforce to different target like database as a real time approach.
References
- https://help.boomi.com/
- https://help.boomi.com/docs/atomsphere/integration/connectors/r-atm-salesforce_platform_events_connector_5be03def-3af7-4861-af94-b21d9ee79dfa/
- https://login.salesforce.com
- https://help.boomi.com/docs/Atomsphere/Integration/Connectors/r-atm-Salesforce_Platform_Events_Connection_99d7b7b2-1099-4f08-8760-fd65dc698e46
- https://help.boomi.com/docs/Atomsphere/Integration/Connectors/r-atm-Salesforce_Platform_Events_Operation_ef454f61-9d04-4da0-bd81-df1be346f807