

Fetching EDI Docs from FTP Server and Routing them using Processing Group Component
Use case:
Develop an inbound Process with one host partner and two remote partners and route the documents to Partner specific sub processes using Processing Group Component. Use the communication method as FTP.
Here the host partner: Kennymos
Remote Partners: ABC Stores and XYZ Stores
840(RFQ)
850 (PO)
What is FTP?
- File Transfer Protocol is a standard network protocol used for the transfer of files from one host to another over the Internet.
- It’s widely used for various purposes including uploading and downloading files and EDI documents.
- FTP supports authentication mechanisms like Username and Password to verify the identity of the user who are accessing the files over the server.
- One of the main reasons why modern businesses and individuals need FTP is its ability to perform large file size transfers.
- In a normal FTP, data is not encrypted. The data will be transmitted as a plain text over the internet.
- By default, it uses port 21.
FTP Communication Method:
- In EDI we have the ftp communication method which allows the trading partners to send and retrieve the EDI files over the ftp server.
- In order to configure FTP Communication method, first we need to set up an ftp server in cloud or local system.
- In a local system we can set up an FTP Server using FileZilla.
FileZilla:
FileZilla is a free, open-source file transfer protocol (FTP) software tool that allows users to set up FTP servers or connect to other FTP servers in order to exchange files.
Now set up an FTP Server by installing the FileZilla server.
Steps to install and configure the FileZilla Server:
Step1.1: Open the below link in browser and click on Download FileZilla Server.
https://filezilla-project.org/download.php?platform=win64&type=server

Step1.2: Click on the downloaded file and click on Yes

Step1.3: Click on I agree.

Step1.4: Click on Next button until the below wizard appears. Now type a password in the box which is marked and click on Next.

Step1.5: Now click on Install to install the server

Step1.6: click on connect to FileZilla FTP server

Step1.7: Enter your password and click on ok

Step1.8:Now go to the server tab,click on configure

Step1.9: A wizard opens as shown below.Now Click on Users and click on Add to add a user.
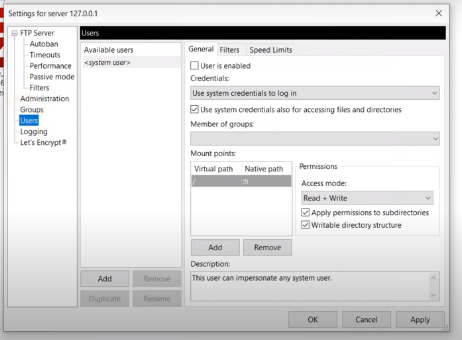
Step1.10: Configure user name and choose Require a password to login under Authentication and type a password which is specific to the user

Click on Add to add the path. Configure the Virtual path and Native path.
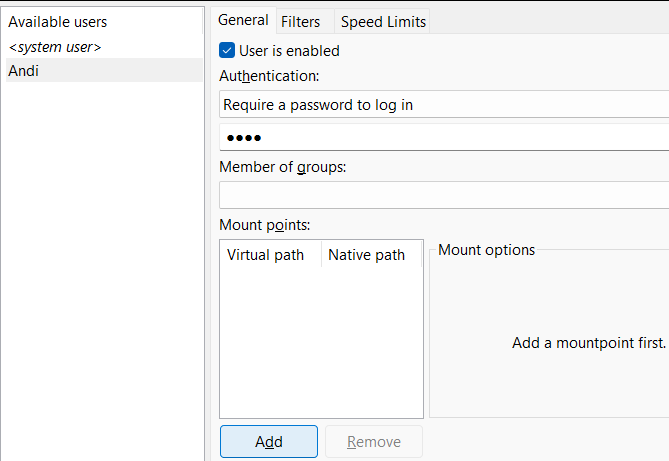
Here Native path is the local directory path and virtual path define the directories the client will see after logging in FileZilla client.
Step1.11: Now the entire configuration will look as shown below. Click on OK to save the changes.

![]()
![]()
Step1.12:Now go the folder in your local system which you gave in the native path and create 2 subfolders as inbound and outbound.

![]()
![]()
Step1.13: Place edi 840 and 850 sample documents in outbound folder and leave the inbound folder empty.
(Refer to sample documents for the sample files)

![]()
![]()
Sample Documents
840 (Request for Quotation)
ISA*00* *00* *ZZ*ABC123 *ZZ*RECEIVERID *YYMMDD*HHMM*U*00401*000000001*0*T*: ~
GS*RFQ*ABC123*RECEIVERID*YYMMDD*HHMM*12345*X*004010~
ST*840*0001~
BQR*00*INV12345678*20221231*1234*PO123456~
REF*VR*123456789~
DTM*002*20230110~
N1*BY*BUYER NAME*92*BUYER CODE~
N1*VN*VENDOR NAME*92*VENDOR CODE~
IT1*1*50*EA*12.34*TE*UP*ITEM12345*IN*SKU1234~
PID*F****PRODUCT DESCRIPTION~
IT1*2*30*EA*8.99*TE*UP*ITEM67890*IN*SKU5678~
PID*F****ANOTHER DESCRIPTION~
CTT*2~
SE*10*0001~
GE*1*12345~
IEA*1*000000001~
850(Purchase Order)
ISA*00* *00* *ZZ*XYZ456 *ZZ*RECEIVERID *YYMMDD*HHMM*U*00401*000000001*0*T*: ~
GS*PO*XYZ456*RECEIVERID*YYMMDD*HHMM*12345*X*004010~
ST*850*0001~
BEG*00*NE*10001234**20230101~
REF*VR*123456789~
DTM*002*20230110~
N1*BY*BUYER NAME*92*BUYER CODE~
N1*SE*SUPPLIER NAME*92*SUPPLIER CODE~
PO1*1*50*EA*12.34*TE*UP*ITEM12345~
PID*F****PRODUCT DESCRIPTION~
PO4*2*4*EA*PLT*UP*12345678901234~
CTT*1~
SE*11*0001~
GE*1*12345~
IEA*1*000000001~
Trading Partners Component
- Trading Partners Component is used to conduct Direct EDI or B2B transactions by configuring a host partner (i.e., My Company or Supplier or Vendor) and a remote partner (i.e., the partner that we are trading with or Buyer)
- We have to create separate Trading Partner Component for My Company as well as the partner.
Configuring Trading Partner Component for My Company (Kennymos)
Step 2.1: Log onto the Boomi platform (https://platform.boomi.com/) with the required credentials (Email Address and Password).

Step 2.2: Under Services choose Integration

Step2.3: Click on Create new and type Trading Partner in the search box and click on Trading Partner Component.

Step2.4: Choose the standard as X12 and This is my company option and click on create.

Step2.5: configure a proper name for the component as shown below and click on save.

Step2.6: Go to X12 tab and configure the ISA and GS control options based on values provided in the sample document and click on save.

Note: For inbound operation My Company will be the receiver. So, we have to configure ISA07, ISA08, GS03 for ISA and GS control options respectively.
Step2.7: Go to communication tab and click on Add communication method and choose FTP.

Step2.8: Configure the Get and send details and click on close and save the component.

Configuring Trading Partner Component for remote Partner (ABC Stores)
Step3.1: Click on Create new and type Trading Partner in the search box and click on Trading Partner Component.

Step3.2: Choose the standard as X12 and This is a partner that I trade with option and click on create.

Step3.3: configure a proper name for the component as shown below and click on save.

Step 3.4: Go to X12 tab and configure the Basic X12 (these are available only for Partner that we are trading with) options along with ISA and GS control options based on values provided in the sample document (840) and click on save.


Note: For inbound operation Partner will be the sender. So, we have to configure ISA05, ISA06, GS02 for ISA and GS control options respectively.
Step 3.5: Go to communication tab and click on Add communication method and choose FTP.

Step 3.6: Configure the Communication Settings to Use All Defaults and click on close button in the bottom left and click on save the component.

Now configure Trading Partner Component for Second Partner i.e., XYZ Stores by following the steps from 3.1-3.6
Note: Configure BasicX12, ISA, GS control options by referring the document related to Trading Partner XYZ Stores i.e.,850 EDI file.
Process Group Component
- Processing Group Component used to add, change or remove trading partners in one location without touching the process logic.
- You can create processing groups on the Build tab by clicking Create New and selecting Processing Group from the list.
- Processing Group Component are the components which can be deployed individually.
- Each Trading Partner in a deployed Processing Group uses a trading partner connection license.
- Because Processing Groups are deployed independently, you must deploy them in order for them to be used in a process.
- To use a Processing Group in a process, open the Start shape that is set to the Trading Partner option or the Trading Partner shape. Then, select Use a Processing Group component and chose your Processing Group component.
- Routing is faster and easier with processing groups.
Processing Group members
The Members tab of the Processing Group component allows you to Add a Trading Partner to the list.
Processing Group routes
- The Routes tab of the Processing Group component allows you to specify how to route the documents and which process to be called.
- We can route the documents based on documents, partners and No Routes Defined.
We are performing an inbound operation with One My Company and 2 Trading Partners
Vendor (My Company): Kennymos
Partners: ABC Stores and XYZ Stores
Configuring Processing Group Component
Step 4.1: Click on create new and type Processing Group in the search box and choose Processing Group component.

Step 4.2: Configure the Component name as shown below.

Step4.3: Under the Members tab, click on Add a Trading Partner and choose the partners (ABC Stores and XYZ Stores) which we configured previously.

![]()
![]()
![]()
Step 4.4: The component will look as shown below

Step 4.5: Go to Routes tab and choose Partners’ option


Step 4.6: Now we can route each Partner to separate Processes.
Configure a process for each Partner
|
Partner |
Process |
|
ABC Stores |
[sub]ABC Stores |
|
XYZ Stores |
[sub]XYZ Stores |
[sub]ABC Stores:
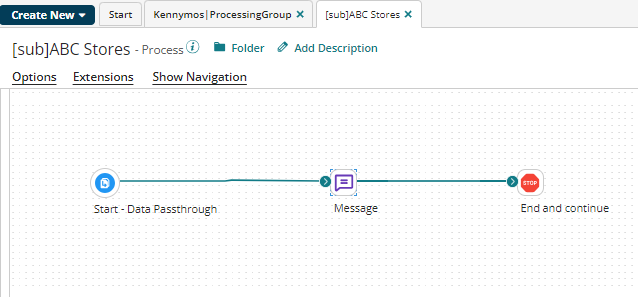
Configure the message shape for [sub]ABC Stores as shown below.

[sub]XYZ Stores:

Configure the message shape for [sub]XYZ Stores as shown below.

The configuration of Trading Partners, FTP communication method, Processing Group Component is completed. Now it’s time to create an inbound Process by using the components which we have configured.
Steps to Build inbound Process
Step5.1: Create a new process with the name as Inbound to Kennymos and configure the start shape with Trading Partner.

Step 5.2: choose the communication method as FTP and select Kennymos Trading Partner under My Standards and choose Use a Processing group Component option and select Kennymos|Processing Group Component which we have configured earlier and click on OK.

Step 5.3: The Process looks as shown below.

Step5.4: Drag and drop a Process route shape and add it in the documents path. Choose the Processing Group option and select Kennymos|Processing Group

Step 5.5: Drag and drop a Trading Partner shape and attach it in the Acknowledgements path.
Configure the trading partner shape as shown below.

Step5.6: Attach stop shape at the end of each path. Click on save to save the changes made to the process. Now, the entire Process looks as shown below.

Step5.7: Now click on test button to test the Process.

Click on each document to check which path it’s following.
Step5.8: First and second documents are empty. They act as placeholders for raw data in the process reporting page once the process is deployed.
Step5.9: Click on third document. We can see it’s going under Acknowledgements path.

Step5.10: Click on fourth document. We can see it’s following documents path.

Now click on blue arrow.
We can see the document is routed to process [sub]ABC Stores as this document is of type 840 which is belongs to partner ABC Stores
Step5.11: Click on fifth document. We can see it’s going under Acknowledgements path.

Step5.12: Click on last document. We can see it’s going under documents path.

Now click on blue arrow.
We can see the document is routed to process [sub]XYZ Stores as this document is of type 850 which is belongs to partner XYZ Stores

In this way the Process route component will route the documents to partner specific processes.
References
- https://platform.boomi.com/
- https://help.boomi.com/
- https://filezilla-project.org/download.php?platform=win64&type=server
- https://help.boomi.com/docs/atomsphere/integration/process%20building/c-atm-trading_partner_group_components_5f1fa272-5d7d-4e5a-a2c3-da273b3db418/
- https://help.boomi.com/docs/atomsphere/integration/process%20building/r-atm-trading_partner_components_96eb4e6c-f5a6-4583-98a8-690236d288f9/