

Data Sync From Salesforce To Database In OIC
Connect with Salesforce and data synchronization between Salesforce and Database in OIC
What is Salesforce?
🡺 Salesforce is cloud-based CRM software. It makes it easier for companies to find more prospects, close more deals, and connect with customers in a whole new way to provide
them with amazing service at scale.
Salesforce brings together all your data, from any source. Customer 360, our complete suite of products, unites your sales, service, marketing, commerce, and IT teams with a single, shared view of customer information. With artificial intelligence integrated across all products, Salesforce helps everyone in your company work more productively and better deliver the personalized experiences customers love.
Before configuring the Salesforce connector, we need to create a Salesforce account.
- Sign-up Link: https://developer.salesforce.com/signup
NOTE: If we have an account in Salesforce, there is no need to create a new one. Then we need to log in to the existing Salesforce account.
- Log-in Link: https://login.salesforce.com/
Now go to the OIC Integration Platform to start connecting with Salesforce
Step 1: Go to the Sign-in page. Use Username and Password to log into the OIC Instance.

Step 2: Click on the hamburger button to create a connection.

Step 3: Click on the Design tab to create a connection.

Step 4: Click on the Connections tab to create a Salesforce Connector.

Step 5: Click on the Create button to configure a Salesforce Connector.

Step 6: Search Salesforce in the search box and select the Salesforce Adapter.

Step 7: Give a suitable name to the Salesforce Connector and the Role should be both Trigger and Invoke and click on the Create button.

NOTE: Identifier should populate automatically but we can change this and need to give any unique name.
Step 8: Fill the required credentials and click on Test.

Properties
- Type: Production
- API Version: 57.0
Security
- Security policy: Salesforce Username Password Policy
- User Name
- Password+Token (Salesforce password concatenated with token without any spaces)
Step 9: Click on Diagnose & Test.

NOTE: The difference between Test and Diagnose & Test is that Test will just test your connection it will not validate the credentials but Diagnose & Test will first validate your all credentials and it will test the connectivity with the actual Salesforce server.
Step 10: Click the Save button after the successful test.

NOTE: Only you can ensure successful connectivity with Salesforce if the Configuration progress bar reaches 100%
Step 11: Click on the left arrow if that is showing Configured.

Connection is established, Now let us configure the Salesforce
Step 12: Now log in to the Salesforce.

Step 13: After jumping into the home page click on the setting button and click on Setup.

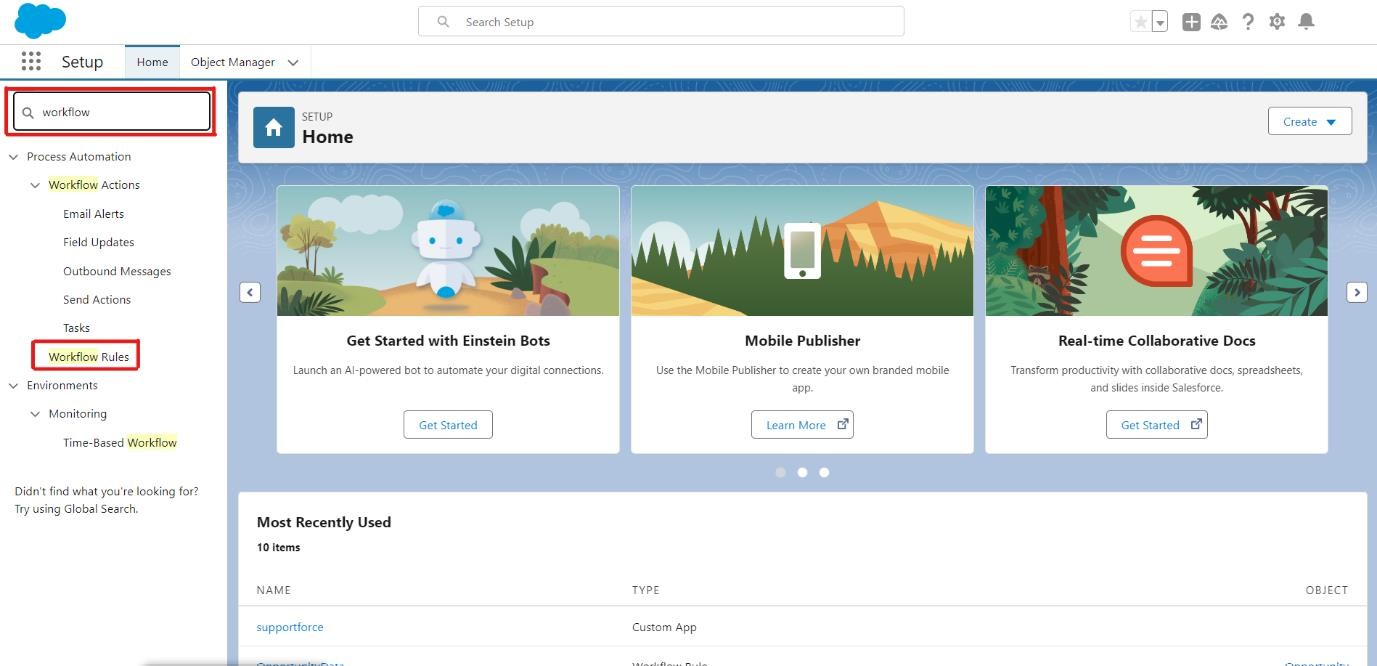
Step 14: After jumping into the setup page, search Workflow Rules and click on the Workflow Rules.
Step 15: Now Click on the New Rule button on the Workflow Rules page.

Step 16: Now Click on the Continue with Workflow Rules button.

Step 17: Now Click on the Object drop-down, and select the required object and click on the Next button (in our case we select the Opportunity object).

Step 18: Now give a suitable name to the Rule Name field, and define a rule using the Field, Operator, and value fields (you can define multiple rules but, in my case, one rule is enough) click on the Save & Next button.

Step 19: Now go to the Add Workflow Action drop-down and select New Outbound Message.

Step 20: After clicking on the New Outbound Message give a Name and Unique Name, And Endpoint URL (now at the time of configuring need to give any sample URL after that we will change this URL), After that we need to choose the required fields from the Available Fields box and click on the Add button to add that fields, and click on Save & Next.


NOTE: Click on Save & Next after choosing the required fields.
Step 21: After Click on Save & Next you need to check the Action and Rule Criteria and click on Done.

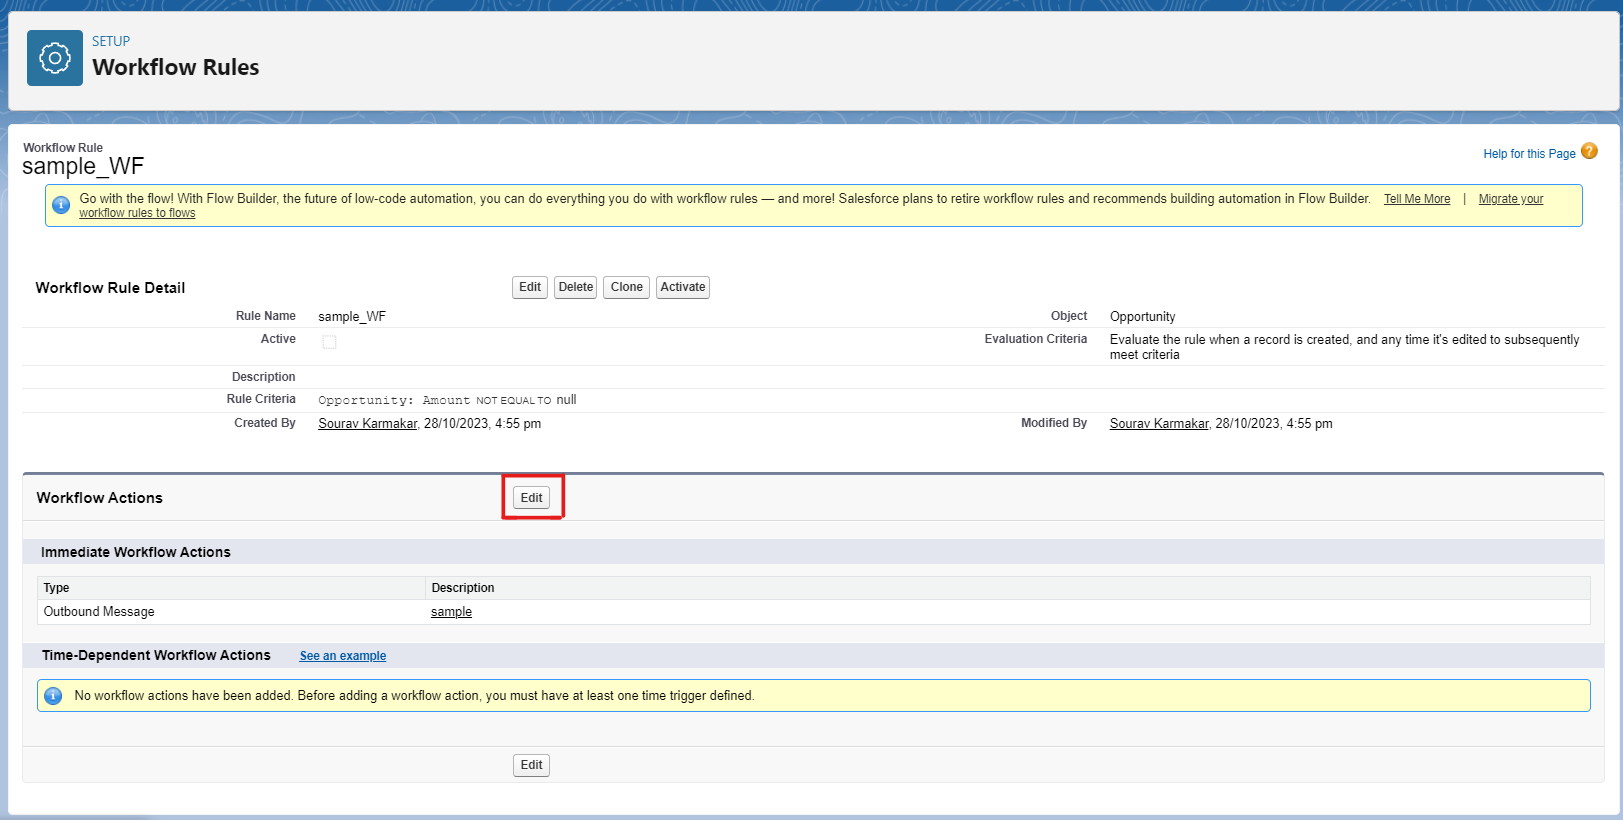
Step 22: This is our Workflow Rule, now this is not in the Active stage, we need to activate this after configuring our integration.

Configuration of Salesforce is done, Now let us start the Integration
Step 23: Now Click on the Integrations tab and click on the Create button.

Step 24: Click on the Application tab to create a real-time integration.

Step 25: In this create integration page give any suitable name and unique Identifier name and click on create button.

 Step 26: After clicking the Create button search for the Salesforce connector that we configured previously, and select the connector.
Step 27: After choosing the connector we need to give some name to the required field and click on the Continue button.

Step 28: Select the Outbound Message option and click on Continue.

Step 29: After that we need to upload the WSDL file.

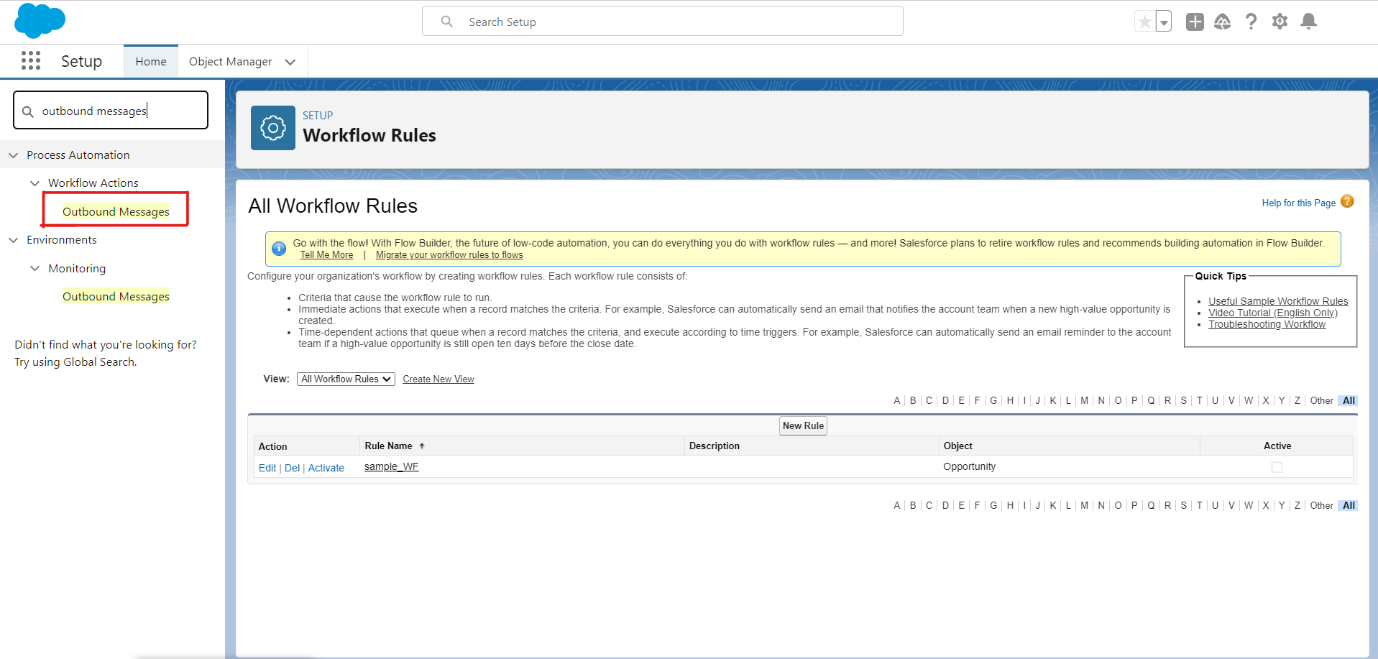
Step 30: After that, we need to jump into Salesforce to get the WSDL file, we need to go to setup fast, and then in the search box we need to search outbound messages and click on the outbound messages link.
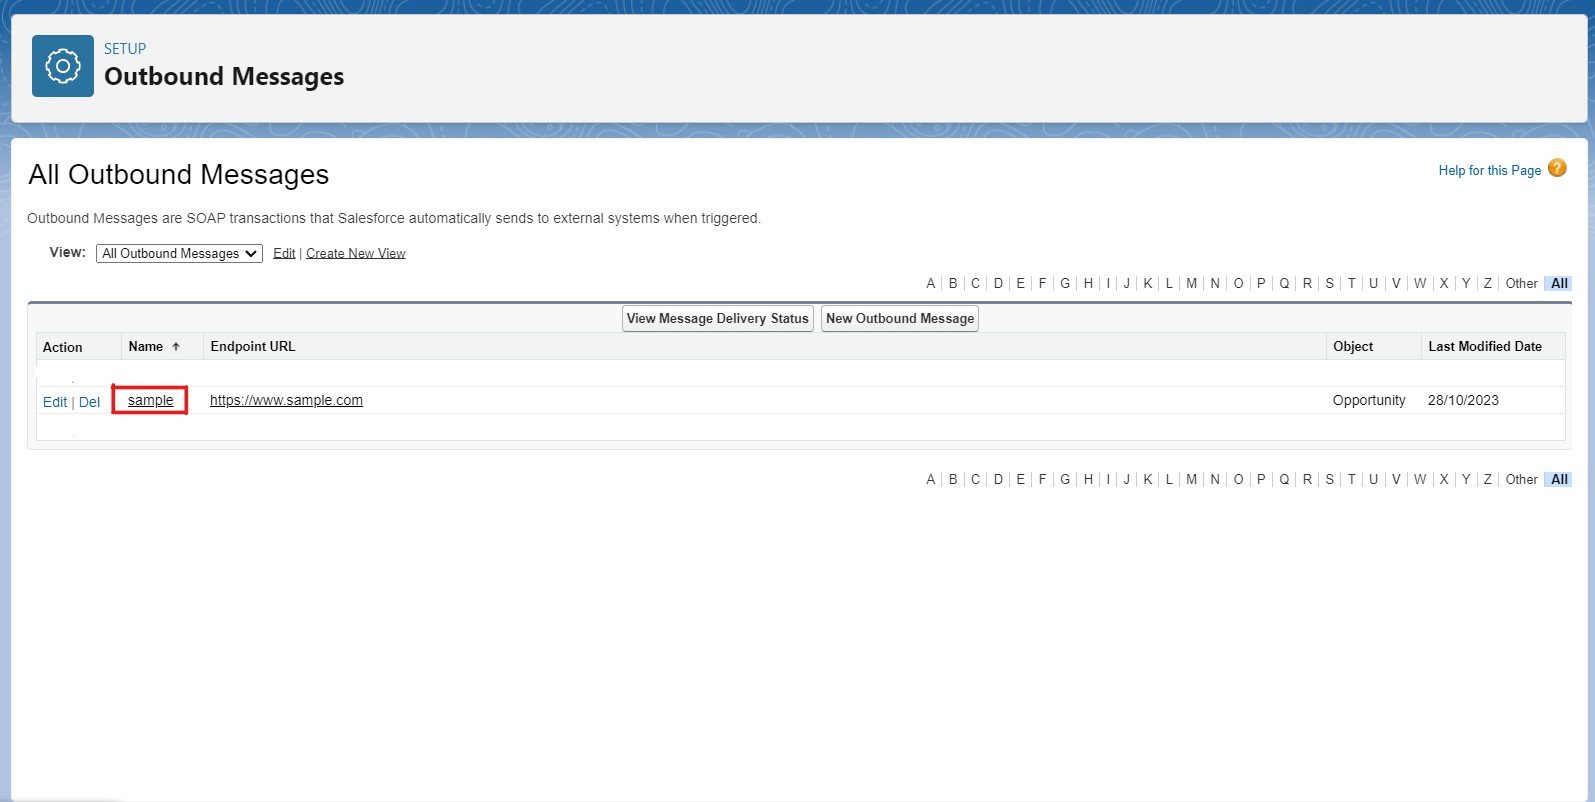
Step 31: After that we need to click on the name (In our case it is sample).
Step 32: After that click on the Endpoint WSDL link to get the WSDL file.

Step 33: After clicking on that link, we will get this WSDL file, and this file we need to copy and paste this into a new file with the .wsdl file extension.

Step 34: Like this, we need to create a new WSDL file in our system.

 Step 35: After that, we need to the OIC platform to upload the WSDL file and click on the Continue button.
Step 36: After that we will jump to the summary page, we need to check the Action Name and Output Messaging and click on the Finish button.

Step 37: This is our Trigger Salesforce connector created, we need to save our Integration.

Step 38: After that you need to click on the plus icon and select the salesforce adapter because we need to pull the account detail which is associated with the opportunity. Because the Account is the parent object of the opportunity.

Step 39: After that we need to give a meaningful name to our operation and click on Continue.

Step 40: After that we need to configure the Action, we need to select the Query Information and click on Continue.

Step 41: After that we need to configure the operation, we need to write the SOQL statement to query the records from Salesforce. Here ‘&’ is used to define the parameter.

Step 42: After that we need to check all details on the Summary page and click the Finish button.

Step 43: After that, we will get this salesforce Invoke adapter and one map shape associated with this, we need to save our Integration.

Step 44: After that, we need to configure this map shape. So, for that click on the three dots and click on Edit.

Step 45: In the map, we need to open the Notification drop-down first, then the Opportunity drop-down, then the second sequence drop-down and we will get the Account ID field, this Account ID we need to drag and connect with the ID parameter present inside the target. After that, we need to validate the map and after that, we need to click the left arrow to go back to the process.

Step 46: This is our configured map shape, and after that, we need to save our Integration.

Step 47: After that, we need to click the plus button, choose our Data Base Connection, and click on it.

Step 48: After that, we need to configure the Database. First, we need to give some meaningful name to our operation and then select the operation Perform an Operation on a Table from the drop-down and choose Insert, then click on Continue.

 Step 49: After that, we need to select the Schema and table Type and click on the search button, after select the required tables from the Available box, and click on the right arrow to add those in the Selected box, and click on the Import Tables.
 Step 50: After that we need to select a table which will be the parent table and click on Continue.
Step 51: After that on the Summary page we need to check all details and click on the Finish button.

Step 52: After that we need to configure this map shape. So, for that click on the three dots and click on Edit.

Step 53: In the map shape we need to first open the Notification drop-down and then Opportunity, we will get all the details of the Opportunity object, and these fields we need to map with the right-side Opportunity fields. After that, we need to open the Salesforce response drop-down and Query Results, we will get all the details of the Account connected with the Opportunity, and these fields we need to map with the right-side accountCollections fields. After that we need to click on validate and after validation click on the left arrow to close the map shape.

Step 54: After that we need to configure the Business Identifier, for that we need to click on the (I) symbol.

 Step 55: After that, we need to drag this Id and paste it in the text box, and save the Integration.
Step 56: Our Integration is completed, now we need to click on the left arrow to close the Integration.

Step 57: Now we need to active our Integration, so for that we need to hover on the integration and click on the power button to activate the Integration.

Step 58: Now on this page we need to select the Audit option and click on the Active button.

Step 59: Now we need to refresh the page and we can see our Integration is in the Active stage.

Step 60: Now we need to Run our Integration, so for that we need to hover on the Integration and click on the three dots.

Step 61: Now we need to click on Run details.

Step 62: Now we need to copy this Metadata URL.

Step 63: Now we need to go to the Salesforce Workflow Rules page and click on the Rule Name.

Step 64: Now we need to click on the Edit button.
Step 65: Now we need to click on the Edit.

Step 66: After that we need to paste the Metadata URL in the Endpoint URL field and remove the (?wsdl) from the end and click on the save button.

Step 67: Now we need to click on Done.

Step 68: Now we need to click on Active.

Step 69: Now we need to check the Active check box is checked.

Step 70: Now we need to create a new Opportunity, first, we need to click on the dotted box, search for opportunities, and click on the Opportunities.

Step 71: Now we need to click on the “New” button to create an Opportunity.

Step 72: Now we need to fill in the details in the required fields and click on the Save button.

NOTE: We need to choose the Accounts from our existing accounts in Salesforce or we can create an Account.
Step 73: Now we need to open our Database and run a SELECT query on the Opportunity table to see the details that we fill at the time of creating an Opportunity in Salesforce.

Step 74: Now we need to run a SELECT query on the Accounts table to see the details of the Account attached with an Opportunity in Salesforce.

Step 75: We can see the total execution in our OIC platform (Observability, Instances).
