

Expose Rest API In OIC
Expose Rest API
STEP 1: Navigate to the following URL https://urldefense.com/v3/__https://design.integration.ca-montreal-1.ocp.oraclecloud.com/?integrationInstance=oic3-partners-bots4saas-yu__;!!N8Xdb1VRTUMlZeI!iKe6knNXh2u9_9i5pqq8lkQHtL53p8Q3Dvr7sazYsfTRMs8VCH3DKmMQezUh4D7LC28ll19tZ6eA3D3hEVjoCeNB$
STEP 2: Log in to Oracle Cloud Gen3 and sign in with Credentials

STEP 3: Click on the 3 Lines as shown in the below image

STEP 4: Navigate and click on Design

STEP 5: Navigate to Connections and then click on Create Integration

STEP 6: Now we have to create a connection for Rest API

STEP 7: We have to provide the name, identifier and role and click on Create as shown in the below image

STEP 8: Select Basic Authentication from the security policy dropdown and select Access type as public gateway and click on Test. After Test validates click on save.

STEP 9: Navigate to the design page again as shown below

STEP 10: Click on integration and then click on create

STEP 11: Create integration and select the integration pattern as Application

STEP 12: Provide the details like Name, Identifier, and Version and then click on Create.

STEP 13: After clicking on Create the following page will open like below

Step 14: Click on the start (+) sign and select the connector name that you have provided in Step 7.

STEP 15: Provide the details shown in the below image.

STEP 16: Provide the endpoint URI and action as ‘GET’ as shown below and then follow STEP 17
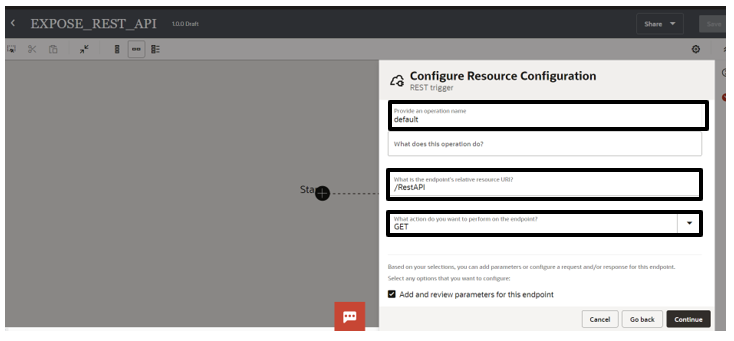
STEP 17: Check the box for “Add and review parameters for this endpoint” and “Configure this endpoint to receive this response” and click continue.

STEP 18: Click on Add under Specific Query Parameters and provide the value for ‘Name’ as ‘Username’ and ‘Data Type’ as ‘String’ and click on continue

STEP 19: Select the response payload format as ‘JSON Sample’ and select inline to provide the payload as shown in the next step.

STEP 20: Provide the payload as shown below and click on continue

STEP 21: Click on Finish

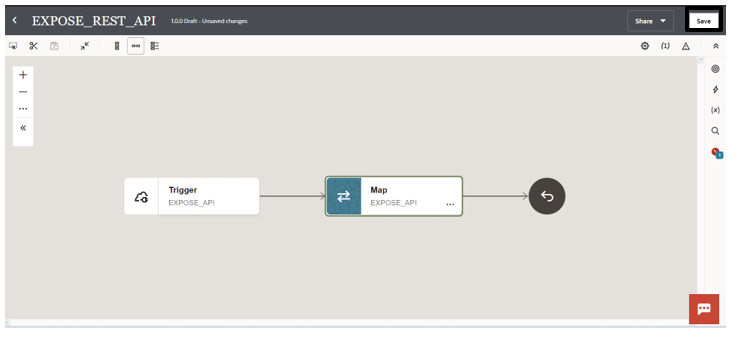
STEP 22: The Following page will open with Trigger Rest connection and Map. Then click on Map Shape to configure

STEP 23: Map the following ‘Username’ from Source to ‘Result’ in Target as shown below and click on validate to test the Map.

STEP 24: Click on save in the Top Right Corner to save the process
STEP 25: Click on Business Identifier on the Right Side as shown below and click on errors

STEP 26: Click on (I) as shown in the below image

STEP 27: Click on QueryParameter and select ‘Username’ and drag and drop in the field as shown below

STEP 28: Click on Save To save the process and Business identifier

STEP 29: Find your integration process from the list and select the activate option as shown below to activate the process for testing.

STEP 30: To activate the integration we need to select the environment or tracing level. For this process, we are selecting ‘Audit’ as the Tracing level and click on Activate

STEP 31: Click on the refresh to activate the process completely.

STEP 32: Click on the dropdown and click on Run

STEP 33: The test page dialog box will open provide the value for the ‘Username’ Query parameter and click on Run
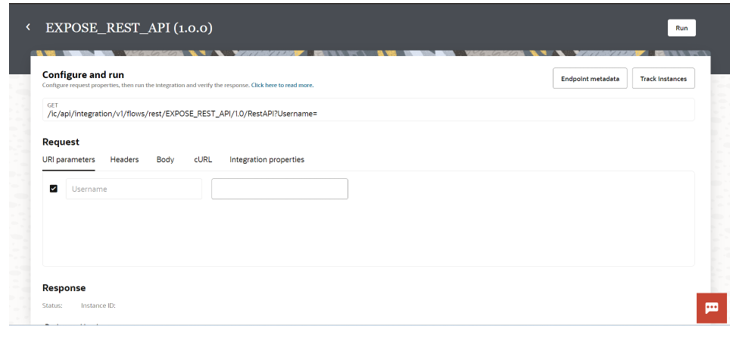
STEP 34: You can see the result with Status and instance ID
