

ATP Database In OIC
What is the ATP Database?
Oracle Autonomous Transaction Processing is a fully automated database service optimized to run transactional, analytical, and batch workloads concurrently.
STEP 1: Navigate to the OIC login page using following URL https://urldefense.com/v3/__https://design.integration.ca-montreal-1.ocp.oraclecloud.com/?integrationInstance=oic3-partners-bots4saas-yu__;!!N8Xdb1VRTUMlZeI!iKe6knNXh2u9_9i5pqq8lkQHtL53p8Q3Dvr7sazYsfTRMs8VCH3DKmMQezUh4D7LC28ll19tZ6eA3D3hEVjoCeNB$
STEP 2: Log in to Oracle Cloud Gen3 and sign in with Credentials

STEP 3: Click on the Hamburger icon as shown in the below image

STEP 4: Navigate and click on Design

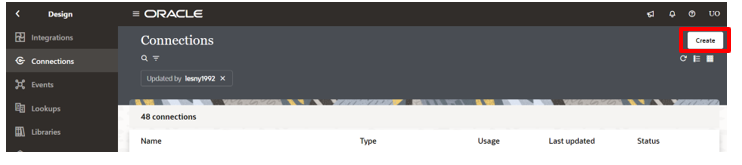
STEP 5: Navigate to Connections and click on ‘Create’
STEP 6: Once the Create connection dialog box opens search for ‘Oracle ATP’ and select it

STEP 7: Fill in the details as shown below and select the action as ‘Tigger and invoke’

STEP 8: Provide the following credentials as shown below

STEP 9: Navigate to ‘Optional properties’ and provide the ‘Service Name’ and click on Save

STEP 10: Click on ‘Test’ to test the configuration and again click on ‘Save’

STEP 11: Again navigate to ‘Connections’ and click on ‘Create’

STEP 12: Select REST Connector by clicking on Create connection

STEP 13: Provide the details as shown below

Step 14: Provide the details as shown below

STEP 15: Select the security policy as “Basic Authentication” and click on ‘Test’ followed by ‘Save’

STEP 16: Navigate to Integrations

STEP 17: Click on “Create” to create a new process

STEP 18: Select “Application” to create an integration

STEP 19: Provide the following details as shown below

STEP 20: A page like below will open for creating processes

STEP 21: Select the Rest Connector shown below

STEP 22: Provide the following details as shown below image and select the HTTP method as ‘Get’ and provide the resource URL

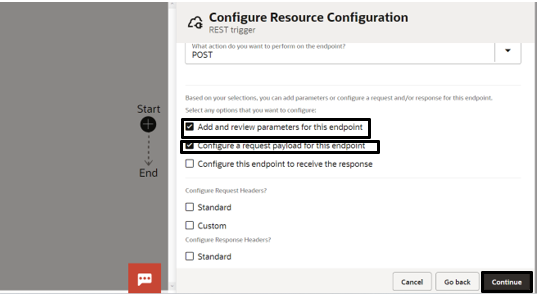
STEP 23: Select the 2 checkboxes as shown below to add ‘Query Parameter’ and to add ‘Response Profile’ respectively

STEP 24: Add the ‘Query Parameter’ and click on continue as shown below

STEP 25: Select the response payload format as ‘JSON Sample’

STEP 26: Click on ‘Inline’ to provide the response sample profile

STEP 27: Provide the response profile in below format and click on continue

STEP 28: Select the media-type of Response Body as JSON

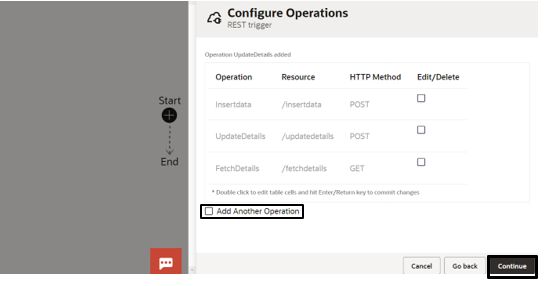
STEP 29: Click on the checkbox for “Add Another Operation” and click on Continue

STEP 30: Provide the details as shown below

STEP 31: Select the checkbox shown in the below image

STEP 32: Select the requested profile as ‘JSON Sample’ and click on Continue

STEP 33: Select the checkbox “Add Another Operation” and click on Continue

STEP 34: Provide the details below. Select the action as ‘POST’ and click on continue

STEP 35: Select the 2 checkboxes like shown below to receive ‘Query Parameter’ and ‘Request Payload’ and click continue
STEP 36: Add the query parameter ‘Id’ and select the Data Type as ‘String’ and click on Continue

STEP 37: Select the request payload as JSON Sample and click on ‘Inline’

STEP 38: Provide the requested profile shown below and click on Continue

STEP 39: Select the Request Body as JSON and click on Continue

STEP 40: Select the checkbox “Add Another Operation” and click on Continue
STEP 41: Provide the following details as shown in below image and select the action as ‘POST’

STEP 42: Select the checkbox to receive the query parameter and click on continue

STEP 43: Click on ‘ADD’ to add ‘Query Parameter’ like the below image select ‘Data Type’ as ‘String’ and click on continue

STEP 44: Click on Continue

STEP 45: Click on Finish

STEP 46: The following page will open like below

STEP 47: Click on the (+) sign like shown below and select ‘ATP Invoke’

STEP 48: Provide the details like the below image and select the operation as ‘Update’ and select ‘Perform an Operation On a Table’ and click on Continue

STEP 49: Select the ‘Schema’, ‘Table Name’, and ‘Table Type’ according to your Database and click on ‘Search’

STEP 50: Table Names will appear as shown below image and click on the ‘>’ arrow

STEP 51: The selected table will be selected and moved to the next column and click on ‘Import Tables’

STEP 52: Select the Primary Key as ‘ID’ and click on Continue

STEP 53: Click on Continue

STEP 54: Click on Finish

STEP 55: The following page will open like below and select the ‘Map’

STEP 56: Open the ‘Map’ Shape and map the following like shown below and click on ‘Validate’

STEP 57: The following page will open like below

STEP 58: Click on the Trackable Field and click on (I) and add the trackable field like shown below and click on ‘Save’

STEP 59: Click on the (+) sign like shown below and select ‘ATP Invoke’
STEP 60: Provide the details like the below image and select the operation as ‘Insert’ and select ‘Perform an Operation On a Table’ and click on Continue

STEP 61: Select the ‘Schema’, ‘Table Name’, and ‘Table Type’ according to your Database and click on ‘Search’

STEP 62: Table Names will appear as shown in below image and click on the ‘>’ arrow

STEP 63: The selected table will be selected and moved to the next column and click on ‘Import Tables’

STEP 64: Select the Primary Key as ‘ID’ and click on Continue

STEP 65: Click on Continue

STEP 66: Click on Finish

STEP 67: The following page will open like below and select the ‘Map’ and click on ‘Edit’

STEP 68: Map the following like shown below and click on ‘Validate’

STEP 69: Click on the Business Identifiers and click on (I)

STEP 70: Add the trackable field like shown below and click on ‘Save’

STEP 71: Click on the (+) sign like shown below and select ‘ATP Invoke’

STEP 72: Provide the details like the below image and select the operation as ‘Update’ and select ‘Perform an Operation on a Table’ and click on Continue

STEP 73: Select the ‘Schema’, ‘Table Name’, and ‘Table Type’ according to your Database and click on ‘Search’

STEP 74: Table Names will appear as shown in below image and click on the ‘>’ arrow

STEP 75: The selected table will be selected and moved to the next column and click on ‘Import Tables’

STEP 76: Select the Primary Key as ‘ID’ and click on Continue

STEP 77: Click on Continue

STEP 78: Click on Finish

STEP 79: The following page will open like below and select the ‘Map’

STEP 80: Open the ‘Map’ Shape and map the following like shown below and click on ‘Validate’

STEP 81: The following page will open like below

STEP 82: Click on the Trackable Field and click on (I) and add the trackable field like shown below and click on ‘Save’

STEP 83: Click on the (+) sign like shown below and select ‘ATP Invoke’

STEP 84: Provide the details like the below image and select the operation as ‘Select’ and select ‘Perform an Operation On a Table’ and click on Continue

STEP 85: Select the ‘Schema’, ‘Table Name’, and ‘Table Type’ according to your Database and click on ‘Search’

STEP 86: Table Names will appear as shown in below image and click on the ‘>’ arrow

STEP 87: The selected table will be selected and moved to the next column and click on ‘Import Tables’

STEP 88: Select the Primary Key as ‘ID’ and click on Continue

STEP 89: Click on Continue

STEP 90: Click on Finish

STEP 91: The following page will open like below and select the ‘Map’

STEP 92: Open the ‘Map’ Shape and map the following like shown below and click on ‘Validate’

STEP 93: The following page will open like below

STEP 94: Click on the Trackable Field and click on (I) and add the trackable field like shown below and click on ‘Save’

STEP 95: Click on Save and close the integration process

STEP 96: Click on the Activate button shown below to activate the integration process

STEP 97: Select the tracing level as ‘Audit’ and click on ‘Activate’

STEP 98: After Activation click on ‘Run’ to run and test the Process

STEP 99: Select the operation as ‘InsertDetails’ from the dropdown and pass the body like shown below and click on ‘Run’

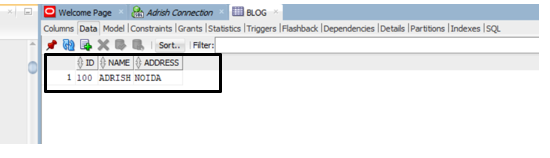
STEP 100: Navigate to Database UI and you can see data inserted successfully in the database
STEP 101:I have added some more data into the database by following the Step 99

STEP 102: Now, select the Operation as ‘UpdateDetails’ from the Operation Dropdown and pass the ‘Query Parameter’ to update the details in the database and also pass the body like the below image

STEP 103: Navigate to DatabaseUI and you can see the field got successfully executed

STEP 104: Now, select the Operation as ‘DeleteDetails’ from the Operation Dropdown and pass the ‘Query Parameter’ and click on ‘Run’

STEP 105: Navigate to DatabaseUI and you can see the field gotsr successfully executed

STEP 106: Now, select the Operation as ‘FetchDetails’ from the Operation Dropdown and pass the ‘Query Parameter’ and click on ‘Run’

STEP 107: You Can see the details according to the respective ID and the following details below
