

Integration with Slack in Boomi
In this blog, we will see how to leverage Slack connector using Web Listener Service in Boomi.
What is Slack?
Slack is a messaging application where team members can communicate and work together more effectively. It allows us to chat in groups, and upload and share files with team members. Slack teams allow communities, groups or teams to join a workspace via the specific URL or invitation sent by a team admin or owner.
In this Use Case, we will configure a listener process which accepts JSON payload and stores it in dynamic document property calls it in a map and sends that data into Slack.
NOTE: Assuming that we have a Slack account and Channel created, we will create the application in Slack from where we get Client ID and Client Secret which is required for establishing a Slack connection in Boomi.
Let us first create the application in Slack.
Step 1: Go to https://api.slack.com/ and click on Your Apps

Step 2: Click on Create New App give a name to the App and select the workspace from the drop-down which we have given while creating the account. Click on Create App


Step 3: Select OAuth and Permissions to set redirect Url and get a Client ID and Client Secret.

- For OAuth 2.0 authentication purposes, we set OAuth 2.0 redirect URI to https://platform.boomi.com/account/<your_Boomi Integration_account_ID>/oauth2/callback.
- Give your Boomi Account ID in place of <your_Boomi Integration_account_ID> in the above URL.
- To get a Boomi Account ID, log into the Boomi Platform. Go to settings and click on User Information.

- Select Account Information on the left and we will find Account ID

Step 4: Now, set the Redirect Uri to https://platform.boomi.com/account/<account ID> /oauth2/callback in the Oauth page by clicking on the add redirect URL. Click on Save URLs.

Step 5: Go to Basic Information to get the client ID and Secret Key.

Step 6: Once we scroll down, we see the client ID and Client Secret which will be used to create a Slack connection in Boomi.

Now that we have the client ID and client secret, we will create the process to integrate Slack Connector in Boomi.
Step 1: Log on to the Boomi platform (https://platform.boomi.com/) with the required credentials i.e. Email Address and Password.

Step 2: Once logged into the Boomi platform, we will be able to view the Home page.

Step 3: Now, click on Services followed by Integration. We will see the Build page. Click on New.


Step 4: Once, click on New, we will be able to see three fields i.e. Type, Component Name and Folder.

- Select Type as process as we are building a process. Component Name and Folder can be given based on your choice (i.e. which name to be given and where do we want to create the process). Click on Create.
Step 5: We see that the process gets created with a start shape which is configured with AS2 Shared Server by default.

Step 6: Select the start shape and choose the type as Connector as we are configuring the Listener Process.

Step 7: Change Connector to Web Services Server Connector and action will be Listen by default. Click + on operation and give it a name.


Step 8: Change Operation Type to CREATE and add the name of the object to slackdemo.

Step 9: Here, the Expected Input Type will be a Single Json Object and we have saved the sample file in the local directory and will upload the file by clicking + on the request profile. Name it and click on import.

Step 10: Choose the file from the local directory.

Step 11: Here, it will be Account.json. Click Next and Finish.

Step 12: We see that the profile has been loaded all the fields got imported.

- The sample JSON file looks like this,


- Click on save and close.
Step 13: Select the expected input type as a single JSON Object and the Response profile will be given in a message body of message shape.

Step 14: Drag and drop the message shape to add the response profile. Add the JSON message as shown in the Message.

Step 15: Drag and drop set properties shape on process canvas to set Dynamic Document property which holds the current data.

Step 16: We will now create dynamic document properties in set properties shape.
- Let us create by selecting the set properties shape and clicking on the + symbol as shown.

- Choose Dynamic Document Property from the drop-down.

- Give the property name as “Text Data” and click ok.

- Now, we have to set parameters for Dynamic Document Property. Select the Dynamic Document property and choose + on parameters.

- We will select Type as current data. Click ok.

Step 17: After setting the property and parameter in the set properties shape, it looks like

Step 18: Drag and drop the slack connector onto the process canvas and configure it.

Step 19: Here we will set the action as send as we are creating the message into Slack. Choose + on connection to create a new one. Select oAuth2.0.

Step 20: Give client ID and Client Secret which we have received after creating the app in Slack.

Step 21: Click on Generate beside the access token

Step 22: Give your Slack workspace and follow the steps which are asked.

- Give email address and password.

- Click on Allow which means that the third-party application can access your app.

- We see that the authentication code is received and the token is generated.


- Close it.

- Click Save and close.
Step 23: Click + on operation and name it. Click on import.

Step 24: Configure the atom and Click on Next.

Step 25: Click on the chat message and click on Next.

Step 26: We see that profiles are imported. Click on finish, save and close.

Step 27: Drag and drop the Map shape onto the process canvas. Click + on the map to create one as shown below.

- Name the map and add the profiles by selecting the choose button on both sides. The left side will be the source profile and the right side will be the destination profile.

- Now, let us add the profiles. First, we will add the profile at the source side which we have added in Listener Operation.

- Select Profile Type as JSON and choose the profile.

- We see that the JSON profile has been added to the map on the source side.
Step 28: Now, we will add the profile at the destination side. In this use case, it would be the Slack Message Chat Request profile which we have imported into Slack. Click on Choose on the right-hand side of the map.

- Choose Profile Type as JSON and select the profile. Click ok.

Step 29: We see that the Slack request profile has been added to the map on the Destination side.

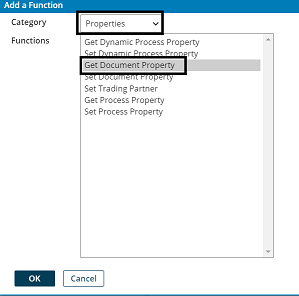
- Now, we will get dynamic document property from functions to get current data and it goes as a body to the attachment. Click +on Functions.

- We can see a few categories in Function i.e. String, Numeric, Date, Look up and so on. Here, we will select Category as properties and function as Get Document Property. Click ok.

- Choose Dynamic Document Property from the drop-down as shown.

- Here, the Property Type would be Dynamic Document Property and the Property Name would be Text Data which we have set in Set Properties shape. Click ok.

Step 30: We see that we can retrieve the Dynamic document Property in the map. Now, set the property to text as shown in the screenshot.

Step 31: Now, we have to set a default value for the channel. we have already created a channel as practice while creating the account. Click on the channel and set a default value.

- Add value as a practice


Step 32: Drag and drop the return document shape onto the process canvas to return the response which comes from the message body.

Step 33: Arrange all the shapes in an order and deploy the process. Click on Create Packaged Component.

- The process gets selected automatically. Click Add Details.

![]()
- Next, select the version and write notes if you have any. Click on Create Packaged Component.


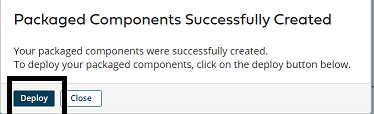
- Now, we see that the package has been created successfully and click on deploy.
- We will then have to select the environment. Choose production and click select version and review.


![]()
![]()
- We will be asked to cross-check the environment which we have configured in the deployment tab.

- Once, we click on deploy we will be able to see that deployment is done successfully. Close it.

Step 34. Go to Manage > Atom management Click on the atom to which we have deployed the process and choose shared web server. Then, copy the URL and append it with the rest path which we have configured in the operation

Step 35: Go to the Build page click on Slack Listener Operation and copy the rest path.

Step 36: Append Base URI with simple URI Path which indeed looks like,
http://192.168.0.103:9090/ws/simple/createSlackdemo
Step 37: Now, test the web service in Postman by giving the following details.
- Give Operation as POST.
- Set the complete URL in the URL Section.
- Get the Authorization Details by navigating to Manage > Atom Management > choose the atom > Shared web server > User Management and get username and token and give it in Authorization.
- In Body, select raw followed by JSON and give the Json request profile which we have added in the listener request profile and add the content
- Click on send.

Step 38: Go to Slack and we see that the JSON file has been sent as a message in the practice channel.
