

Reading from Disk Connector and Sending as Salesforce Attachment in Boomi
In this blog, we will see how to read files from a disk connector and send them as an attachment to Salesforce.
What is Salesforce?
Salesforce is a cloud-based computing service as a software (SaaS) company that specializes in customer relationship management (CRM). The cloud-based service allows companies to track (in real-time) analytics, customer success and support, customer complaints and a variety of other CRM functions with the ease of cloud storage and access wherever the users are.
In this use case, we will read an XML file from the disk location, encode it save it in a document property and send it as an attachment to Salesforce.
Let us begin with the steps.
Step 1: Log on to the Boomi platform (https://platform.boomi.com/) with the required credentials i.e. Email Address and Password.

Step 2: Once logged into the Boomi platform, we will be able to view the Home page.
Step 3: Now, click on Services followed by Integration. We will see the Build page. Click on New.


Step 4: Once, click on New, we will be able to see three fields i.e., Type, Component Name and Folder.

- Select Type as process as we are building a process. Component Name and Folder can be given based on your choice (i.e. which name to be given and where do we want to create the process). Click on Create.
Step 5: We see that the process gets created with a start shape which is configured with AS2 Shared Server by default.

Step 6: Select the start shape and choose No Data. Click ok.

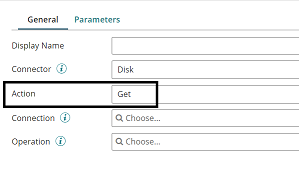
Step 7: Drag and drop the salesforce connector onto the process canvas and configure it.

- We have to configure 3 fields in connector i.e. Action, Connector and Operation.
- We see 2 actions i.e. Get and Send.
Get – To get the data from Salesforce.
Send – To send to the Salesforce.
- Here, we choose action as Send as we are sending data to salesforce.

Step 8: Click on ‘+’ to create a new connection.

Step 9: To set up the connection, we need to follow the below steps.
URL – We will see a default URL of Salesforce. Let us retain it.
USERNAME – Give the user name that was configured at the time of account creation.
PASSWORD — Password will be the combination of account password and token which we receive through mail while creating the account. We are going to append a password and token.
Steps to Generate Token:
- Log into Salesforce via the browser to request the security token.
- Do one of the following:
- If you have a regular Salesforce account, go to Setup > My Personal Information > Reset Security Token.
- If you have a Salesforce developer account, from the home page, go to Manage Users > Users > click your name > Change password > Reset Security Token.
- This triggers an email which contains your security token.

- Click save and close.
Step 10: Click on “+” to create a new operation.

Step 11: Name it and click on the import button to import the required object. Here, it will be Attachment.

Step 12: We need to choose the connection to import objects.

Step 13: After selecting the connection, click on next. If you are using bulk API then select the required version otherwise keep it as none.

Step 14: Choose the object, which you want to import. In this use case, we are going to import the Attachment object and the action will be Created. Click on Next.

Step 15: Select Attachment and click on Next.

Step 16: We see that the Attachment object is imported. Click on Finish.

Step 17: We can see the object name and request profile get imported. Save and close the operation.

Step 18: Drag and drop the disk connector shape onto the process canvas to read a file from a specific directory.

Step 19: We have to configure 3 fields in connector i.e. Action, Connector and Operation.

Get – To get the data from a disk location.
Send – To send to the disk location.
- Here, we will choose action as GET as we are reading the file.
- Click + on connection to create a new one.

- Name the file and give the directory from where we want to read the file. Here, we are reading the XML file from the D drive and BoomiExamples folder as shown in the screenshot.


- Click save and close
- Now, we will configure the operation. Click + on operation to create a new one.

- Name the operation and configure the following.

- File Filter: Read-only files with a file name that matches the file filter. Here, it will be emp.xml.

File Matching Type:
- Wildcards uses simple file filters like * and ?. * represents multiple characters and ? represents a single character.
- Regular Expressions can include complex regular expressions.
- Exact Match includes the filename that we are reading.

- Here, the file matching type would be Exact Match as we are giving the file name.

- Maximum files to read: It sets the maximum number of files to be read at one time. Let it be default i.e.
- Delete files after reading: If we want the file to be read and deleted, we can check this option. Here, we are leaving it to default. Click save and close
- The complete disk operation looks like this,

Step 20: Drag and drop the Data Process shape onto the process canvas to encode the data coming from the disk connector.

- Select the shape and click on the + button as shown below.

- Select Process Type as Base64 Encode from the dropdown and click ok.

Step 21: Drag and drop set properties shape onto the process canvas to set the encoded data into dynamic document property as current data.

- Select the shape and click + to set the dynamic document property.

- Choose the Dynamic Document property from the drop-down.

- Here, the Property Type will be Dynamic Document Property and the Property Name will be BODY. Click ok.

- Select the property and click + on the parameters side.

- Select Type as Current Data as we are storing the encoded data coming from the disk connector.

- After setting Type as Current Data, it looks like

- Click ok.
- We see that the set properties shape is configured with Dynamic Document Property as BODY and the value will be the current data which is encoded. The Current Data goes in the body of an attachment.

Step 22: Drag and drop the message shape onto the process canvas to give the data which comes from the Disk connector.

- Add the XML data which comes from the disk connector in the message as shown in the screenshot. Give {1} in the message text.

- This is the XML file which we are going to read from the disk connector.
<Request>
<id>1</id>
<name>Timmy</name>
<place>Hyd</place>
</Request>
- Add the above data in the variable section of the message shape. Click on + beside Variables. Select Type as Static and add the data in Static Value. Click ok.

Step 23: Drag and drop the map shape onto the process canvas. Click + on the map to create one as shown below.

- Name the map and add the profiles by selecting the choose button on both sides. The left side will be the source profile and the right side will be the destination profile.

- Now, let us add the profiles. First, we will add the profile at the source side which is XML in this case. Click on Choose.

- Select Profile Type as XML and click on Create a New Profile.

- Name the profile and choose import as shown.

- Choose a file from the directory where we have saved the file.

- We see that the file has been chosen. Click Next.

- The XML profile is loaded. Click on Finish.

- XML profile looks like below. Click save and close.

- We see that the XML profile has been added to the map on the source side.

- Now, we will add the profile at the destination side. In this use case, it would be the XML profile of the attachment object which is imported into salesforce. Click on Choose on the right-hand side of the map.

- Choose Profile Type as XML and elect the XML profile of the attachment object which is imported into salesforce. Click ok.

- We see that the SF Attachment profile has been added to the map on the Destination side.

- Now, we will get dynamic document property from functions to get current data and it goes as a body to the attachment. Click +on Functions.

- We can see a few categories in Function i.e. String, Numeric, Date, Look up and so on. Here, we will select Category as properties and function as Get Document Property. Click ok.


- Choose Dynamic Document Property from the drop-down as shown.

- Here, Property Type would be Dynamic Document Property and Property Name would be BODY which we have set in Set Properties shape. Click ok.

- We see that we are able to retrieve dynamic document Property in map. Now, set the property to body of an attachment as shown in screenshot.

- Now, we have to set values for each field of Attachment Object as default values.
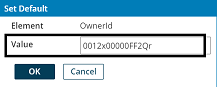
Parent Id: This will be the ID of an account to which the data has to go as an attachment.
To get the ID> Go to Accounts in salesforce > Click on the account to which attachment has to set. On the Url section, we see the ID which is the combination of numbers and alphabets and that would be the ID of an account.

- In this case, we are taking ID of the Account named “Shrimy” and attachment has to set for this account.
- In this case, Parent Id would be the account Id of Shrimy. Click on the arrow beside ParentId to give default value.

- Give the value for ParentId. Click ok.

Name: It should be name of the attached file. Here, it is emp. Click on the arrow as shown above and give the value for name. Click ok.

Is Private: It indicated if this data is viewable only by the owner and administrators (true) or viewable by all otherwise-allowed users (false). Here, It will be False. Click on the arrow as shown above and give the value for Is Private. Click ok.

Content Type: It defines file format of the attachment. Here, it will be xml. Click on the arrow as shown above and give the value for Content Type. Click ok.

Owner Id: It is ID of the User who owns the attachment. Here, it the ID of Shrimy Account as shown in the above example. Click on the arrow as shown above and give the value for Owner Id. Click ok.
Description: It is the text area and can write any text. Here, it will be “This is an xml Document”. Click on the arrow as shown above and give the value for Description. Click ok. Save and close.

- Here, we have to give ParentId, Name and Body values in the parameters tab as these are mandatory fields.
Step 24: Select salesforce connector and go to parameters. Click on + as shown.

- Select Input as Parent Id, Type as Profile element, Profile type as Xml, Profile will be the imported SF_Attachment configured in operation and Element will be Parent Id. Click ok.

- Click + as shown above and select Input as Name, Type as Profile element, Profile type as Xml, Profile will be the imported SF_Attachment configured in operation and Element will be Name. Click ok.

- Click + as shown above and select Input as Body, Type as Profile element, Profile type as Xml, Profile will be the imported SF_Attachment configured in operation and Element will be Body. Click ok.

- After configuring all the 3 parameters. It looks like

- Click ok.
Step 25: Drag and drop stop shape to indicate the end of the flow.
![]()
Step 26: Arrange all the shapes in an order.

Process Flow:
- The flow starts with a start shape of no data type.
- Next, we have configured disk connector to read files from specific director.
- Have Placed Data Process shape to encode the data coming from disk (as body in attachment accepts only encoded data)
- We have placed set properties shape to set the encoded data in a dynamic document property named as “BODY” which holds the current data (i.e. encoded data).
- We have configured message shape to hold the data coming from disk connector.
- Have Placed map shape as to set the values in the Attachment profile.
- Have Configured Salesforce Connector to send the data as an attachment to a specific account.
- Finally placed stop shape to indicate the end of the flow.
Step 27: Test the process by clicking on run test and configuring the atom as shown.


Step 28: We see the process has been executed and output has been generated. Click on stop and select view source.

- This is what the Response looks like,

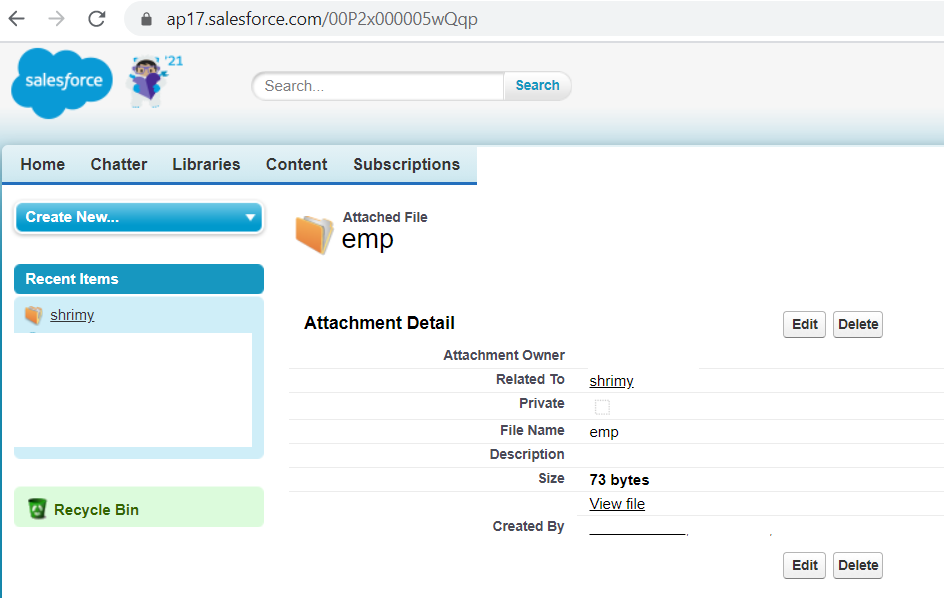
Step 29: We see that an attachment has been set for the account Shrimy.

- To see the details of an attachment, click on Title.
- If we click on view file, file will be downloaded and looks like

