

Routing Headers In API Service Component
API Service Component:
- API Service components are deployable and versioned components used to expose sets of REST, SOAP, or OData API endpoints
- You can build API Service components only you are using an account for which the Service Enablement feature is enabled.
- you can deploy API Service components only to Atoms for which API Type is set to Advanced in the Shared Web Server panel.
- By using API Service components, you can expose different sets of endpoints for use by different customers
- Each defined endpoint has a linked Web Services Server listener process configured to listen for and process requests for a particular operation
- The default settings for an operation specified for an endpoint are derived from the linked process. The defaults can optionally be overridden.
- For a REST endpoint we have routing headers option.
Routing Headers:
When we have two or more REST APIs with same endpoint, the Routing header will help us to route to specific API or webservice (i.e., linked subprocess) based on specified header value.
Steps to expose an API using a web service server connector
Step 1.1: Log onto the Boomi platform (https://platform.boomi.com/) with the required credentials (Email Address and Password).

Step 1.2: Under Services choose Integration

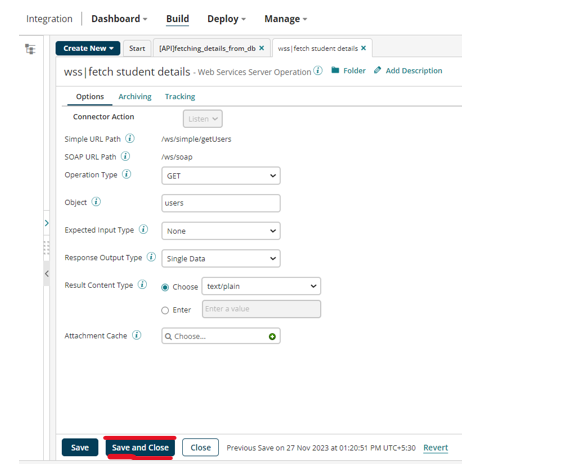
Step 1.3: Create a new process and configure the start shape with the connector choose web services server connector and give a proper name for the process
(ex: [API]fetching_details_from_db)

WKT, connection settings of web services server connector are managed by the runtime engine’s shared web server.
Step 1.4: Configure the operation component as shown below image and click on save

Step 1.5: Now drag and drop a database connector into the process canvas
Step 1.6: Configure Connection Component with Proper Details

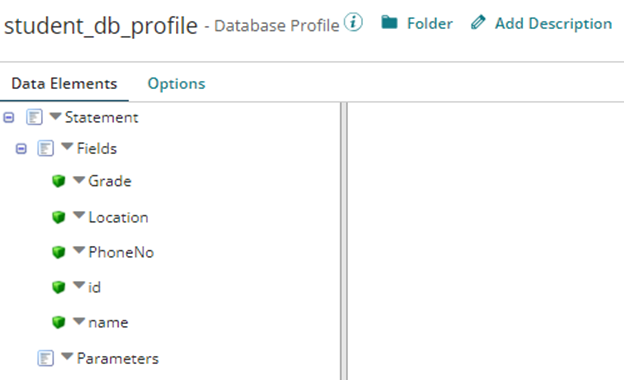
Step 1.7: Choose the action as get configure the operation component and import the database profile into Boomi.

The below image represents a sample database profile which I imported from a database
Step 1.8: Drag and drop a map shape into the process canvas. For the source profile choose the database profile which we configured in the database connector operation component and configure a JSON profile as the target profile.
Mapping Details:
| Source Element | Target Element |
| id | StudentId |
| name | StudentName |
| PhoneNo | PhoneNo |
| Location | Location |
| Grade | Grade |

Step 1.9: Drag and drop a message shape into the process canvas and configure as shown in below image.

Step 1.10: Drag and drop a return document shape and attach it to the message shape.
The complete flow will look as shown below.

Now expose one more API with the same endpoint using the web services server connector by following the below steps.
Step 2.1: Create a new process and configure the start shape with the connector choose the web services server connector and give a proper name for the process
(ex: [API]fetching_details_from_sfdc)

Step 2.2: configure the operation component as shown in below image and click on save
Step 2.3: Now drag and drop a salesforce connector into process canvas
Step 2.4: Configure Connection Component with valid credentials

Step 2.5: Choose the action as get and configure the operation component and import the profile into Boomi.

Now the operation component will look as shown below

Step 2.6: Drag and drop a map shape into the process canvas. For source profile choose the response profile that we imported and configure a flat-file profile as the target profile
Mapping Details:
| Source Element | Target Element |
| Id | id |
| IsDeleted | IsDeleted |
| Name | name |
| LastModifiedDate | modified_date |
| AccountNumber | account_number |

Step 2.7: Drag and drop a data process shape into the process canvas and configure as shown in below image and click on OK.

Step 2.8: Drag and drop a message shape into the process canvas and configure as shown in below image.

Step 2.9: Drag and drop a return document shape and attach it to the message shape.
The complete flow will look as shown below.

Till now we have created two APIs with same simple URL path (refer step2.2 and step1.4 and see simple URL path)
Configuring API Service Component:
Now expose the above APIs using API Service Component by following the below steps.
Step 3.1: Create an API Service Component and configure the details under General tab as shown below.

Step 3.2: Now click on import an endpoint

Step3.3: select Use an existing process and click on Next

Step 3.4: Choose the process ([API]fetching_details_from_db) that we have configured earlier check REST checkbox and click on Finish.

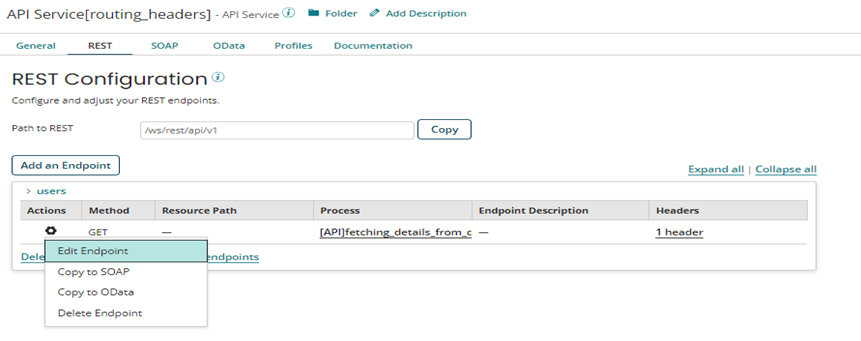
Step 3.5: Go tothe REST tab. We can see the endpoint that got imported. Click on the gear icon and click on Edit Endpoint.
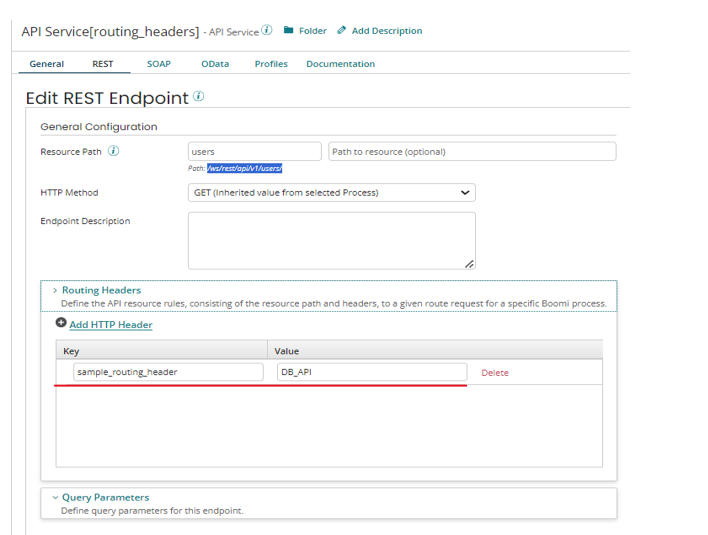
Step3.6: Copy the resource path and paste it in a notepad. Click on Add HTTP Header and configure as shown below and click on ok.
Step 3.7: Repeat the steps 3.2-3.6 to import another endpoint. [Note: choose process [API]fetching_details_from_sfdc in step3.4 and configure a different value i.e., SFDC_API for sample_routing_header in step3.6.

Step3.8: Now the API Service Component will look as shown below.

- Now create a packaged component of API Service Component (API Service[routing_headers]) and the processes ([API]fetching_details_from_sfdc, [API]fetching_details_from_db) and deploy to your environment.
- Go to Manage-Atom Management. Choose the atom that is attached to your environment. Go to the Shared Web Server panel and configure the API Type as Advanced and Authentication Type as None and copy the Base URL. Click on save to make the changes come into effect.

- Prepend the Base URL to the resource path which we copied in notepad in step3.6.
- Now endpoint of the two resources is the same with different values for the routing header as shown below
http://LAPTOP-SSDEQISD:9091/ws/rest/api/v1/users/
| Routing Header | Value | Process Attached |
| sample_routing_header | DB_API | [API]fetching_details_from_db |
| sample_routing_header | SFDC_API | [API]fetching_details_from_sfdc |
(Note: Base URL might change depending on server where the APIs are hosted)
- Now test the resources using testing tool like Postman.
Steps to Test in Postman:
(1) Create a new collection. Within that create new request
(2) paste the endpoint (http://LAPTOP-SSDEQISD:9091/ws/rest/api/v1/users/)
(3) Go to Headers tab and add the header and configure the name as sample_routing_header
Scenario1: For the sample_routing_header assign the value as DB_API
(4) click on send

From the response it’s concluded that the request is automatically routed to the webservice [API]fetching_details_from_db
Now modify the value of sample_routing_header to SFDC_API and click on send

From the response, we can see that the request is automatically routed to the web service [API]fetching_details_from_sfdc
Conclusion:
Whenever we have multiple resources with the same endpoint routing headers are used to route to specific resources based on specified header value.
References:
- https://platform.boomi.com/
- https://help.boomi.com/
- https://help.boomi.com/docs/Atomsphere/API%20Management/Topics/int-API_Service_components_8f868bda-5099-4e1f-ad16-5648f98b68b2
- https://help.boomi.com/docs/Atomsphere/API%20Management/Topics/t-atm-Configuring_a_REST_route_in_an_API_component_c61c0d7e-ecc9-47c3-8fc9-452c8ffc62aa
- https://help.boomi.com/docs/Atomsphere/API%20Management/Topics/r-atm-API_REST_tab_53469a70-6574-486b-a6cf-58fc147546fc