
Developer Portal
What is a Developer Portal?
- The API Developer Portal is where developers explore and subscribe to published APIs, even if they aren’t Boomi platform users.
- As organizations look to extend the reach of their businesses, they require a mechanism to interact with a broader population of users.
- The Developer Portal provides a means of engagement with developers who may be internal or external to your organization.
- The hosting of a Developer Portal is on an API Gateway. There is a 1-1 correlation of the Developer Portal to API Gateway.
- The URL used for interaction with the Developer Portal is configured on the API Gateway. By default, the Developer Portal uses port 18077.
- Users must be authenticated in order to access the Developer Portal.
- Developer Portal users often do not have Atmosphere accounts, so they are authenticated using an authentication source defined in the Developer Portal Settings tab of the Gateway.
- Users signed in to the Developer Portal are able to register their applications, review available services, and request access to specific APIs in order to use them as part of
their application.
What are the Benefits of Using the Developer Portal?
Using the Developer Portal allows users to access published APIs and has a number of benefits.
1. Engagement:
Your developer community can browse the API Catalog to:
- Find available APIs
- Subscribe to available APIs
- Use an embedded swagger UI to explore and test API.
2. Self-Service:
- The developer portal allows developers to register their applications and send subscription requests
- After their requests are approved and configured from within Atmosphere developers can retrieve their Api keys for subscribed APIs from the portal and can generate a new key if necessary.
3. Control:
- The authentication source you define controls access to the developer portal.
- Only those APIs published to an environment that is attached to gateway will be available in the API Catalog.
Preconfiguration before creating a developer portal:
- Install the Gateway in your machine
- Attach an environment to the gateway. Deploy some APIs. (Here I’m deploying only two APIs Employee API & Token API
- Employee API is an Api having one endpoint. It is used to retrieve employee data from database based on Uri parameter (empid)
- Token API is used to generate an access token
Request profile-JSON {“ClientID”: “value”, “client secret”: “value”} Response Profile-JSON {“Access Token”: “Value”}
Both the Api’s are authenticated using Basic authentication source and Api Key.
- Create a basic authentication source (later we can use this same authentication source to authenticate both the APIs & developer portal)
How to configure basic authentication source:
S1: Log onto the Boomi platform (https://platform.boomi.com/) with the required credentials (Email Address and Password).

S2: Go to API Management

S3: Click on Configure Server 🡺 Authentication

S4: click on the new authentication source

S5: Configure authentication source name & select Identity provider type as Basic authentication (Gateway). Click on ok

S6: Now we have to configure users, groups, roles.
- Roles are the group of users who serve a specific function (ex: Administrator, General)
- Groups are used to organize the users
- Users are the actual entities or people who will make requests to the Api

S7: To configure roles, go to Roles tab 🡺click on Add Role 🡺 configure role name as Administrator then click on save.
Repeat the same to configure one more role as General

S8: The changes will look as shown below

S9: Now configure Groups. Go to Groups tab 🡺 click on Add Group🡺 Configure Group name as Developer 🡺 next

Now check the checkbox and then click on next 🡺finish

S10: Now configure Users. Go to Users tab. Click on Add user. Configure the fields and click on next

Check the check box and click on next and then finish.
Repeat the same to add another user with username as Harry and password Harry@123. S11: Now the complete authentication source will look as shown below. Click on save .

How to Configure Developer Portal in Boomi
Step 1: Log onto the Boomi platform (https://platform.boomi.com/) with the required credentials (Email Address and Password).

Step 2: Go to API Management

Step 3: Go to Configure Server 🡺 gateways

Step 4: Search for your gateway and click on the hyperlink

Step 5: Go to Developer Portal settings Do the following configurations (i)Enable the portal status
- configure the public URL as http://localhost:18077
- Enable Http security headers
- Specify the appropriate Authentication Source for the Developer portal.
[select Basic AUTH (Developer Portal) which we have created previously]
- select the roles you want give access
- click on save


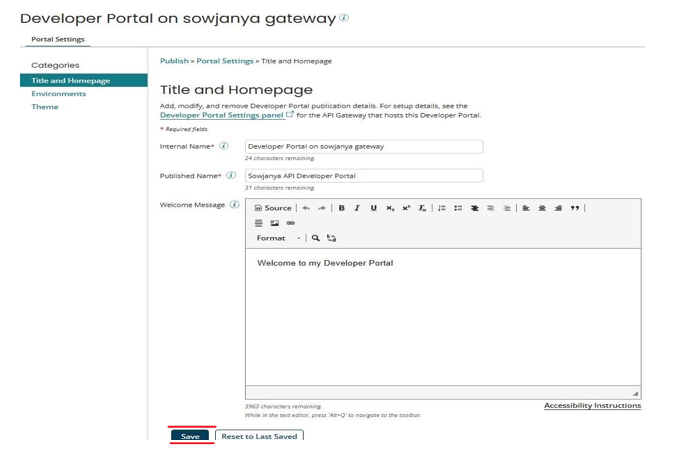
Step 6: Navigate to the Publish page and select your Developer Portal from list.

Step 7: From the Title and Homepage category, enter an Internal Name, Published Name, and Welcome Message for your Developer Portal and click on save.
Step 8: From the Theme category, specify the theme colours and site logo with alternative text for your Developer Portal. Click Preview Before Saving and then Click Publish.

Configuration of the Developer Portal is completed by following steps 1-8. Now it’s time to make the developer portal available to the users.
Step 9: Send your Developer Portal URL to your Developer Portal users so that they can sign in and begin working with your APIs.
Step 10: To get the developer portal URL go back to developer portal settings and copy the public URL which we have configured in step 5.

Step 11: Now assume yourself as a developer portal user open a new tab in the browser and paste the public URL . The portal will look as shown in the below image.

Step 12: Sign in with username and password (which we have configured while creating basic authentication source refer to Basic Authentication Source Configuration). The portal will look as shown below.


Step 13: By default, we will be in the API Catalog. In the API Catalog we can find all the APIs that were deployed to an environment that is attached to the gateway.
Here you can find only 2 APIs since I have deployed only Employee API and Token API to my gateway.
Step 14: Before subscribing to any API, it is mandatory to create an application.
Step 15: Go to the Applications tab and click on Register an application.

Step 15: Click on the API for which you want to get a subscription and click on the subscribe button. Choose the Application from the dropdown and click on subscribe.

Step 16: Go to the subscriptions tab and expand your application .You can see the status as pending for Employee API.

Step 17: Now acting as Api provider, go to Boomi Atmosphere API Management to approve the request. In the Approve tab we can see all the subscription requests.
Click on Approve and search for your gateway. You can see the status as pending.

Step 18: Click on the pending Approval link and click on Accept.

Step 19: Select a Plan from the dropdown and configure enable and disable dates. Click on approve.
(Here plan is a collection of policies which is used to set limits around the usage of an Api including maximum message size, rate limit and quota limit)

Step 20: Go back to developer portal. Click on subscriptions tab. Expand the application which you have created in Step 15. We can see status as Enabled.

Step 21: Click on the Employee API hyperlink. Copy the Api key and paste it in a notepad and click on save.

Step 22: Go to API Catalog tab and click on Employee API. Then click on REST We can see the new window will look as shown below.

Step 23: Now we can test the Api in developer portal or we can use testing tool like postman
![]() Step 24:
Step 24:
In order to test in developer portal, click on Authorize and paste the Api-key which you copied in Step 21. Enter Username and password. Click on authorize and then x symbol.
(Here for Employee API also we are using the same authentication source which we have configured previously to authenticate the users of developer portal)

Step 24: Expand the operation.

Step 25: Click on Try it out and pass the EmpId. Now click on Execute bar.


Step 26: we can see the response with status code as 200.

Step 27: To test in postman
Copy Base URL path and resource path. Concatenate to form . the complete endpoint
http://localhost:8077/ws/rest/apis/emp/v1/employees/ {EmpId}

Step 28: Open postman app. Paste the endpoint and give value for Uri parameter (ex:101). Create a custom header as x-api-key and give the value (api-key) which we copied in step 21.

Step 29: click on Authorization. Choose Type as Basic auth and give the valid username & password.

Step 30: Now click on send. We can see the response with status code as 200 OK

Step 31: To get the swagger specification file of this API
Copy the Open API Reference (see step 22) & paste it in postman.
Configure the Authorization and Headers tab as mentioned in step 28 & Step 29.

Click on send. We can see the Specification file which is generated. Click on save response to file to save.
References:
- https://help.boomi.com/
- https://help.boomi.com/docs/Atomsphere/API%20Management/Topics/c-api- Getting_Started_f06ad982-c0d9-4c67-ab0f-7a19db534868
- https://help.boomi.com/docs/Atomsphere/API%20Management/Topics/api- Developer_Portal_8d00d936-4358-41f5-94eb-0b950d892e74