

Seamless Integration with Salesforce Bulk API v2 With MuleSoft: A Complete Guide
Pre-requisites
- We need to have an Anypoint Studio should be set up.
- We need to have a Salesforce developer account.
- Create a Salesforce custom object with some fields, as per the requirement.
- Click on Create in the home section, which is on the right-hand side. Then click on a custom object, then fill in the name of the custom object. Then click on fields and relationship, then select the fields with the respective type of information.

- In this scenario, we’ll be having 3 fields i.e. Id c, Name c, and chassis__c fields are having text as the type of information.

- We need to keep the security token handy for that, click on profile and then click on setting which is on the right-hand top corner of the screen type security token in the quick find section, and click on reset security token.
- The security token will be sent to the registered mail ID.
Salesforce Bulk API v2
- Salesforce Bulk API is a REST-based API optimized for processing large volumes of data asynchronously.
- It is designed to efficiently handle operations like insert, update, upsert, delete, and query for huge amounts of records.
- Characteristics:
1. High Performance:
Processes large datasets in chunks, reducing the impact on server resources and improving efficiency.
2. Asynchronous Processing:
Operations are processed in the background, freeing up client applications for other tasks.
3. Supports CSV:
Both the v1 and v2 of Salesforce Bulk APIs support CSV format records.
- Each organization is only able to handle a certain number of API requests within 24 -hour period.
- There are two versions of bulk API i.e.
1. Salesforce bulk API v1.
It requires you to create batches of records for each job manually, monitor each batch’s status, and handle errors and retries.
2. Salesforce bulk API v2.
It automatically chunks the data for your job into multiple internal batches to improve performance while processing it. Salesforce handles the creation and execution of internal batches, error handling, and retries.
- Salesforce Bulk API v2 has some key features:
- The connector itself will create the job, and batches, and close it manually.
- It returns the response in which, we get a summary of the records that are getting processed.
- In the response, we’ll get the job ID, using this job ID we can get the status of the job, whether it is completed or in progress and we can retrieve the failed and success records.
- It has 10 automatic retries.
- It has different status which describes the processing of the records:
- Open – In this state, the records are accepted.
- UploadComplete – In this state, the record upload is complete, this status comes after the open status.
- Inprogress – In this state, the record is under process.
- JobComplete – In this state, the job is complete, processing of the records has been completed.
- Failed – In this state, the processing of the record has been failed due to some error.
- Aborted – In this state, the job is aborted and the processing of the recording has been stopped.
- It can process up to 150 MB size file per job.
- It accepts two different line ending support, LF (Unix-style) and CRLF (Windows-style) line endings in CSV files, providing flexibility in data formatting.
- In this blog, we’ll explore how to efficiently insert large volumes of data into Salesforce using the Salesforce Bulk API v2 connector. The process involves reading a specific file and seamlessly inserting a bulk set of records into Salesforce.
- Note: The names of the fields should match those of the fields with those created in Salesforce. For this instance, we have the Id__c , Name__c and chassis__c.
Steps:
- To begin, a new Mule project needs to be created. Then, a HTTP listener component dragged and dropped into the project from the HTTP module. Configure the listener, and set the host to All interface (0.0.0.0), port number as 8081. Set the path as /createRecord.

2. Following the addition of the listener component, include two loggers to mark the beginning and the end of the flow. By logging the message “Start of flow” ++ (flow.name as String), in expression mode.

3. Next, we will read the CSV file using the read component. To achieve this, configure the appropriate reading directory. 
4. Next, drag and drop the “Create Job Bulk API v2” component from the Salesforce module onto the canvas and configure it as demonstrated below. In this example, we are working with the custom object “vehicle_records__c”, and the connector configuration references a secure properties file for enhanced security


SObjects: Records on which, the operation is going to be performed.
Operation: The operation that will be performed.
Line Ending: In the case of Linux/macOS, it will be LF, whereas in the case of Windows, it will be CRLF.
Column Delimiter: The delimiter that separates the column.(comma)
External ID field name: The field name of the external ID.(Id__c)

5. Next, we’ll add a Transform Message component before the Salesforce connector to convert the records into CSV format. This step is essential because, once the records are read, they are transformed into binary format. 
6. Next, we’ll add a Transform Message component immediately after the Salesforce connector to format the response into JSON.

7. The setup is complete. We’ll deploy the application, by passing the environment variables and key for the secure properties.

8. Next, we’ll test it out using Postman and as a response we’ll get a summary of records.

9. Next, we will verify the status of the records on the Salesforce platform. To do this, navigate to the search bar and type “Bulk”. From the results, select Bulk Data Load Jobs and click on the corresponding job we received as a response from Salesforce.

10. We’ll get a detailed summary of the records, including the number of records that failed, the number of records that succeeded, processing time, completed batches, and so on.


11. Next, we’ll retrieve the state of the records currently being processed. To achieve this, we’ll create a new flow. Start by dragging and dropping a Listener component into the flow and configuring it with the same connector settings as before but with a unique resource path. We’ll use “/getStatus” as the resource path for this example. 
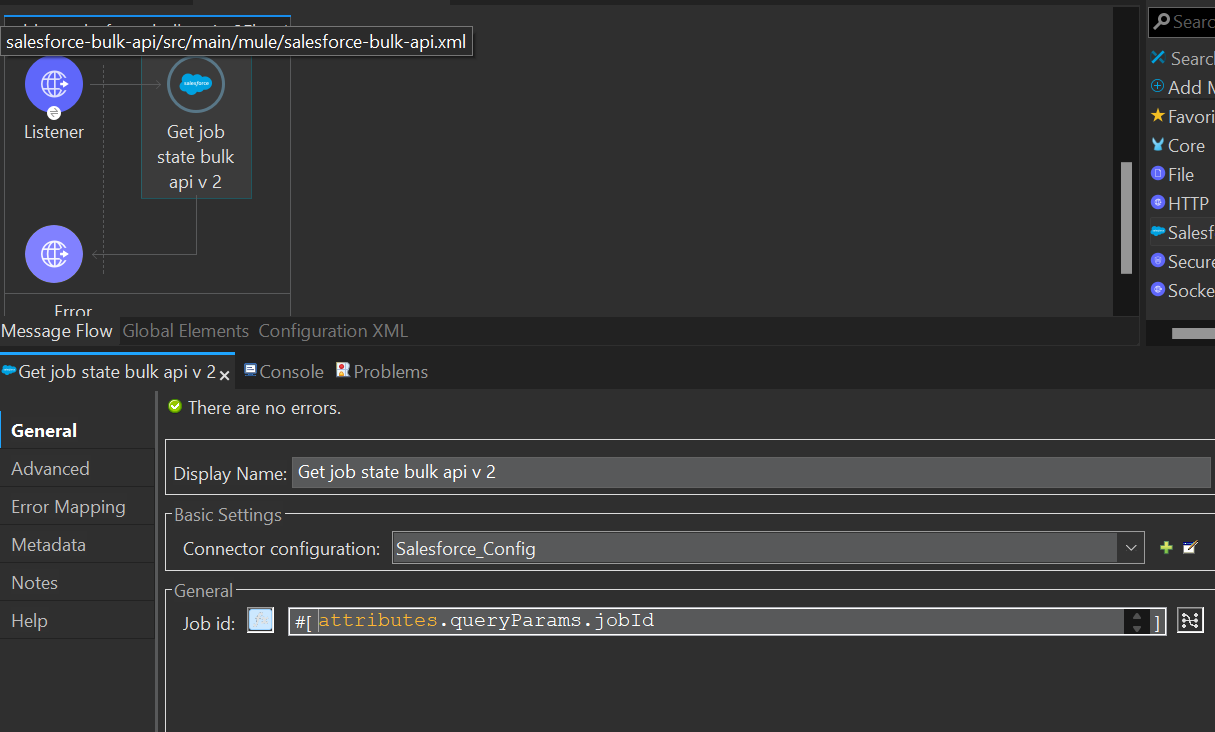
12. Next, we’ll a add the “get job bulk state v2” component. To configure this component, we need to pass the job ID.
13. Then, we’ll add a transform message component for transforming the response into json format.

14. Next, we’ll deploy and test the application using the Postman. Copy the job ID from the createRecord response.
Note: Copy till the 4th last place. 750J1000005lTdqIAE – 750J1000005lTdq

15. Next, we will retrieve both the failed and successful records using the “Retrieve Job Failed Records v2” and “Retrieve Job Successful Records v2” components. To achieve this, we will create separate flows with distinct resource path names, “/failedRecords” and “/successRecords” while reusing the existing connector configuration.

16. In response, the system provides a detailed list of failed records along with the reasons for their failure. For successful operations, the corresponding records are retrieved seamlessly.


