

Custom Ruleset and API Governance
API Governance
- API Governance involves implementing and enforcing standards, best practices, and policies to ensure APIs are secure, compliant, and performant throughout their lifecycle.
- It helps organizations streamline API management and align it with enterprise requirements.
- It applies only to REST APIs, HTTP APIs, and ASYNC APIs published for exchange.
- These rulesets are built on a framework, AMF (Anything modeling framework), and written in a language called AML.
- There are 11 rulesets, provided by MuleSoft and those are as follows:
- API Catalog Information Best Practices.
- API Documentation Best Practices.
- Anypoint Best Practices.
- Async Best Practices.
- Authentication Security Best Practices.
- Datagraph Best Practices.
- HTTPs Enforcement.
- Mule API Management Best Practices.
- OWASP API Security Top 10 2019 Checklist.
- OpenAPI Best Practices.
- Required Examples.
- API governance has 2 profiles and those are:
- Normal. (if the conformance is more than 70%)
- At risk. (if the conformance is less than 70%)
- In this blog, we’ll learn, how we can govern our APIs and how we can create our custom ruleset which can be applied to our APIs.
Steps:
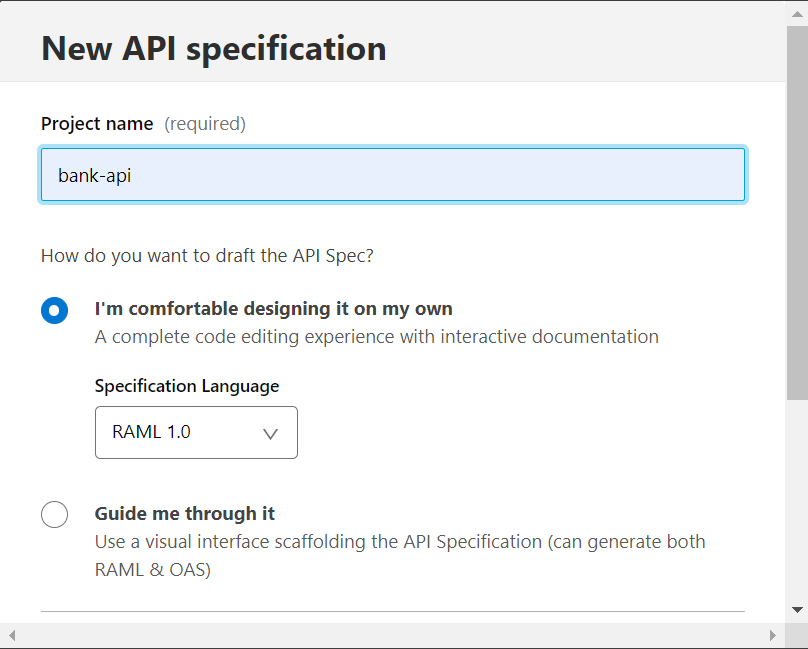
- First, navigate to the Design Center in Anypoint platform and create a new API specification.


2. Next, we’ll write the API specification and publish it to the exchange. Once, published to exchange add a tag.


3. Then, we’ll navigate to the API governance and click on create profile.

4. Then, apply the rulesets. For this instance, we’ll apply the Required Examples and HTTPs Enforcement rulesets.

5. Next, we’ll add the filter criteria type, tag, and categories to filter the API. Then, click on next. For this instance, bank tag has been added.

6. Then, configure the non-conformance notification, by selecting the checkbox. If the notification should be received by multiple recipients then click on the “Others” option and enter the multiple recipients mail ID separated by comma(,). Once, configured click on next.

7. Next, enter the name for the profile and the purpose (optional). Then, click on next.

8. Then, lastly review the configurations and save them as active.

9. Once, done with that. Then, the API governance console will be reflected.

10. An email notification will be sent if the API is at risk.

Let’s see how we can create the custom ruleset:
- First, download the ruleset from the exchange and unzip it.

2. Then, open the ruleset.yaml in a notepad. Copy the code and then change it as per the requirement.

3. For this instance, we are creating the ruleset that will validate two different things:
-
-
- Whether the title of the API contains the layer or not.
- Whether the versioning of API should follow this format: v1.0- v9.9.
-

4. Then, install Anypoint CLI, then the following steps are needed:
-
- Install the node.js and git bash. Then, navigate to the users in C: drive and select the relevant user.
- Create a text file, name it as credentials in the .anypoint named folder, and copy the following code into it.
{
“default”:{
“username”:”6tgh013″,
“organization”:”Techy Geek Hub Software Solutions pvt. Ltd”,
“environment”:”Sandbox”,
“host”:””
},
“otherProfile”:{
“username”:””,
“password”:””,
“organization”:””,
“environment”:””,
“host”:””
}
}
- Fill in the details of the default section and save it.
- Open the Appdata folder🡪 roaming folder🡪npm folder. Then, open the command prompt from that directory. (Note: The AppData folder may be hidden, so may have to unhide from the control panel)

- Next, write the command to connect with your Anypoint platform account.
anypoint-cli -username “your_username”

- After that enter your password, it will take some time to get connected.
- Once, after we need to create a document for the custom ruleset. We’ll run this command to create the document out of the ruleset.
governance document “path_of_ruleset_file” “path_of_document_of_ruleset_file”
Note: the path where the document of the ruleset should be saved with .doc.zip extension.

- Next, create a zip file of the ruleset.yaml and rename it. In this case, the name of the zip file is title_version_rule.zip.

- Everything is ready, we have to publish it to exchange. For publishing, we’ll use the command.
exchange asset uploadv2 –name “name_of_asset” –description “description_about_the asset” –properties.mainFile ruleset.yaml –files.ruleset.zip “path_of_zipped_ruleset.yaml_file” asset_id/asset_version –files.docs.zip “path_of_zipped_document_for_ruleset.yaml”.

- Once, the asset gets published to the exchange, we’ll go to the exchange and verify the documentation of the ruleset.
