

Consume Salesforce API Using the REST Client Connector
Consume Salesforce API Using the REST Client Connector
What is Rest?
- Rest stands for representational state transfer.
An API, or application programming interface, is a set of rules that define how applications or devices can connect to and communicate with each other. A REST API is an API that conforms to the design principles of the REST, or representational state transfer architectural style. For this reason, REST APIs are sometimes referred to as RESTful APIs.
Rest Principles
- Rest APIs are following six REST design principles
- Uniform interface
- Client-server architecture
- Statelessness
- Cacheability
- Layered system architecture
- Code on demand (optional)
Consume Rest API in Boomi
- To consume Rest API, we have 2 connectors in Boomi.
- HTTP Client Connector
- Rest Client Connector
Rest Client Connector
- The REST Client connector provides the flexibility to connect to any RESTful API service, extract the data, and use it in your process. The connector is generic and is not tailored to any specific REST data source. By being generic, the connector provides a standard way to connect to any RESTful API endpoint service and use the information from the service-specific API, rather than requiring the use of a specific branded connector.
To configure a connector to communicate with an HTTP-enabled server, set up two components:
- REST Client connection
- REST Client operation
Now go to the Boomi Atomsphere Platform to start integrating Salesforce with Boomi Using Rest Client Connector.
Step 1 : Go to platform.boomi.com
Use Email Address and Password to log into the Boomi platform

Step 2: Click on Integration

Step 3: Click on Create New

Step 4: Create a Process Component

Step 5: Configure Start Shape with No Data type

Step 6: Search Rest Client in the Shape palette
Drag and drop the Rest Client Connector in the process canvas.

Step 7: Drag and drop the Rest Client Connector
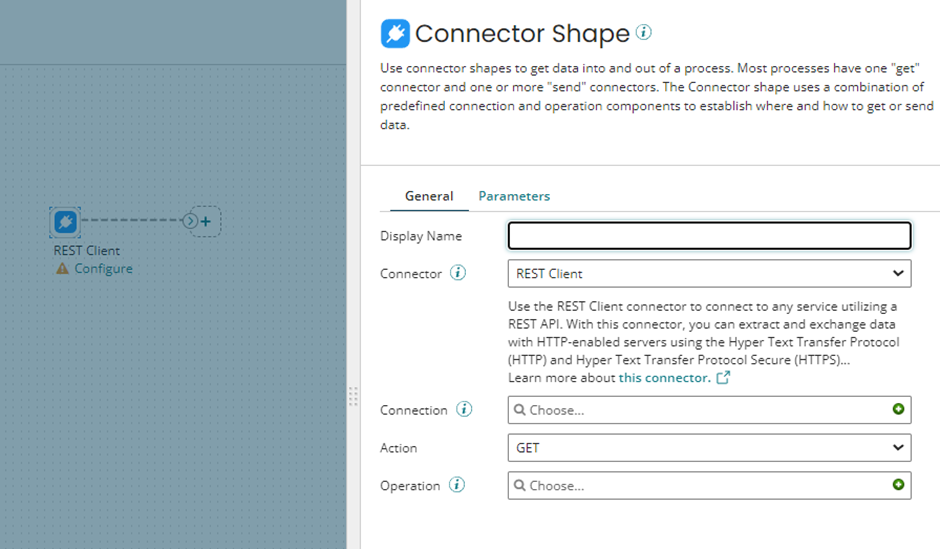

REST Client Connector Actions
GET — Retrieve information about an existing resource from the server.
POST — Request that a web server accept the data enclosed in the body of the request message.
PUT — Replace the resource at the current URL on the server with the resource contained within the request.
DELETE — Delete an existing resource from the server.
HEAD — Retrieve header information about an existing resource from the server, and not the actual resource itself.
OPTIONS — Retrieve information about the communication options available for an existing resource from the server.
PATCH — Update and make partial changes to an existing resource without replacing the original version of the resource.
TRACE — Perform a message loop-back test along the path to the target resource.
Step 8: Create a Connection Component

To establish a connection with Salesforce APIs we need to know about Salesforce
Step 9: Log in to Salesforce https://login.salesforce.com

Step 10: Click Switch to Salesforce Classic

Step 11: Copy the Base URL of Salesforce

Step 12: Paste the Base URL in the Connection Component Base URL box and select the Authentication Type OAuth 2.0

Step 13: Click on the OAuth 2.0 tab

- Connection Timeout
The maximum wait is in milliseconds to establish a connection to a service. A value less than or equal to zero means that the process will wait indefinitely until a connection to the service is made.
- Read Timeout
The maximum wait in milliseconds to return all of the data from a service. A value less than or equal to zero means that the process will wait indefinitely until all of the data has been returned from the service.
- Enable Connection Pooling
If selected, connection pooling is enabled and connections can be reused when future requests are required. Connection pools may increase performance by using resources more efficiently.
- Cookie Scope
- Global — cookies are shared in all processes throughout the Atom JVM life cycle. This is the default.
- Connector Shape — cookies are isolated and shared only for the duration of the Connector Shape execution.
- Ignored — cookies are discarded, even if they are requested by the server.
Step 14: Select the Grant type Resource Owner Credentials

- Grant Type
- Authorization Code — The standard, 3–Legged OAuth2 authorization where you grant the client an authorization code that can be exchanged for an access token.
- Resource Owner Credentials — Requires username and password
- Client Credentials — Uses client credentials to retrieve an access token directly instead of asking for user authorization. This authorization is typically used for administration tasks specific to a client.
Client ID: The client ID is obtained from the application.
Client Secret: The client secret is obtained from the application.
Authorization Token URL (Authorization Code): The endpoint URL to use to obtain an authorization token.
Scope: Add one or more permissions, case-sensitive and separated by a space, to application request URLs. If you change scope permissions, you need to re-authenticate to ensure that all of the requested permissions are granted.
Add Authorization Parameter (Authorization Code): The name and value of extensible endpoint parameters (Optional).
Access Token URL: The endpoint address provided by the application to make API requests.
Add Access Token Parameter: The name and value of additional or custom token parameters required by your application (Optional).
Access Token (Authorization Code, Resource Owner Credentials): The encrypted access token retrieved from the application that is used to access protected resources.
Generate (Authorization Code, Resource Owner Credentials): Click to generate the access and refresh tokens. When a new window opens asking you to confirm offline access, click Accept. A second message indicates the access token was received and successfully generated.
To use Salesforce APIs, we need to generate a Client ID and Client Secret
Step 1 5: Click on Setup to Create a Connected App in Salesforce

Step 1 6: Search Apps in the quick search box

Step 1 7: Create a new Connected App

Step 1 8: Fill the required fields to Configure the Connected App
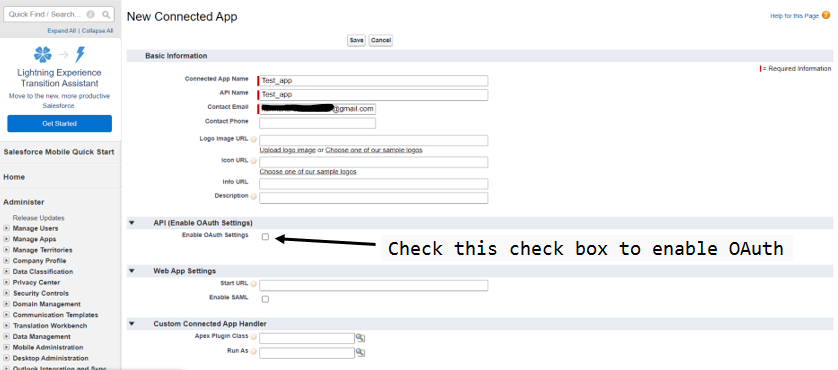
Step 1 9: Give the Callback URL and OAuth Scopes

Step 20: Add the Scope

Step 21 : Click on save

Note: Some time it takes 10 minutes to take effect
Step 22: Click on Manage Customer Details

- Click this Manage Customer Details Button to generate a Client ID and Client secret.
- One mail will be sent by Salesforce with the verification code to the mail ID that we give at the time of configuring the connected app.
Step 23: Give the 4-digit Verification Code and click Verify

Step 24: Copy the Consumer Key and Consumer Secret

- Consumer Key = Client ID
- Consumer Secret = Client Secret
Step 25: Give the Client ID, Client Secret, and Access Token URL

Access Token URL: Base URL + /services/oauth2/token
Step 26: Give Salesforce Username and Password (SFDC Password+token)

If every detail is right then Access Token will get generate

We are able to establish a connection with Salesforce now we need an operation
Step 27: Create an operation and choose the action as POST

Step 28: Give the Resource URL and Content-Type

- First, we need to create a job to get the records from Salesforce. And after this API call, we will get a job ID, we need that ID to fetch records from Salesforce.
Path: services/data/v57.0/jobs/query
We need to add a property to give a Content-Type as application/json. The values are static.
Step 29: Use a Message shape to pass a request file to the API
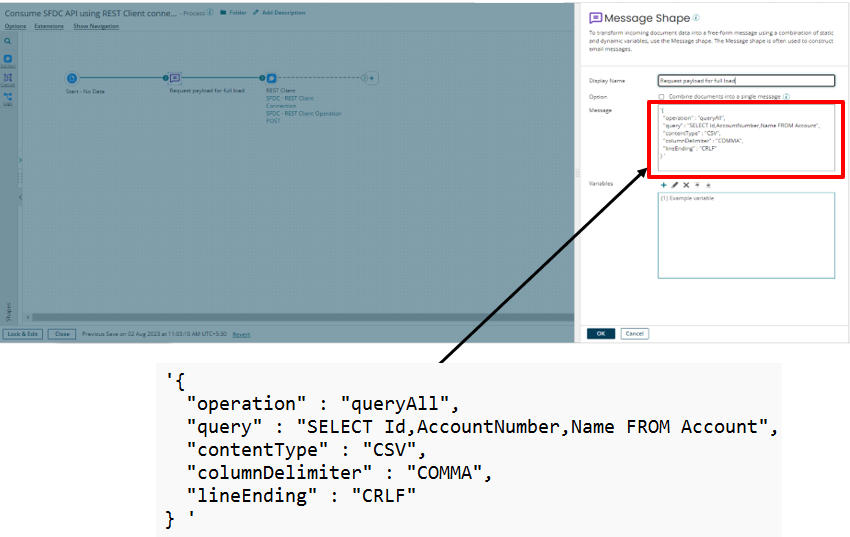
We need ID, Account Number, and Name. If we need more fields, we can mention them in the query.
Step 30: Use a set property shape to capture the job ID from the profile element and store it in a Dynamic Process Property

Step 31: Set a DPP to store the job ID

Step 32: Set the Parameter Value

Step 33: Use a stop shape after the set property shape

Now we need to get the Records from Salesforce
Step 34: Use a branch shape after the start shape

Step 35: Use a Data Process shape to give some delay to our process

Note: The job takes some time to complete so we use delay. If we don’t use delay sometimes the job will not be complete and we won’t get the desired output.
Step 36: Choose the Custom Scripting in Data Process Shape

Step 37: Need to select Inline Script and Language as Groovy 1.5

Step 38: Script

Step 39: Set a Dynamic process property to create the URL to get the records
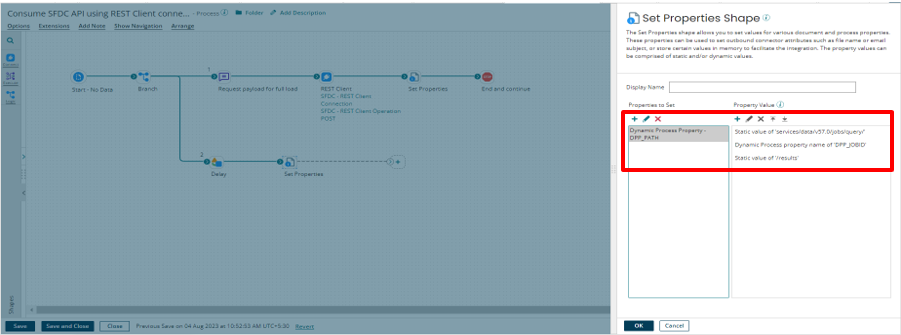
Step 40: Set the DPP

Step 41: Set the Parameter value


Step 42: Drag one Rest Client Connector and set it after the Set Property shape

Step 43: Configure the Operation of the Rest Client Connector and the action should be Get also we need to reuse the Connection

Step 44: Set the path in Dynamic Operation Property

Dynamic Operation Property
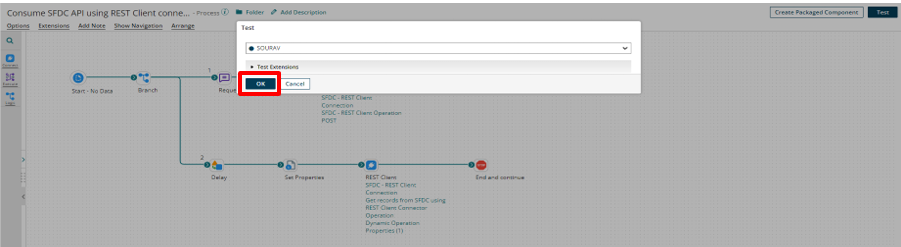
Step 45: Attach a stop shape at the end and click on the test button to test the process

Step 46: Select the Atom and click OK to test the process
Step 47: Go to the stop shape and Shape Source Data and see the response
