

Developing SOAP web service in Boomi
Developing SOAP web service in Boomi
In this blog, we will see how to develop SOAP web service in Boomi.
What is SOAP?
SOAP stands for simple object access protocol which follows SOA i.e., simple object architecture. It provides a way to communicate between applications running on different technologies. SOAP is based on XML. A soap message is an XML document consisting of Envelope, Header, and Body.
- To develop SOAP service in Boomi, we have to configure a connector called as “Web Services Server” connector.
- In this example, we will develop a SOAP web service which takes name as input and will display “Welcome Message” as output.
Now, let us begin with the steps to develop SOAP web service.
Step 1: First, log onto Boomi platform (https://platform.boomi.com/) with required credentials i.e., Email Address and Password.

Step 2: Once, you have logged into Boomi platform, you will be able to view Home page.

Step 3: Now, click on Services followed by Integration. We will see the Build page. Click on New.


Step 4: Once, clicked on New, we will be able to see three fields i.e., Type, Component Name and Folder.

- Select Type as process as we are creating the process to develop web service. Component Name and Folder can be given based on your choice (i.e., which name to be given and where do we want to create the process). Click on create.
Step 5: We see that the process gets created with a start shape which is configured with AS2 Shared Server by default.

Step 6: Now, click on start shape and select the connector as “Web Services Server” connector. There will be only one action i.e., Listen (by default). Select + on operation to create a new one.

Step 7: Give a relevant name to the operation and configure the following.
- Operation Type: We have to choose field based on the operation which we are going to perform. In this case, we are developing a service to display the welcome message. Therefore, Operation would be created.
- Object: It can be given any name based on the operation. Here, we are giving it as Welcome.
- Expected Input Type: We have to choose input based on the profile we want to add i.e. (XML, JSON etc). Here, we are considering Expected Input Type as Single XML Object as request profile is in XML format.

- Request Profile: To choose the request profile, click + and give it a relevant name. Choose import.

- Once, clicked on import we will have to choose input file from the location where file is saved. Click Next and Finish.


![]()
- We see that the request profile is loaded successfully. Click Finish, Save and Close.


Click save and close.

- Welcomereq.xml file looks like
<request>
<name>Tommy</name>
</request>
- Response Output Type: We have to choose the output based on how the data should be represented as response. Here, we are expecting the output to be in XML format. Therefore, we are considering Response Output Type to be as a single XML object as response would be in XML Format.

- Response Profile: To choose the response profile, click + and give it a relevant name. Choose import.

- Once, clicked on import we will have to choose output file from the location where file is saved. Click Next and Finish.


![]()
- We see that the response profile is loaded successfully. Click Finish, Save and Close.


Click save and close.

Post adding Request and Response profiles, the operation looks like

- Welcomeres.xml file looks like
<response>
<message> welcome to SOAP Webservice! Tommy </message>
</response>
- Click save and close.
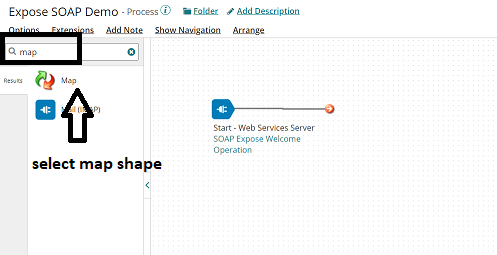
Step 8: We can configure any shape after the web services server connector depending up on the requirement. Here, we are placing map shape after webservices server connector as map shape is loaded with some user defined functions. We choose String Concatenate function as we want to display welcome message before the name.
Now, let us see how to configure map shape.
- Search for map in shape pallet. Drag and drop the Map shape after Webservices Server connector. Select map and click on + and name the map shape as Welcome Map.


- Let us add profiles to the map. Click on choose in map and select profile Type as XML. Select the same request and response profiles which we have configured in Webservices service connector.

- First add the profile on left side i.e., source side profile. Click choose and select the folder in which you created the profile.

- We see that source profile got added to the map. Click ok and save.

- Now, we will add profile on the right side i.e., destination profile. Click on choose and select the folder in which you created the profile.

- We see that destination profile got added to the map. Click ok and save.

- Map looks like as follows after selecting source and destination side profiles.

- To add a function in map, click + on function. Select String as we want string message to be displayed.

- Select String Concat as we want to display the welcome message.

- In delimiter, give single space as we want the gap between two inputs. Add the input names as per the requirement. We are giving input names as input 1 and input 2. Click ok.


- We are adding a default value for input 1 as Welcome to SOAP Webservice! and input 2 will be the name which we are receiving from the request profile. Click ok.

- We will see that function got added to the map.

- Now, provide mapping for name🡪 input 2 and Result🡪 result. Here, the message which we gave in input 1 will be concatenated with input 2 (i.e., name coming from request profile) by giving space (as we have given single space in delimiter) and get the result. Click save and close.

Step 9: Next, we have to place return document shape at the end to send back the response.

Step 10: Now, deploy the process which we have created. To deploy, click on create packaged component.

- To get packaged component created, we will be asked to follow some steps. Once, we click on create package component, the process gets selected automatically. Click Add Details.

![]()
- Next, select the version and write notes if you have any. Click on create packaged component.

- Now, we see that the package has been created successfully. Click on deploy.

- We will then have to select the environment. Choose one and click select version and review.


![]()
![]()
- We will be asked to cross check the environment which we have configured in deployment tab. Check and click on deploy.

![]()
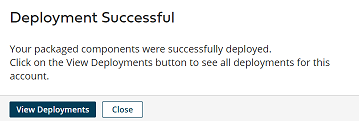
- Once, we click on deploy we will see that deployment is done successfully.
Step 11: Now, close and navigate to build tab and click on manage followed by atom management.

Step 12: Now, select the atom to which process is deployed and click on shared web server. You see the base URL which is highlighted in the below box and is responsible for establishing the connectivity for the webservice which we develop. Copy the base URL.

Step 13: Now, go to build page and select webservices server connector. Click on edit symbol of the operation.

Step 14: Copy the SOAP URL path.

Now, we have to append base URL with soap path.

Complete URL looks like:

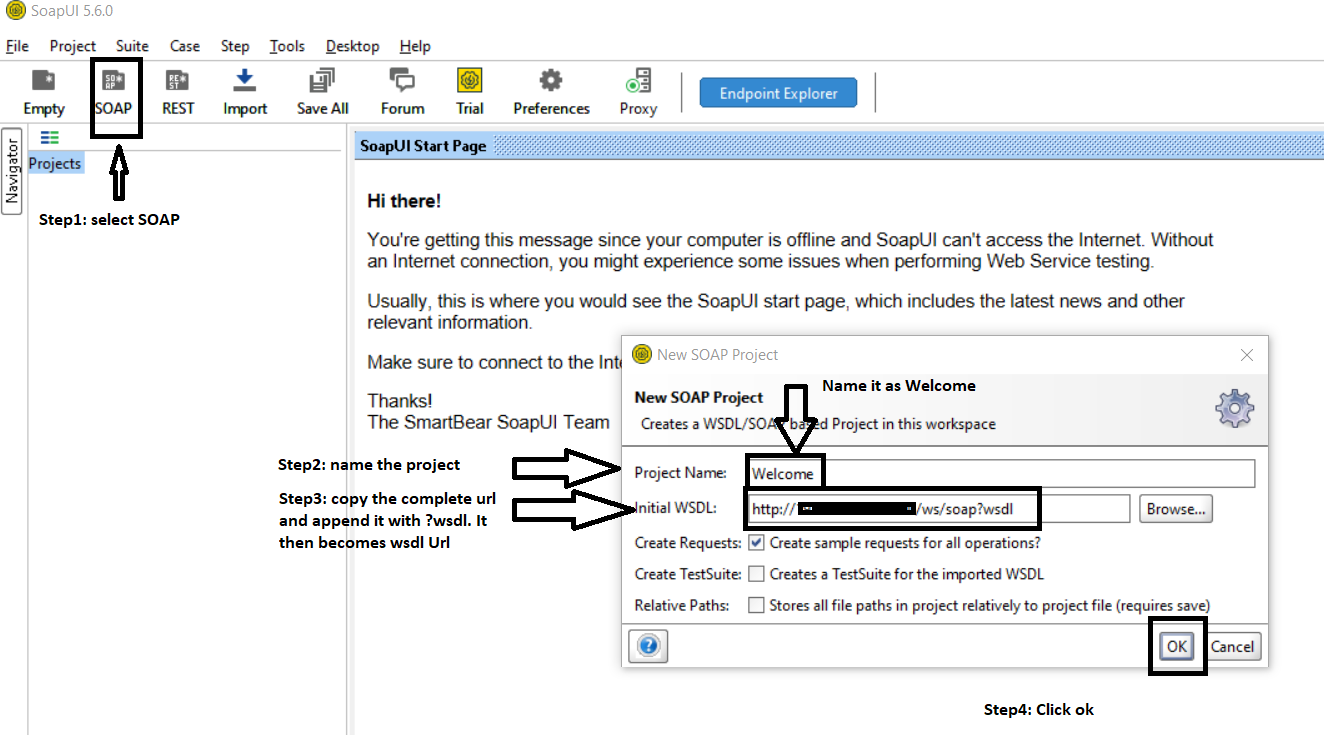
Step 15: Now, test the webservice in SOAP UI.
- First, select project as soap. Give Project Name and initial WSDL as per below screenshot. Click ok.
- In this example, initial WSDL would be
http://192.168.0.103:9090/ws/soap?wsdl
Now, click on Request1. Left side would be the request where we have to provide the input and right side will be the response which we receive after providing the input.
