

Integrate Amazon SQS In Boomi
HOW TO SEND AND RECEIVE TO/FROM AMAZON SQS.
In this blog, we will see how to send and receive to/from Amazon SQS.
What is Amazon SQS?
Amazon Simple Queue Service (SQS) is a message queue service offered by Amazon Web Services. It is used by distributed applications to exchange messages through a polling model. The connector uses the AWS access key and AWS secret key to authenticate users.
In this Use Case, we will read JSON Data that comes from message shape and send it to Amazon SQS. Also, retrieve messages from Amazon SQS and send them to disk locations in XML format.
Firstly, we will see how to create the Queue in Amazon SQS.
Step 1: Search for the AWS free tier (https://aws.amazon.com/free/?all-free-tier.sort-by=item.additionalFields.SortRank&all-free-tier.sort-order=asc). We will see a page to create an AWS Free Account or sign in to the console.

- If you are a new user, you will have to click on Create a Free Account and proceed with the required details. They ask for credit or debit card details for verification purposes and then select a basic free plan. If you are an existing user, we can directly click on Sign in to the console.
Step 2: Once we click on sign-in to the console, we will have to provide the Root user email address which have given while creating the account. Click Next and give the password.

Step 3: Once we have authenticated with the user’s name and password, we will see the AWS Management Console.

Step 4: In Find Services, type SQS and press enter. We see an option of creating a Queue where we can store files and documents inside the queue.


Step 5: Once, we click on create queue and leave other options to default. Click on Create Queue.


Step 8: We see that a queue is created named “Test Queue” with default options.

Now we will get the AWS access key and secret key which are required while configuring the Amazon SQS Connector in Boomi.
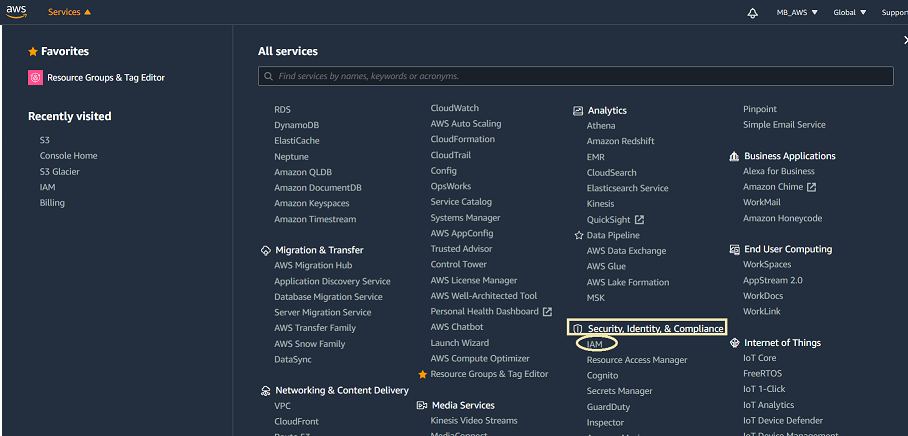
Step 1: Click on services and choose IAM from Security, Identity & Compliance as shown in the screenshot.

Step 2: In Quick Links, open my access key as shown in the screenshot.

Step 3: We will see the Security credentials page and then choose Create New access key.

Step 4: We see that a new access key ID and secret key have been generated.

As we have created the queue in Amazon SQS and got the access and secret keys, we will now integrate Amazon SQS Connector in Boomi.
Step 1: Log on to the Boomi platform (https://platform.boomi.com/) with the required credentials i.e., Email Address and Password.

Step 2: Once logged into the Boomi platform, we will be able to view the Home page.

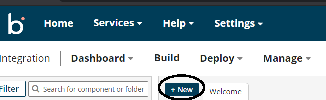
Step 3: Now, click on Services followed by Integration. We will see the Build page. Click on New.

Step 4: Once, clicked on New, we will be able to see three fields i.e., Type, Component Name, and Folder.

- Select Type as process as we are building a process. Component Name and Folder can be given based on your choice (i.e., which name to be given and where do we want to create the process). Click on Create.
Step 5: We see that the process gets created with a start shape which is configured with AS2 Shared Server by default.

Step 6: Select the start shape and choose No Data. Click ok.

Step 7: Drag and drop the Amazon SQS connector onto the process canvas and configure it.

- We have to configure 3 fields in the connector i.e., Action, Connector, and Operation.
- We see 3 actions RECEIVE, SEND, AND DELETE.

Receive — For receiving messages from SQS.
Send — For sending messages to SQS.
Delete — Fore Deleting messages in SQS.
- Here, we are sending a message to the queue. Therefore, action will be Sent.
Step 8: Select + on connection and create a new connection. Name the connection and we have to give the AWS Access key and AWS Secret Key which were generated in the above steps.

- To choose AWS Region, click on the account name and you will automatically get pointed to the region as per the configuration set while creating the account.

- Choose AWS Region as AP_SOUTH_1 from the drop down.

Step 9: Now, test the connection by clicking on Test Connection.

- Choose the atom from the dropdown and click next.

- We see test connection is successful. Click Finish, save, and close.

Step 10: Select + on Operation and give it a name. Click on import.

- Choose the atom and connection. Click Next.

- We have two Objects Dynamic queue and Test Queue. Dynamic Queue is the one where we can give the queue name at run time. Here, we choose it as Test Queue which we have created in the above steps.

- We see that the profile has been loaded. Click finish.

- We see that the object name with Test Queue has been imported.

Step 11: Drag and drop the message shape onto the process canvas. We will add static data in the message part as shown below in JSON format.

- We can see the static data in the below file.

- Click ok.
NOTE: Till now, we have designed the process to send the data coming from message shape to AWS SQS. Now, we will retrieve the message from SQS transform it to XML using a map, and send it to the disk directory.
Step 12: Let us configure the Amazon SQS connector by following the same steps with little modifications as stated below.
- Action will be Received.
- Connection will be the same one i.e., Amazon SQS Connection.
Step 13: We will configure the new operation. Click + on operation, name it, and click on import.

- Choose the atom and connection. Click Next.

- We see that there is only a single queue i.e. (Test Queue) which we have created. Click next.

- The Profile has been imported. Click finish, save, and close.

Step 14: Drag and drop the Map shape onto the process canvas. Click + and name the map.

- Add source side and Destination side profiles to the map. Here, the source side they would be JSON path profile and Destination the side will be XML profile. at First, we will add Source profile. Click choose and select the folder where we saved the profile.

- Here, the Profile Type will be JSON, and click on Create New Profile.
![]()
- Name the profile and click on import.

- Choose the file from the directory where we have saved the file. Click on Next.

- We see that the profile is imported.

- This is what the JSON profile looks like,

- Click save and close.
Step 15: Now, add the destination profile. Click choose on the right side as shown.

- Select Profile Type as XML and click on Create New Profile.

- Name the profile and click on import.

- Choose the file from the directory where we saved it. Click Next.

- We see that the profile has been imported. Click finish, save, and close.

- This is how the XML profile looks like

Step 16: We see that source and destination profiles have been imported. Provide one-to-one mapping from source to destination. Click save and close.

Step 17: Drag and drop the disk connector shape onto the process canvas to send a response to the disk.

Step 18: We have to configure 3 fields in the connector i.e. Action, Connector, and Operation.

Get – To get the data from a disk location.
Send – To send to the disk location.
- Here, we will choose action as SEND as we are sending a response to the file.

- Click + on connection to create a new one.

- Name the file and give the directory to save the response file. Here, it is the D drive and Boomi Examples folder as shown in the screenshot.

- Click save and close.
Step 19: Click + on operation and name it. Leave everything to default. Click save and close.

Step 20: Drag and drop the set properties shape onto the process canvas to set the file name that comes to the disk. Select + on properties.

Step 21: Select disk connector from Connectors and choose file name. Click ok.

Step 22: Select + on parameters side and assign value to the disk.

Step 23: Choose type as static and static value as Test.xml.

- After configuring the properties in set properties shape, it looks like

Step 24: Drag and drop stop shape onto the process canvas to indicate the end of the flow.

Step 25: Arrange all the shapes in an order and run the test by clicking on Run Test and configuring the local atom.


Step 26: We see that process has been executed. Click on Amazon SQS followed by shape source data. We can see the response which comes from SQS when message has been sent into SQS.


Step 27: Now, let us go to Amazon SQS and see if the Json message has been added to Test Queue. Navigate to Test Queue which we have created and we can see that there is a message existing in Queue.

- Click on Test Queue followed by send and receive messages to view the message.

- Scroll down and click on poll for messages.

- We see that polling is done and message is retrieved.

- Click on id and we can see the Details, Body, and attributes of the message.

- Choose Body and we can see the JSON data that has been sent from the message shape.


Step 28: Select disk connector and click on view source to see the response.


Step 29: We see that the file has been created into Boomi Examples Folder.

- The Test file looks like,
