

Tracking Fields In Boomi
Tracking Fields and How to set those in Boomi Process
In this blog, let us see what are Tracking Fields and How to set those in Boomi Process.
What are Tracking Fields?
It can be used to track the documents’ process execution history based on the specific tracking field defined in Document Tracking. Tracking Fields allows us to use certain business identifiers to track the complete flow. Dell Boomi allows the same tracking fields to be used across different Boomi processes. We can view the process of tracking in the Process Reporting tab.
In this Use case, we will send JSON data into the MYSQL Database and will track what comes into the database.
Let us begin with the steps.
Step 1: Firstly, we will create a table named “Accounts” in the MYSQL database and import that profile into the process that we create. To create a table, we need to follow below steps:
- login to the MYSQL Database server with the required credentials.
- Go to Databases > System databases > Right-click on Tables > New > Table

- Set Column names and data Type, Allow Nulls as per the screenshot.

- Save the table with the name “Accounts” and we see that the table has been created with the above details.

Step 2: Log on to the Boomi platform (https://platform.boomi.com/) with the required credentials i.e., Email Address and Password.

Step 3: Once logged into the Boomi platform, we will be able to view the Home page.

Step 4: Now, we will set the tracking field in the document property. Go to settings > Select Account Information > Document Tracking.

Click on + to add the tracking field. Add Field Label as Account ID and Data type as Character. Click ok.

Step 5: Now, click on the Build page > New.

Step 6: Once, clicked on New, we will be able to see three fields i.e., Type, Component Name, and Folder.

- Select Type as process as we are building a process. Component Name and Folder can be given based on your choice (i.e., which name to be given and where do we want to create the process). Click on Create.
Step 7: We see that the process gets created with a start shape which is configured with AS2 Shared Server by default.

Step 8: Select the start shape and choose No Data. Click ok.

Step 9: Drag and drop the Database connector onto the process canvas.
- We have to configure 3 fields in the connector i.e., Action, Connector, and Operation.

- We see 2 actions i.e., Get and Send.
Get – To get the data from the Database.
Send – To send the data to the Database.
- Here, we choose the action as Send as we are sending data.
- Click + on connection as shown and name it

Driver Type: Select the database to connect to from the drop-down list. Here, it would be SQL Server(jTDS).
Username and Password: Give the Database username and password.
Host: It will be the Name or IP address of the database server.
Port: The port that is used to connect to the database server. The default port for SQL Server is 1433.
Database Name: Give the Database name.
NOTE: Drivers are not included in MYSQL. We need to manually add the jars for MYSQL Connectivity.

- Save and close.
- Click + on the operation and name it.

- Click + on the profile to add it.

- Name the profile. Click on the statement and select Type as Dynamic insert from the dropdown as shown in the screenshot.

- Choose import.

- Choose the atom and connection. Click on next.

- Choose the table as “Accounts” which we have created above. Click Next.

- Choose all the fields from the table. Click Next.

- We see a success message saying the profile has been successfully imported. Click Finish.

- We see that all the fields from the table have been imported. Click save and close.

- We see an option of Tracking in Database options. Click on it.

- Click on + and we see Account ID as the tracking field which we have set in Document Tracking in Step 4.

- Select Account ID. Click + on Field Values and assign the account ID of the Database profile coming from the Accounts table.

NOTE: Here, we have to choose the profile based on where we want to track a particular field. Here, we are tracking the ID that goes into the Database. Hence, the profile will be a Database Profile.
- Here, the Type would be the Profile element, the Profile Type will be Database as we are assigning the Account ID of Database profile to the tracking field, Profile will be Account DB Profile which we have imported and Element will be Account ID. Click ok, save, and close.


Step 10: Drag and drop a message shape onto the process canvas to add the static message.
Here, it would be JSON data and looks like
[
{
“Account_Id”: 100,
“Account Name” : “Rittu”,
“Branch”: “Nagole”,
},
{
“Account_Id”: 200,
“Account Name”: “Samy”,
“Branch”: “Koti”
}
]
NOTE: Whenever we add JSON Data in message shape, we should enclose the data in single quotes (‘).
- Add data in the message section as below.

- Click ok.
Step 11: Drag and drop the data process shape onto the process canvas to split the JSON Data. Click on + and choose Process Type as Split Documents.

- Select Profile Type as JSON as shown.

- Click on + to create a new JSON Profile.

- Name the profile and click on import as shown.
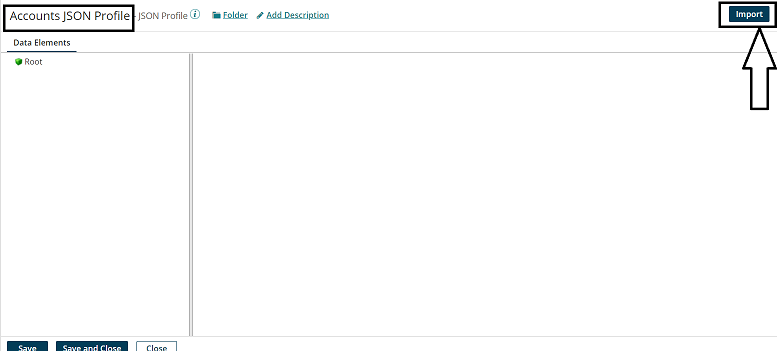
- Choose the location of the JSON File from the directory where you saved it.

- We see that the Acc.json file has been selected. Click Next.

- We see that the profile has been loaded. Click Finish.

- We can now see the imported profile with respective fields. Click save and close.

- We have to select the split element (i.e., based on which element the document has to be divided). Here, it will be Account ID. Select it and click ok.

- After configuring all the fields, it looks like below

Step 12: Drag and drop the Map shape onto the process canvas. Click + and Name the map.

- Add source side and Destination side profiles to the map. Here, the source side would be the JSON profile and the Destination side would be the the Database profile. First, we will add a Source profile. Click choose and select the folder where we saved the profile.

- Here, the Profile Type will be JSON, and select the JSON profile which we have configured in Data Process shape. Click ok.

- Now, add the destination profile. Click choose on the right-hand side.

- Profile Type will be Database and select the Database profile which we have imported in the previous steps. Click ok.

- We see that source and destination profiles have been imported. Provide one to one mapping from source to destination. Save and close.

Step 13: Drag and drop the stop shape onto the process canvas to indicate the end of the flow.

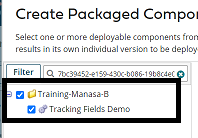
Step 14: Arrange all shapes in the order and deploy the process. Click on Create Packaged Component as shown below.

- The process gets selected automatically. Click Add Details.
![]()
- Next, select the version and write notes if you have any. Click on create packaged component.


- Now, we see that the package has been created successfully and click on deploy.

- We will then have to select the environment. Choose production and click select version and review.


![]()
![]()
- We will be asked to cross-check the environment that we have configured in the deployment tab.

- Once, we click on deploy we will be able to see that deployment is done successfully.

Step 15: Click on Manage followed by Process Reporting.

Step 16: Click on execute the process. Select the atom and process as shown below. Click on Execute.


Step 17: We see that the process has been executed and records have been inserted.

MYSQL Table:

Step 18: Now, to track the Account Id click on Executions followed by Documents.

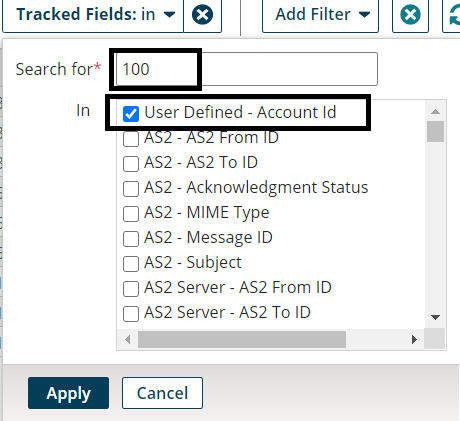
- Select Add Filter and choose the option as Tracked Fields.

Step 19: Check in User Defined – Account ID option as we have defined the tracking field. Give value as 100.
- We have got the document with Account Id as 100 which went into the database. Click on time. We will see the document Details.

- We can view the logs and document by clicking on the circle symbol beside 100.

- Once, we click on view Document, we can see what document came into Database.

- Similarly, we can search for 200 Account Id by following the above steps. Replace 200 with 100 in the search.
