

Send Mail Using SMTP Server In Boomi
Boomi Mail Using SMTP server
How to send Mail Using SMTP server in Boomi
In this blog, we will see how to send mail in Boomi using Gmail as SMTP server.
What is Mail connector and why is it used?
It is a connector in Boomi which is used for receiving and sending emails to an SMTP email server. We will be able to configure Disposition as an attachment or inline which means we can send the body of an email as an Attachment or Inline based on the requirement. If we want to send the document as an attachment, we can set disposition to Attachment. If we want to send the document as a body, can set the disposition to Inline.
In this Use Case, we are sending an email with Disposition as an Attachment.
Let us begin with the steps.
Step 1: Log on to Boomi platform (https://platform.boomi.com/) with the required credentials i.e Email Address and Password.

Step 2: Once logged into Boomi platform, we will be able to view Home page.

Step 3: Now, click on Services followed by Integration. We will see the Build page. Click on New.


Step 4: Once, clicked on New, we will be able to see three fields i.e Type, Component Name and Folder.

- Select Type as process as we are building a process. Component Name and Folder can be given based on your choice (i.e., which name to be given and where do we want to create the process). Click on create.
Step 5: We see that the process gets created with a start shape which is configured with AS2 Shared Server by default.

Step 6: Select the start shape and choose No Data. Click ok.

Step 7: Drag and drop mail connector onto the process canvas and click ok.

Step 8: Select the mail connector and we have to configure Action, Connection and Operation.

- Here, we see 2 actions in Action i.e., Get and Send. We are choosing action as send as we are sending an email.

- To configure the connection, click + on the connection as shown in the screenshot and name the connection.


- The Mail connection contains the connection and login information for the email server. Let us look into each field as follows.
Host: It contains the IP address or domain name of the mail server. The Mail connector receives files or sends files to the mail server. Here, we keep the host as smtp.gmail.com.
Port: It consists of port number on which the mail server listens for incoming connections from a mail client. The default ports for SMTP server would be 25, 465 and 587. We can try any one of three if one doesn’t work. Here, we are using the port number as 465.
Use TLS: All data exchanged between Boomi Integration and the server is encrypted which makes it difficult to hack the email and/or password. We will check this box for secured authentication type.
Use SSL: It is a secure way of providing authentication and encryption during communication online between the client and server. We will check this box for secured authentication type.
User/Password Authorization: Select to provide login credentials (i.e., username and password) to authorize with mail server.
User Name: Give user name of the account on the mail server. (example : abc@gmail.com)
Password: Give the password of the account which is configured above.
- After configuring all the fields in the connection part, it looks like

- Click save and close.
Step 9: Now configure the operation part. Click + on operation and name it.


We have to configure few fields in the operation as per above screenshot.
Connector Action: It will be sent which we have configured in connection part.
From and to: From will be the address of sender which we have configured in the connection and to can be any email Id which we want to send.
Subject: It refers to the value in the Subject field of the email messages that are sent. Here, subject will be Test Demo.
Disposition: We can set disposition to Attachment or Inline.
- Choose Attachment, if the document data should be sent as an attachment.
- Choose Inline, if the document data should be sent in the body of the email message.

Attachment Content Type: use this field to specify the file format for the attachment. We can select different types of file formats (plain text, xml, html etc) from the drop down as shown in the screenshot.

Body Content Type: Use this field to specify the file format for the body of the email message. We can select the file formats from the drop down as shown in the screenshot.

Note: If we set disposition as Inline, we will be able to set only the content type of body. If we set disposition as an Attachment and if body is available, we will have to set the content type of attachment and body.
- In this Use Case, we will set disposition as an Attachment. Content type of Attachment and Body will be text/plain.
After configuring the operation part, it looks like as follows.

- Click save and close.
Step 9: Now, drag and drop message shape onto the process canvas.

- Select the shape and write some text in message section so that it goes as an attachment to the email which we want to send (as we have configured disposition as attachment). Click ok.

NOTE: We can set and override the values which we have given in the mail operation tab by selecting document property 🡪 mail connector.
Step 10: We will drag and drop set properties shape onto process canvas to set the mail properties as Filename, body and so on.

- Select the shape and click on + on the left side to set the parameter.

- Now, select the connector as mail from left side and click on +. We can see that Body, File Name, Subject, From Address and To Address can be set in the document property.

Step 11: We will select File Name and Body and set the values in set properties shape. Select body and click ok.

- Once again, click on + on the left side to set the parameters. Select the connector as mail from the left side and click on + and choose File Name.

- We have configured both the properties (i.e., Body and filename) in set properties shape

- We will now set values to the properties. Select Mail – Body and click + on the parameters.

- Choose Type as static and static value as a text message i.e. “Please find the attached file for your review”. Click ok.

- Select Mail – File Name and click + on the parameters.

- Choose Type as static and give file name (demo.txt) as static value. Click ok.

- After configuring the set properties shape, it looks like,


Step 12: Finally, drag and drop stop shape onto the process canvas to indicate the end of the process flow.

Step 13: Place all shapes in the order as shown below.
start 🡪 Message 🡪 Set properties 🡪 Mail 🡪 Stop

Step 14: Test the process by clicking Test button on the Righthand side by configuring the atom as shown in the below screenshots.


Step 15: we see that process has been executed. Click on mail connector and navigate to connection data and we can see that mail has been sent with the details which we have configured.

This is how the mail and attachment look like,
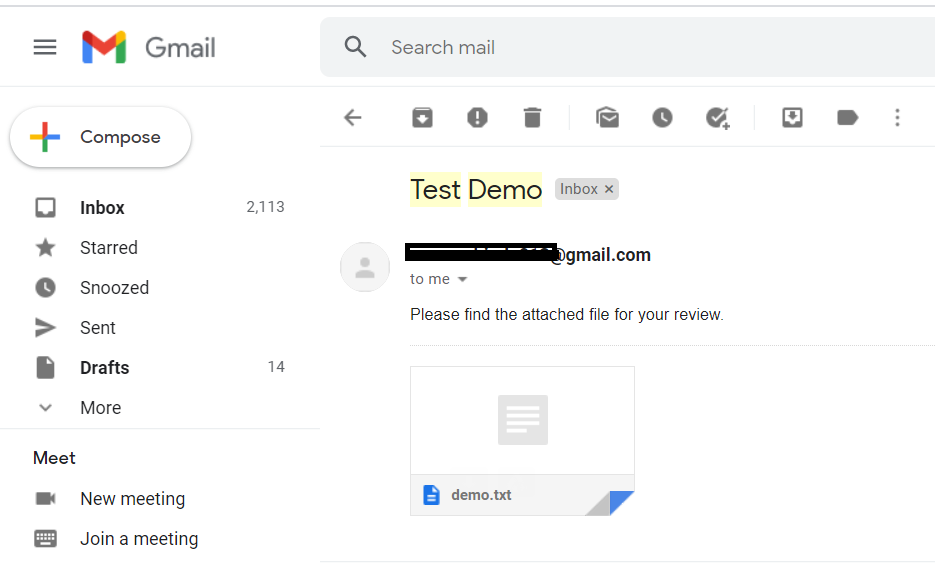
Attachment:
