

How to Add User-Defined Functions and Do a Lookup On the Map
How to Add User-Defined Functions and Do a Lookup On the Map
In this blog, we will see how to add USER-DEFINED FUNCTIONS and DO A LOOKUP on the map.
What is User Defined Functions?
These functions allow us to perform different transformations using multiple functions. We can use any type of function like String, Numeric, Date, lookup, Connector, Custom scripting, and properties depending on the requirement. With a user-defined map function, we will be able to combine all functions and produce value for a target field in a single map.
What is a Cross Reference Look Up?
The cross-reference table allows us to retrieve a single row of values based on the value of one or more lookup references. It stores data in the form of key and value pairs. The cross-reference `table is easy to use and requires no coding. Retrieving value from cross reference table is much faster than performing a database or other connector lookup.
In this Use Case, the source system sends Country and City Details as Country City i.e. (IN_HYD). We need to split the value using the split function as County and code and do a lookup using cross cross-reference table for actual country and city values to be set in the target system.
Let us begin with the steps.
Step 1: Log on to the Boomi platform (https://platform.boomi.com/) with the required credentials i.e., Email Address and Password.

Step 2: Once logged into the Boomi platform, we will be able to view the Home page.

Step 3: Now, click on Services followed by Integration. We will see the Build page. Click on New.


Step 4: Once, clicked on New, we will be able to see three fields i.e., Type, Component Name, and Folder.

- Select Type as process as we are building a process. Component Name and Folder can be given based on your choice (i.e., which name to be given and where do we want to create the process). Click on Create.
Step 5: We see that the process gets created with a start shape which is configured with AS2 Shared Server by default.

Step 6: Select the start shape and choose No Data. Click ok.

Step 7: Drag and drop the message shape onto the process canvas to set static data coming from the flat file profile.

- We will set static data in the message body as shown.

- We will add ID, Name, and Country City with 1, Mark, and IN_HYD in the message and click ok.

Step 8: Drag and drop the map shape onto the process canvas. Click + on the map to create one as shown below.

- Name the map and add the profiles by selecting the choose button on both sides. The left side will be the source profile and the right side will be the destination profile.

- Now, let us add the profiles. First, we will add the profile on the source side. Click on Choose.

- In Profile Type, we see different kinds of profiles i.e. Database, EDI, Flat File, XML, and JSON. Select the profile type based on the request. Here, it would be a Flat File. Select Flat File and click on Create New Profile as shown in the below screenshot.

- Once we click on create a new profile, name the profile.

- Click on the elements and choose Add multiple elements.

- A popup box comes up asking how many elements would you like to add. Here, we are adding 3. Keep it 3 and click ok.

- We see 3 elements get created with default names. We have to name the elements.

- We have to select 1st element below Elements and add a name on the data name field. Here, it would be Id.

- Name 2nd, and 3rd elements as Name and County City following the same steps as above. After naming all the fields, it looks like

- Select Options beside Data Elements as shown in the screenshot.

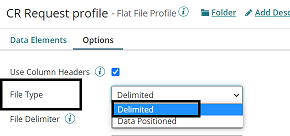
- We will have to configure the required fields in options i.e., if we check Use Column Headers, the first row of the document is assumed to contain column labels and it is ignored. We will check the box.

- File Type defines the structure of a file if it is delimited or data positioned. We will select as delimited.

- File Delimiter defines the character that delimits the data elements. We see different options such as Star delimited, Comma delimited, and so on. In this Use Case, we choose Comma Delimited.
- After configuring options, it looks like as shown below. Click save and close.

- We see the source profile got added to the map as follows.

- Now, we will add a profile on the Destination side. Click Choose on the right side as shown.

- In Profile Type, we see different kinds of profiles i.e. Database, EDI, Flat File, XML, and JSON. Select the profile type based on the request. Here, it would be a Flat File. Select Flat File and click on Create New Profile as shown in the below screenshot.

- Once we click on create a new profile, name the profile.

- Click on the elements and choose Add multiple elements.

- A popup box comes up asking how many elements would you like to add. Here, we are adding 4. Keep it 4 and click ok.

- We see 4 elements get created with default names. We have to name the elements.

- We have to select 1st element below Elements and add a name on the data name field. Here, it would be Id.

- Name 2nd, the 3rd, and 4th elements as Name, Country, and City following the same steps as above. After naming all the fields, it looks like

- Select Options beside Data Elements as shown in the screenshot.

- We will have to configure the required fields in options i.e., if we check Use Column Headers, the first row of the document is assumed to contain column labels and it is ignored. We will check the box.

- File Type defines the structure of a file if it is delimited or data positioned. We will select as delimited.
- File Delimiter defines the character that delimits the data elements. We see different options such as Star delimited, Comma delimited, and so on. In this Use Case, we choose Comma Delimited.

- After configuring options, it looks like as shown below. Click save and close.

- We see that the destination profile was added to the map as follows.

Step 8: Now, we will try to split the field which is Country City from the source profile. We will create a new user function and will add a split function to split the field coming from the source profile. Click on Functions.

- Select Create a new function and name the map as shown in the screenshot. Click on + beside inputs.


- Now, add input i.e., string which we want to split in the input section i.e. to the left-hand side. Here, it will be Country City. Click ok.

- We need a split function to split the string. We will click + on the Steps section as shown below.

- We can see a few categories in Function i.e., String, Numeric, Date, Lookup, and so on. We have to choose it as per our requirements. Here, we will select Category as String and function as String Split as we are splitting the string. Click ok.


- Here, we will have to define Split By i.e., considering what, it has to split the segment. We have 2 options Delimiter and Field length.

- In this case, Split By will be delimiter and the Value will be _.

- In outputs, we have to mention the expected output values. Click + on the output section.

- Here, the output values will be Country and City, and click ok.

- Now, Drag and drop the input to the first step as shown below. Click save and close.

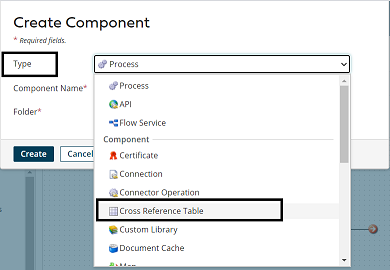
- Here, we have split the function which is (Country City) as Country and code. Now, we will create a cross-reference table such that actual country and city values will be set in the target system. Click on New on the Build page as shown.

- Select Type as Cross Reference Table from the drop-down as shown.
- Name the component and Folder name as per your choice. Click Create.

- Click on Update Table Definition and set it to 4.

- Update the columns with names i.e., Country Code will come from the source side and Country will be set on the destination side. Similarly, the City Code comes from the source profile and the city will be set on the destination side. Click ok.


- Now, assign the values in all 4 columns by clicking + as shown below.

- Here, IN and HYD will be the codes coming from the profile side. India and Hyderabad will be set on the destination side. Click save and close.

- Now, we have to configure the cross-reference table in the map and do a lookup. Select map shape and click on the edit symbol of the function as shown below.

- Click on + beside steps and select the category as look up.


- Choose Function as Cross Reference Lookup. Click ok.

- Choose the table by clicking on the magnifier icon. Select the references from the left side and values on the right-hand side.

- Here, Lookup references will be Country Code and City Code. The values that we are going to set on the destination side would be Country and city.

- After setting the lookup references and Values, it looks like as below. Click ok.

- Now, drag and drop step 1 results in step 2 as shown.

- Click + on outputs and add the fields at the destination side.

- Add 2 fields as Country and code as shown.

- Drag and drop step 2 results to the output fields. Click save and close.

- Now, provide mapping from source to destination as shown in the screenshot. Save and close.

Step 9: Drag and drop the stop shape on the process canvas to indicate the end of the flow.

Step 10: Arrange all the shapes and run the test. Click on Test on the right side and configure the atom as shown below.


Step 11: We see that the process has been executed and output has been generated. Click on Stop and select View Source to see the output.
